This section contains relevant information to assist a Tradesperson with the management of their TradesWallet profile.
If you need assistance, please contact our support team via email [email protected]
This section contains relevant information to assist a Tradesperson with the management of their TradesWallet profile.
If you need assistance, please contact our support team via email [email protected]
Find out more about the features available through the TradesWallet Self Service mobile application.
Should a wallet holder have more than one TradesWallet, assigned by different organizations within the TradesWallet community, these can be combined such that the wallet holder can carry only one of the cards but have access to the information contained within each individual Wallet.
Wallet holders can simply present their TradesWallet cards to an on-site administrator, and request these be linked using the Field Scanner application.
Notifications are used within TradesWallet to inform Wallet holders of changes to their TradesWallet profile. This can include notifications pertaining to expiring or expired 'Cards' or certifications within the Wallet as well as alerts to advise of any new or past due 'Training Requests' issued.
In order to receive email notifications will require that you have a valid email address associated to your Wallet profile.
For more information about how to add an email via the Self Service app, click here.
TradesWallet utilizes 'Push Notifications' to enable alerts to your mobile device when you are not actively using the app.
When setting up your TradesWallet Self Service profile for the first time, you will be asked to allow TradesWallet to send 'Push Notifications' to your phone or mobile device.
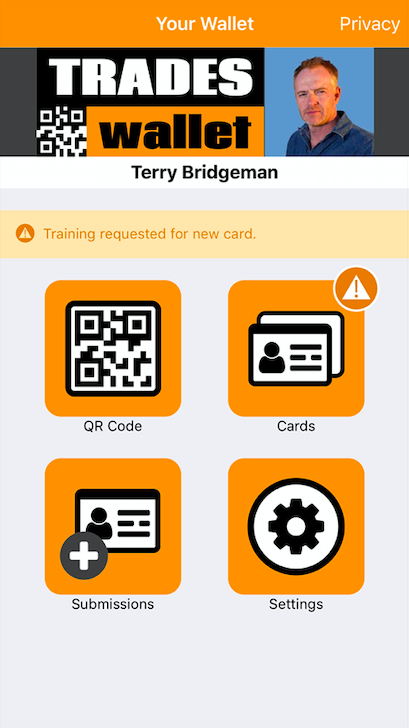
Within the app, you will be presented with warning notifications on your Home Page directing you to your 'Cards' tab.
TradesWallet tracks each Card within your Wallet and will notify you 60-days in advance of the indicated expiration date. This applies to both 'Public' and 'Private' cards. This allows you sufficient time to review potential classes prior to your existing credential becoming obsolete.
If you have expiring or expired cards within your Wallet, you will receive an email containing the 'Title' of the credential and the date it is set to expire.

If your organization provides in-house training, has preferred or recommended training providers linked via TradesWallet, you may also be presented with upcoming 'Classes' for a course that, upon successful completion, would result in the recertification of your credentials.
Select the relevant links to be directed to the 'Course' registration page.

TradesWallet will notify you of any issues relating to the contents of your TradesWallet directly from your Wallets Home Page.
If you have both expiring or expired Cards and upcoming 'Training' due, you will be directed to the 'Cards' tab of your Wallet profile.
Within the 'Cards' tab of your Self Service profile, any Card(s) that are within (2) months of their indicated expiration date will be highlighted with an orange indicator:

Once a Card within a Wallet is no longer valid, it will be highlighted with a red indicator.
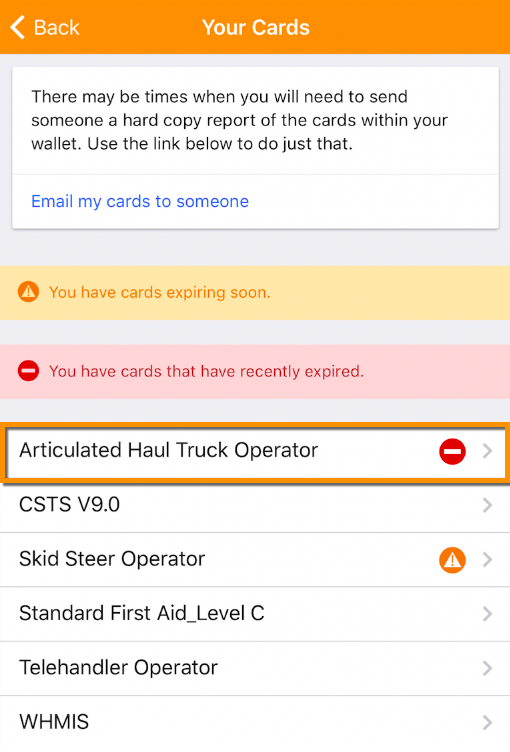
NOTE: Expired cards will remain visible within your Self Service profile for a period of (2) months - or until such time as they are renewed or manually removed.
It is important to note, however, that expired cards will NOT be visible when your Wallet is scanned by a potential employer on a job-site.
For more information on how to renew your Card directly from the Self Service app, click here.
If your organization requires you to complete mandatory training in advance of any potential employment opportunities, they may assign your 'Training' directly to your TradesWallet profile.
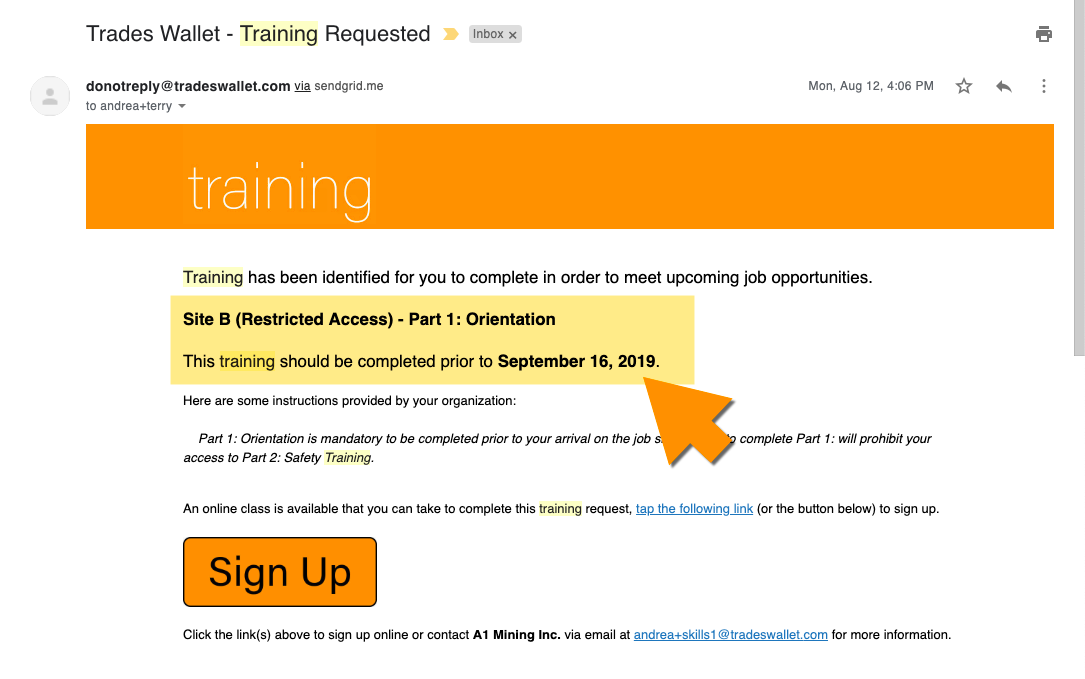
You will receive an email with the subject line: 'training' containing the details requested by your Wallet provider. You should note that a relevant 'Course' title has been provided, as well as the date that the training is expected to be completed by.
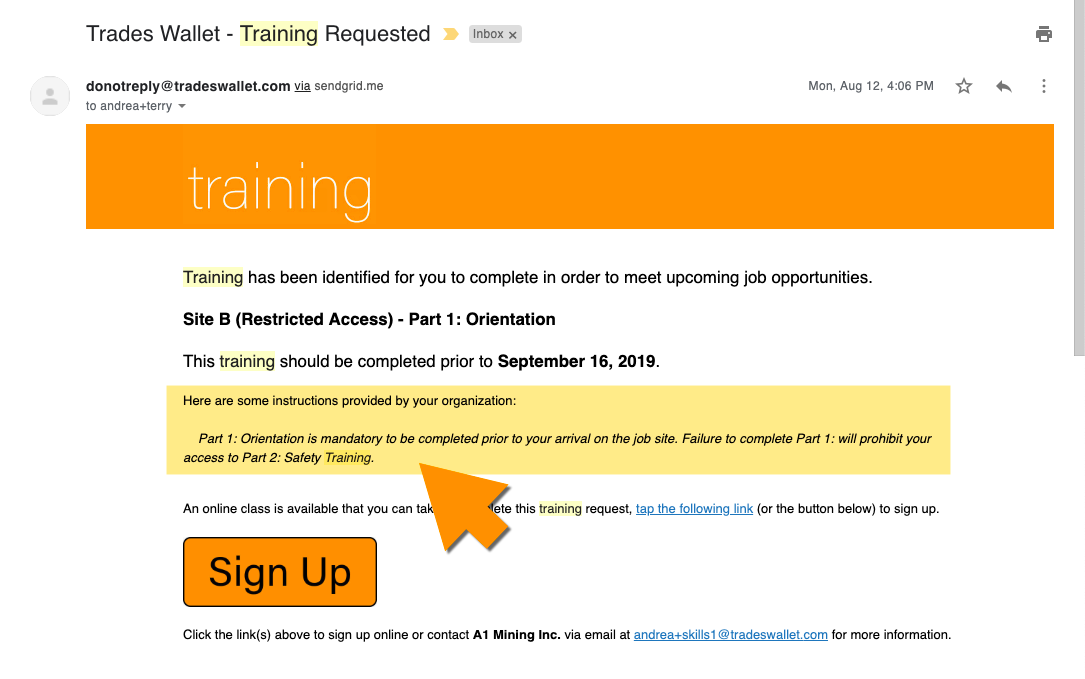
If special instructions were included by your administrator, they will be presented here:
If the 'Training' requested is associated to a 'Course' that provides 'Online' classes, you will be directed to view the details by selecting the 'link' provided.

Alternatively, if the 'Course' is associated to 'Physical' classes, you will be presented with a listing of upcoming classes to choose from:
If you have the Self Service app downloaded to your phone or mobile device, you will receive a 'Push Notification' to advise you when a new 'Training Request' has been issued to your Wallet profile.
Within the Self Service app, you will be presented with a (yellow) notification identifying that 'Training' has been requested.
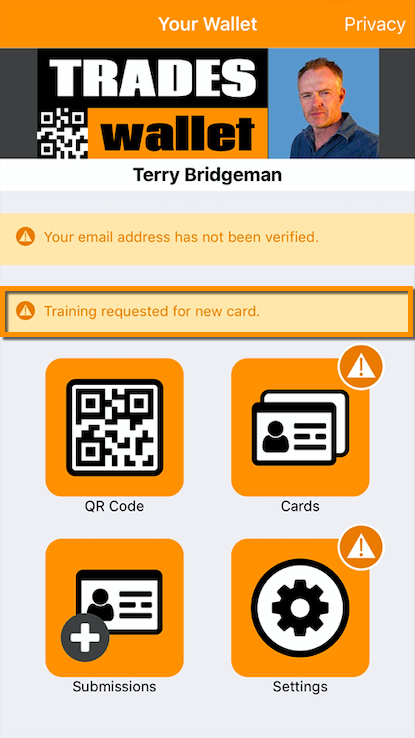
Select the 'Cards' tab to review your Wallet contents then select the option for 'Training'.
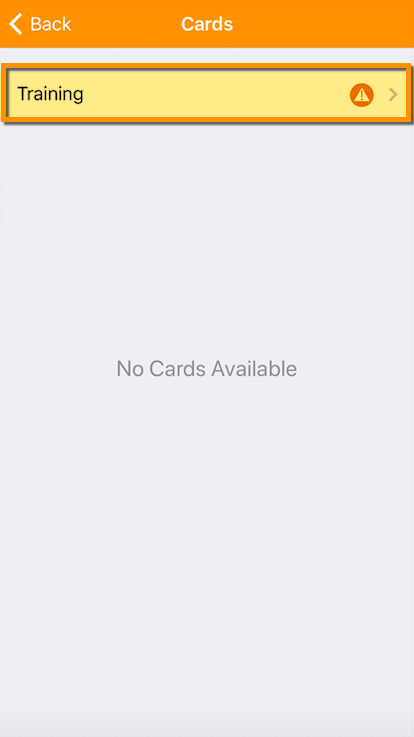
For more information about how to access your 'Training Requests', click here.
A TradesWallet's profile image is one of the most important means of authentication within TradesWallet, used to confirm that the Wallet presented belongs to the Tradesperson in question.
A 'Profile Picture' can be established within TradesWallet one of two ways:
For more information on how you can request your profile picture be set, or reset by an administrator from within the Web Admin Portal, click here.
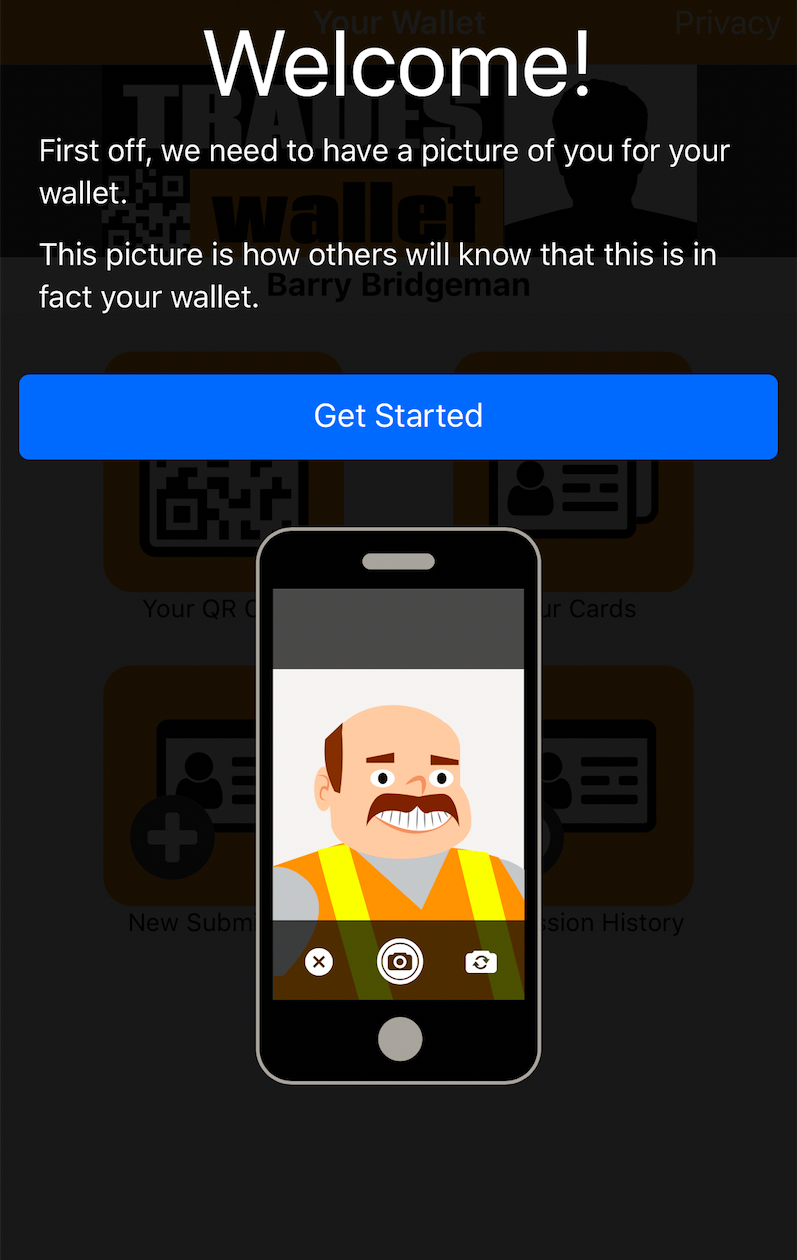
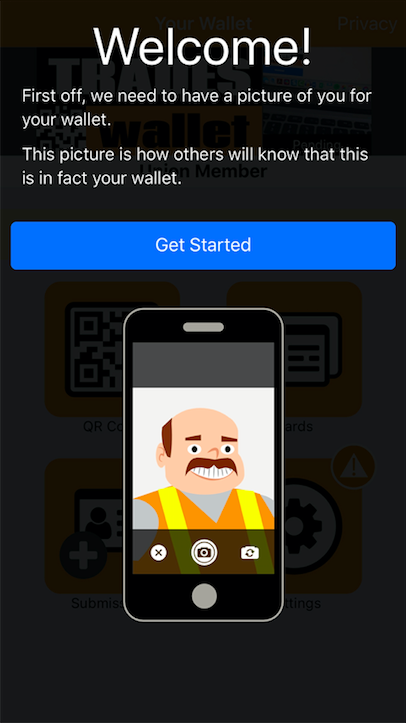
Upon launching the TradesWallet Self Service application for the first time, you will be prompted with the following 'Welcome' screen:
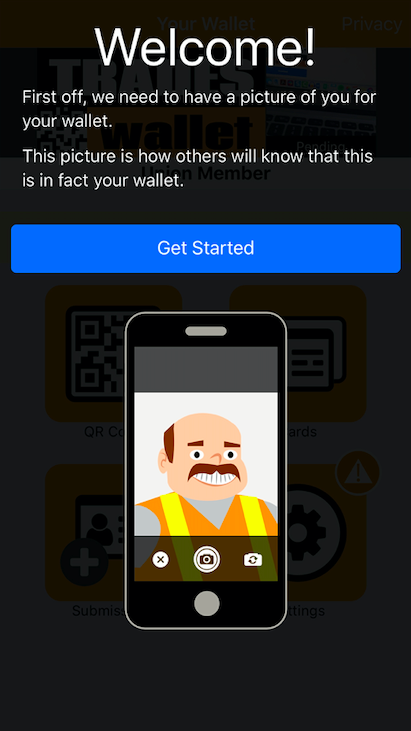
Simply select the (blue) 'Get Started' button to complete the setup of your TradesWallet Self Service profile.
For more information on the 'Get Started' process, click here.
Once your initial 'Profile Picture' has been established, you can update your Profile Picture at any time by making a new submission:
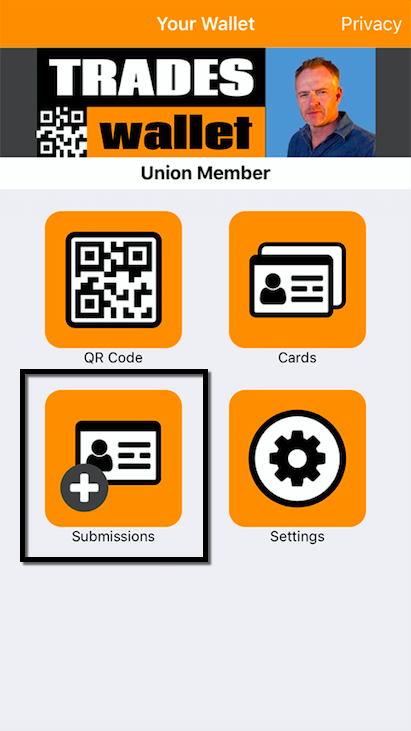
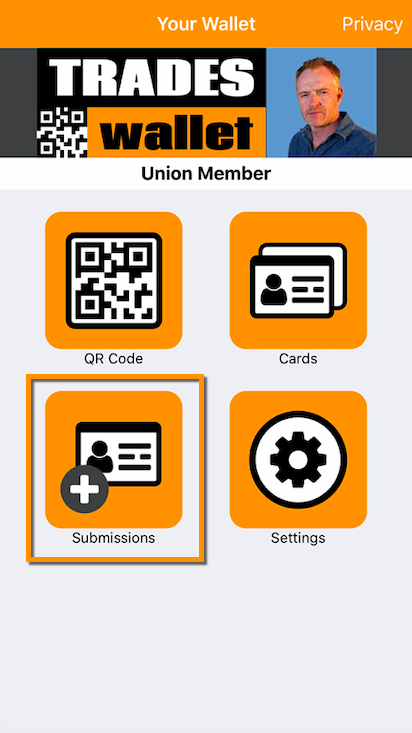
Select 'Submissions' from the main menu:
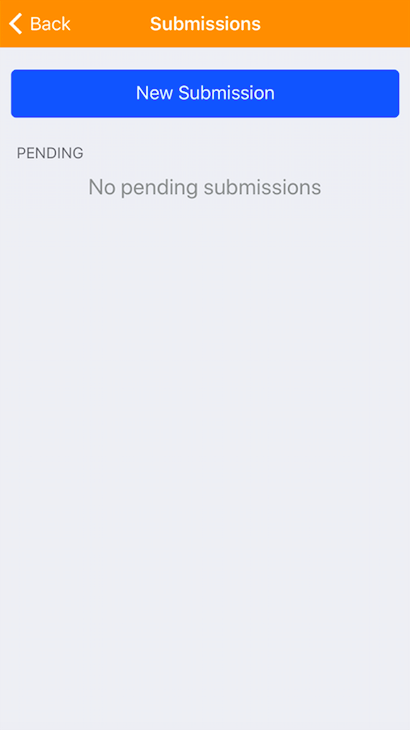
From the 'Submissions' page, select the (blue) 'New Submission' button:
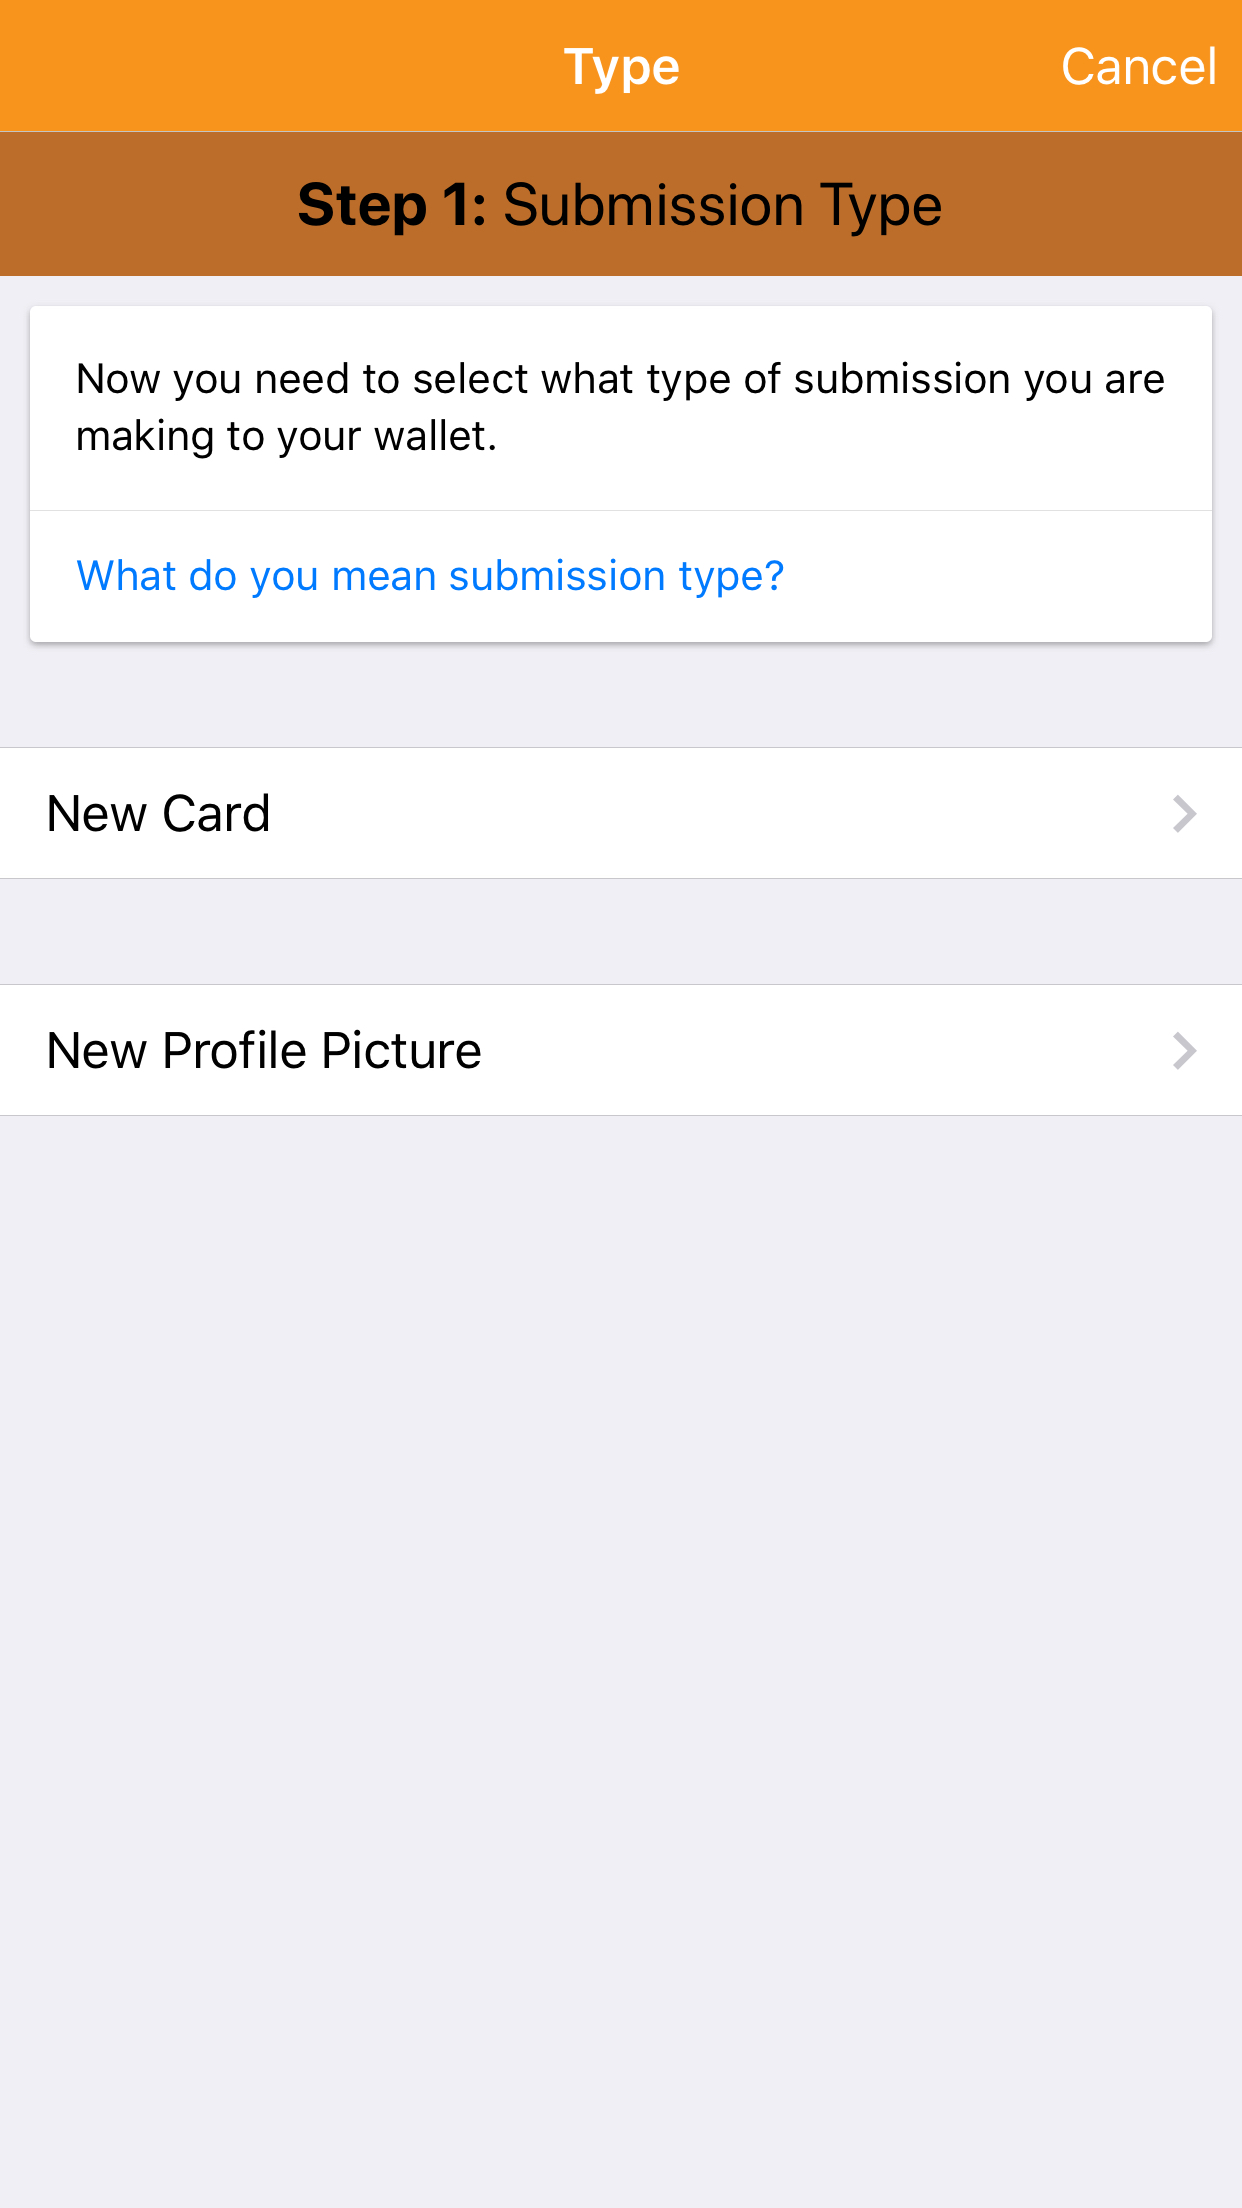
Select the option for a 'New Profile Picture':
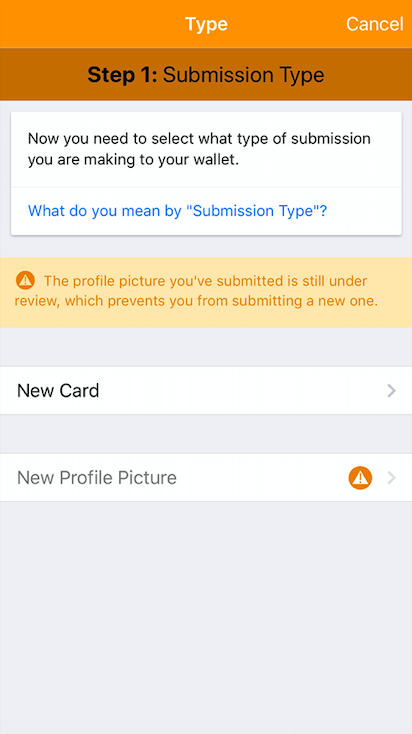
NOTE: You cannot upload a new profile picture if the existing profile image is still marked as 'Pending'; the 'New Profile Picture' option will be disabled.
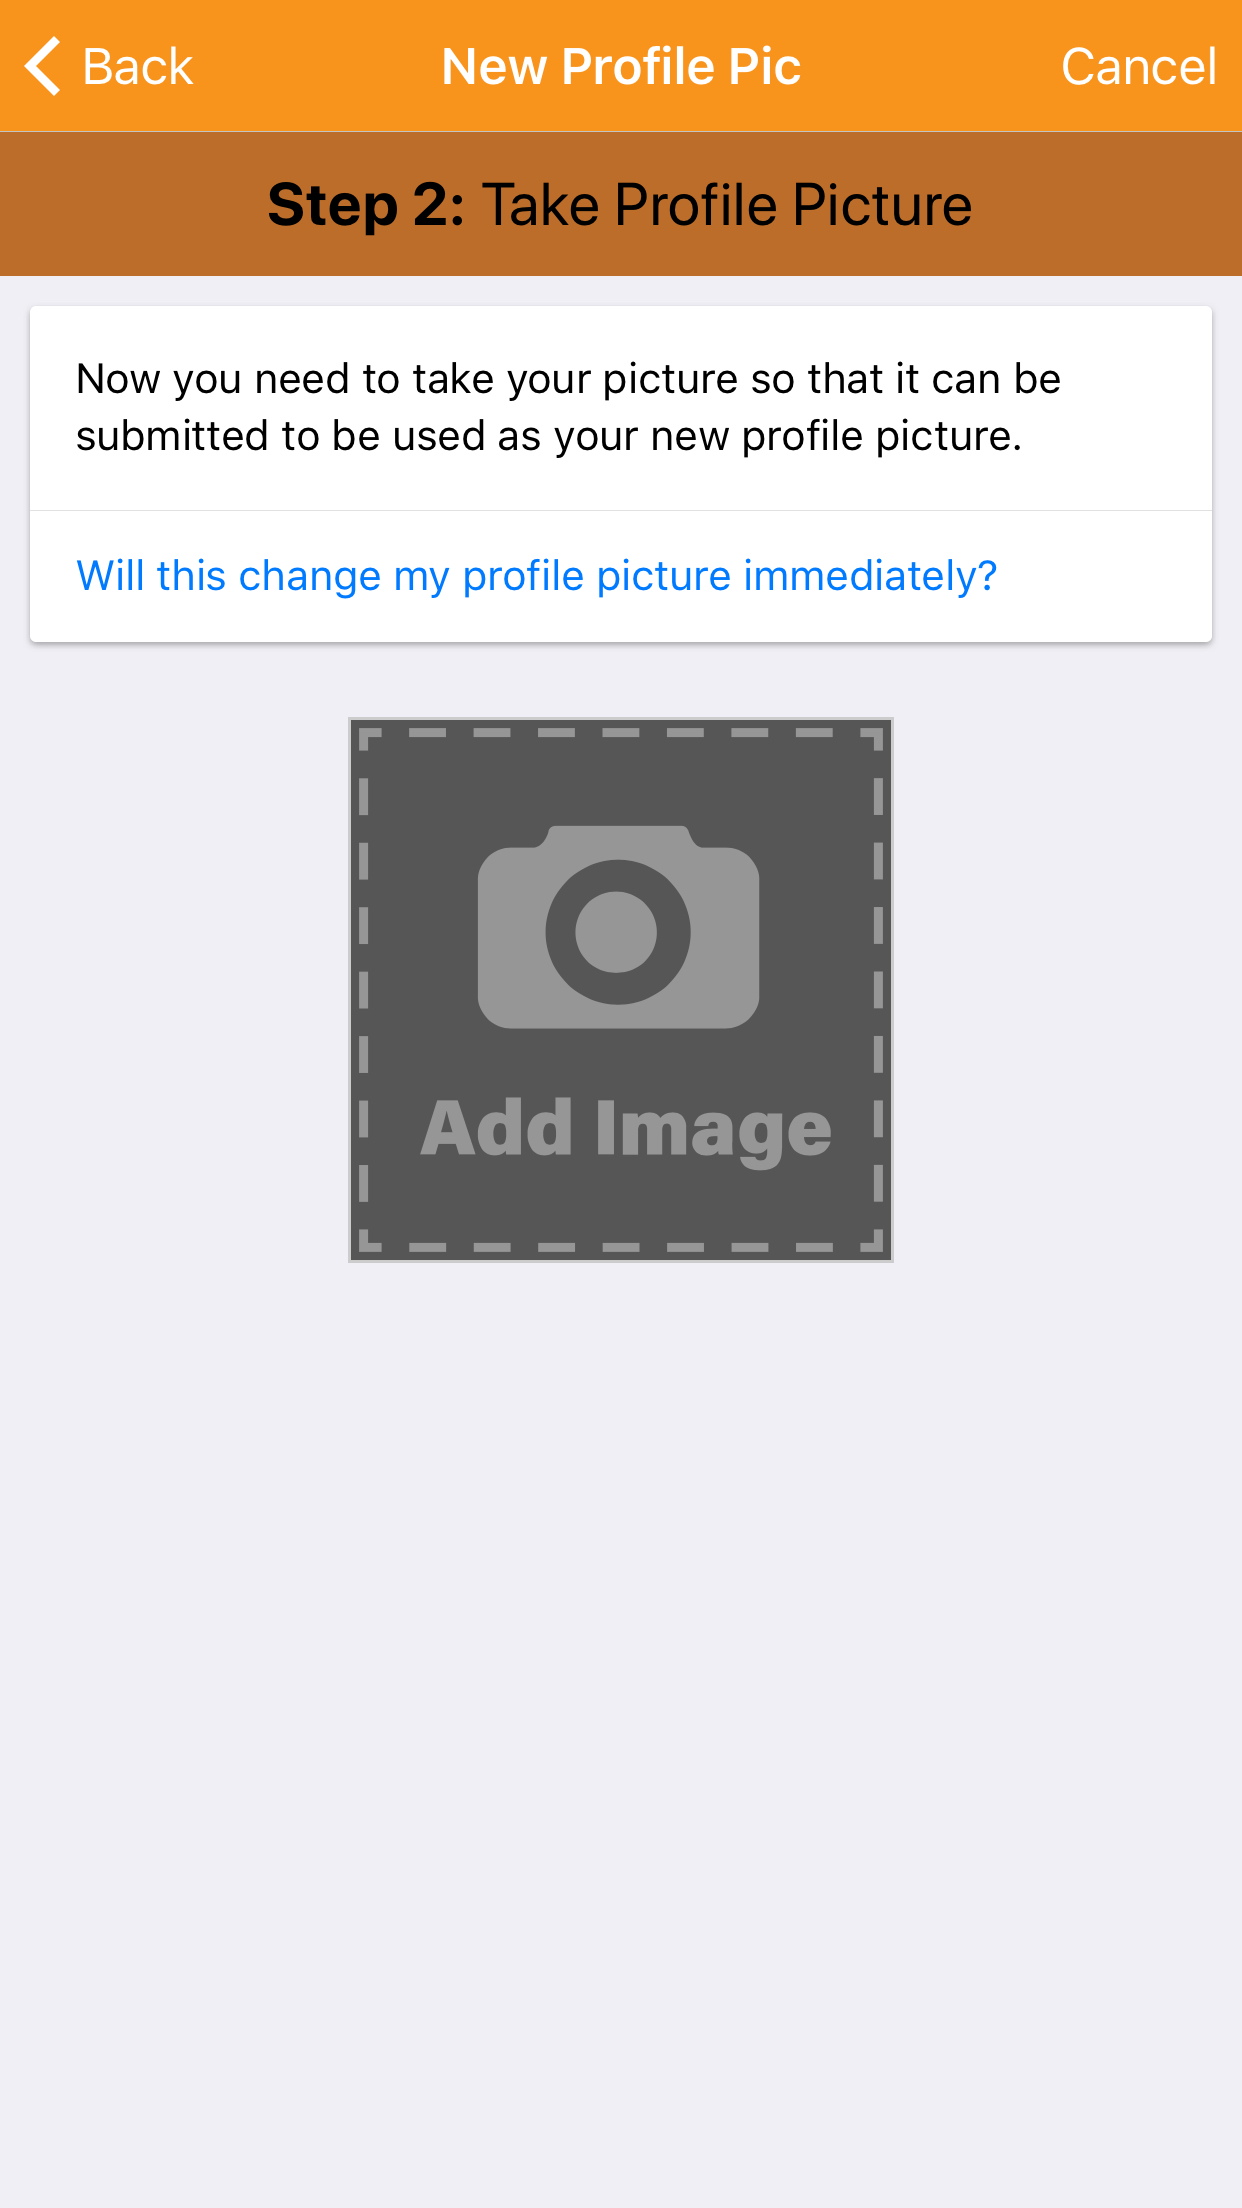
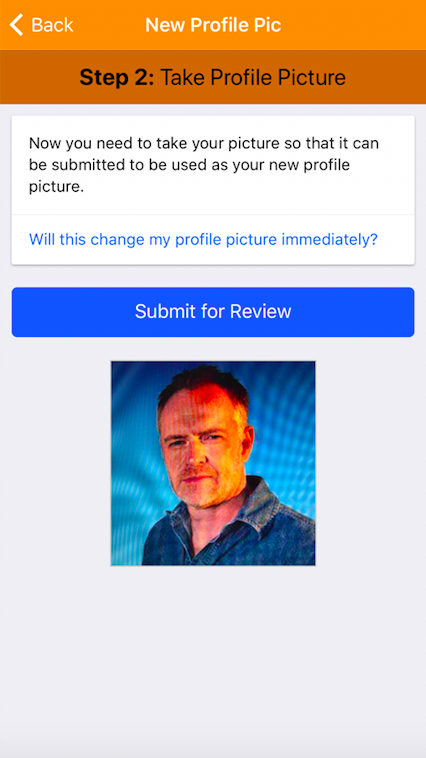
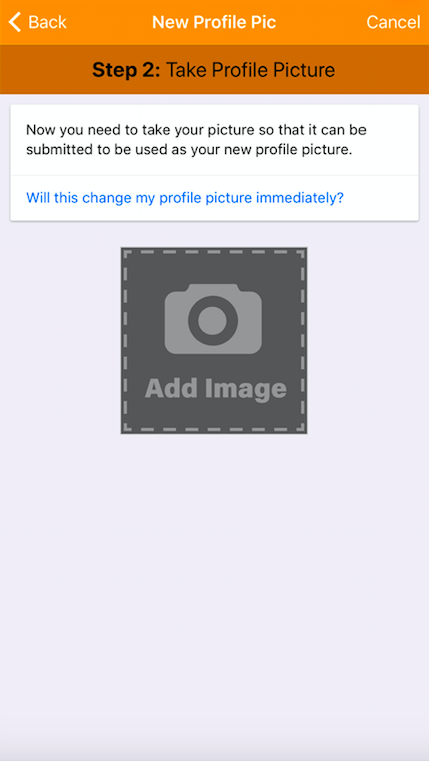
Select the 'Add Image' button and proceed to take a picture for your Wallet.
Once taken, you will be asked to either 'Accept' the image, or if the image is not clear, you can simply select the 'Retake' button.
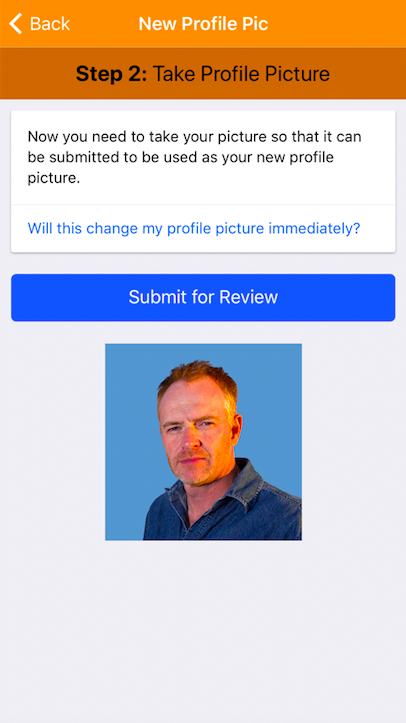
Select the blue 'Submit for Review' button to initiate the submission of your new image for review by your Admin.
NOTE: Until it is approved, this image will appear within your Wallet with a 'Pending' banner.
Any submission (profile picture or new 'public' card) made by a Wallet holder via the TradesWallet Self Service app, OR, added by an administrator via the Web Admin Portal directly, will NOT automatically be added to the relevant Wallet.
Instead, these submissions are first vetted by an administrator, assigned by the Union or organization who owns the TradesWallet, in order to verify the origin and authenticity of the submission. Only once approve will the submission be visible within the Self Service profile.
In order to use the TradesWallet Self Service app, a Wallet holder is required to create a Self Service profile. When launching the application for the first time, the application will display a 'Get Started!' page:

This step is mandatory for Wallet holders. A Profile Picture associated to a TradesWallet helps to ensure that the TradesWallet presented belongs to the relevant Wallet holder.
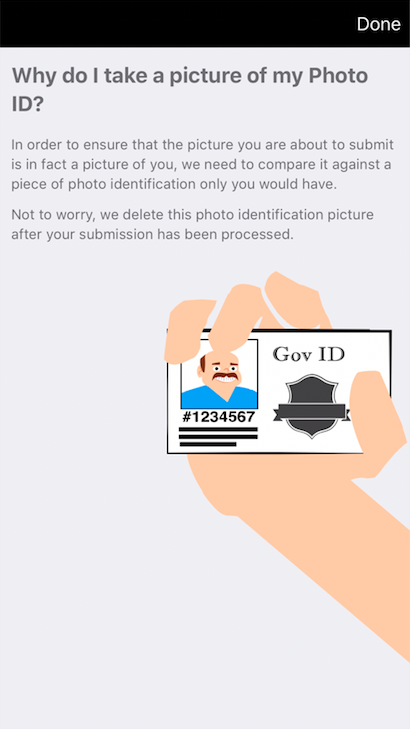
The ID submitted is used by an administrator, assigned by the Union or organization who owns the TradesWallet, to verify the identity against a piece of ID that only the Wallet holder would have (i.e. a Driver's License).
Once verified, the ID will be removed from the system.
NOTE: The 'type' of ID required is at the discretion of the Union or organization who owns the TradesWallet. Contact the organization that issued the TradesWallet for more information on what forms of ID are acceptable for submission.
For more information on creating a Self Service Profile, click here.
When uploading images to a Self Service app, a Wallet holder is in complete control of how much information is shared with the TradesWallet Community:
If the image of the Card submitted is insufficient, or does not meet the requirements outlined by the Union or organization who owns the Wallet, it may be 'Rejected'. Rejected submissions will contain a comment or description relevant to why the submission was not approved to assist with the re-upload of a new submission.
Yes! The security and privacy of your information is of the utmost importance to us. Your TradesWallet has been secured with industry best-practices for data encryption.
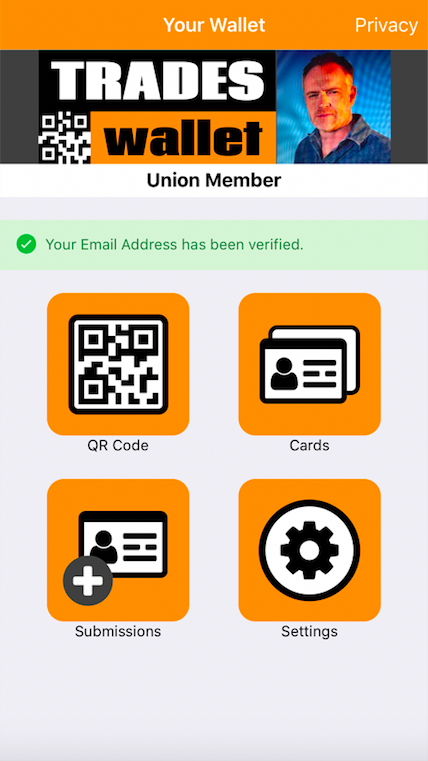
Having a 'Verified' Email address associated to your TradesWallet profile provides you with additional security when 'Signing In' to the Self Service application.
With a 'Verified' Email Address established, you will be prompted to confirm your identity via Email during the 'Sign In' process. This verification will ensure that you, and only you, are able to view the contents of your TradesWallet from the Self Service app.
To learn more about 'Verified Email Address', click here.
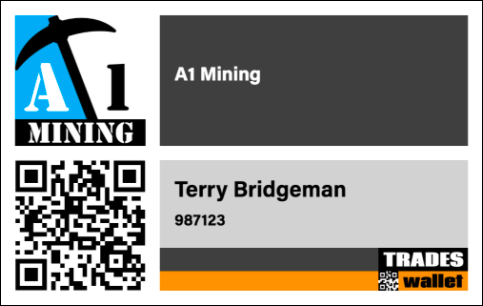
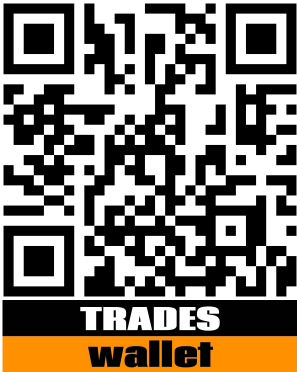
Short for Quick Response Code, a QR Code is a two-dimensional barcode that can be read by an imaging device - such as a Smartphone camera.
TradesWallet creates and assigns a unique QR Code to each new TradesWallet.

QR Codes are a secure way to share information while out in the field. QR codes are unique and cannot be replicated outside of TradesWallet.
Tradespeople can either present their QR Codes via their physical TradesWallet Card (issued by your Union or organization), or directly from their Self Service profile. A Field Admin on a job site can utilize the Field Scanner application to scan and view your credentials while out in the field.
If you're reading this, your Union or organization has created a TradesWallet on your behalf - Welcome!
TradesWallet is an online certification management system designed to manage the various credentials an organization needs to verify their workforce is trained and qualified.
Think of TradesWallet as a secure online repository filled with your organizations membership information. Within this repository, the credentials for their entire workforce is catalogued into individual 'Wallets', unique to each member or employee.
Each 'virtual Wallet' contains the cards and certifications the member or employee has earned and would be required to present to potential employers.
As a 'Wallet holder', you can upload and manage your various certification and safety credentials in the cloud - where they can be accessed - and shared - from anywhere, at any time, via our mobile 'Self Service' app.
NOTE: The 'Self Service' app is FREE to download and works on both iOS and Android devices.
Using the mobile 'Self Service' app, a Wallet holder can:
For more information on the Self-Service Application, click HERE.
Unions and organizations can utilize the functionality of the TradesWallet Web Admin Portal to ensure their workforce is trained and qualified for the jobs their employees are being dispatched to.
The portal (www.tradeswallet.com) is designated for use by office administrators, responsible for managing the day to day operations of TradesWallet for their organization. Within the Web Admin Portal, an admin can:
For more information on the TradesWallet Web Application and its functionality, click HERE.
The best way to review a Wallet holders various safety credentials and certifications from within a TradesWallet, while out in the field, is with the TradesWallet 'Field Scanner' app.
Also FREE to download, this app has been designed specifically to provide admins a means with which to view the contents of a relevant TradesWallet while out in the field.
Once signed in to the 'Field Scanner' app, admins will be able to complete the following actions:
For more information on the Field Scanner Application, click HERE.
TradesWallet has been designed to store, track and manage any and all types of credentials, from safety cards to trades certificates.
If you 'Sign In' using a verified email, you can even upload 'Private Cards' to be tracked. For more information about 'Private Cards', click HERE.
If you have not yet received a 'Welcome Email' from TradesWallet, please contact your Union or organization to request this be sent.
For more information about getting started using your TradesWallet profile, click HERE.
If you have an Email address associated to your TradesWallet profile you will receive notification of your 'Requested Training' via Email.
Navigate to your email client and search for the email with the subject: 'TradesWallet - Training Requested'.
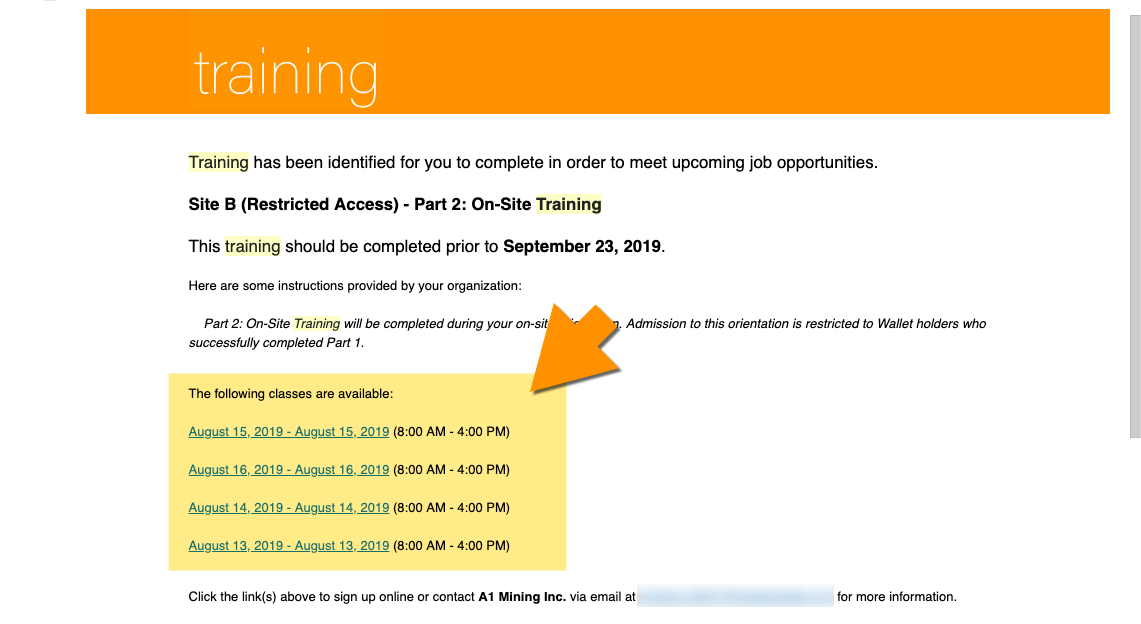
Within the email you should note instructional verbiage stating that 'Training has been identified for you to complete in order to meet upcoming job opportunities.
The specific 'Course' required will be identified: 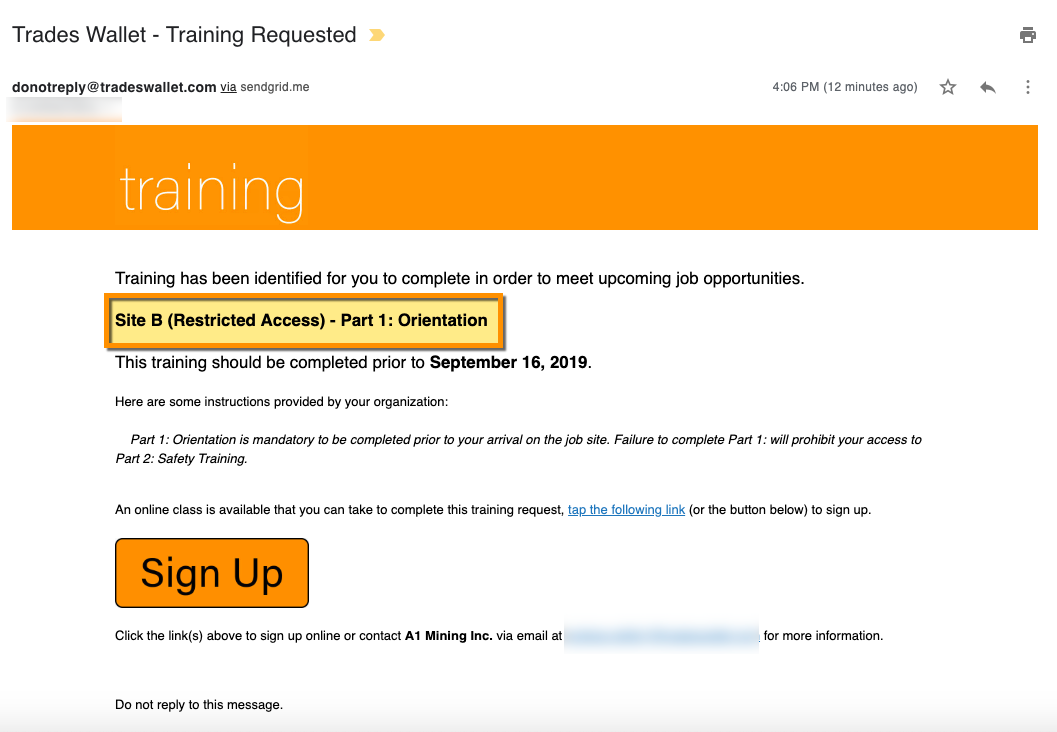
Followed by the date the training is expected to be completed by:
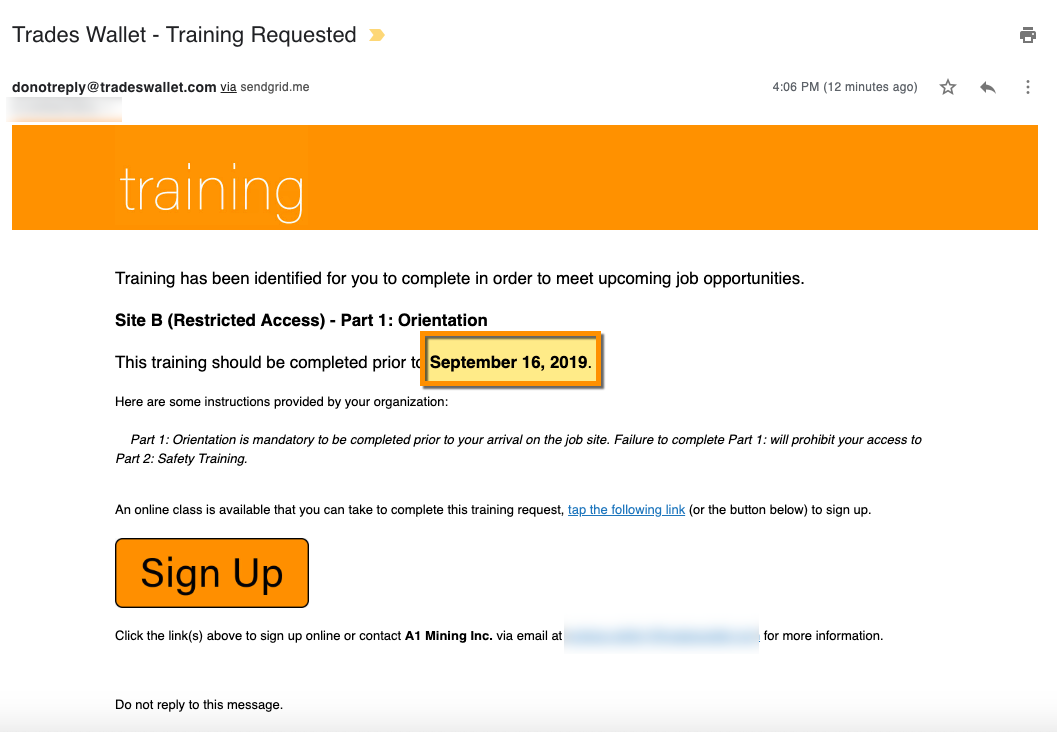
If special instructions were included by your administrator, they will be presented here:
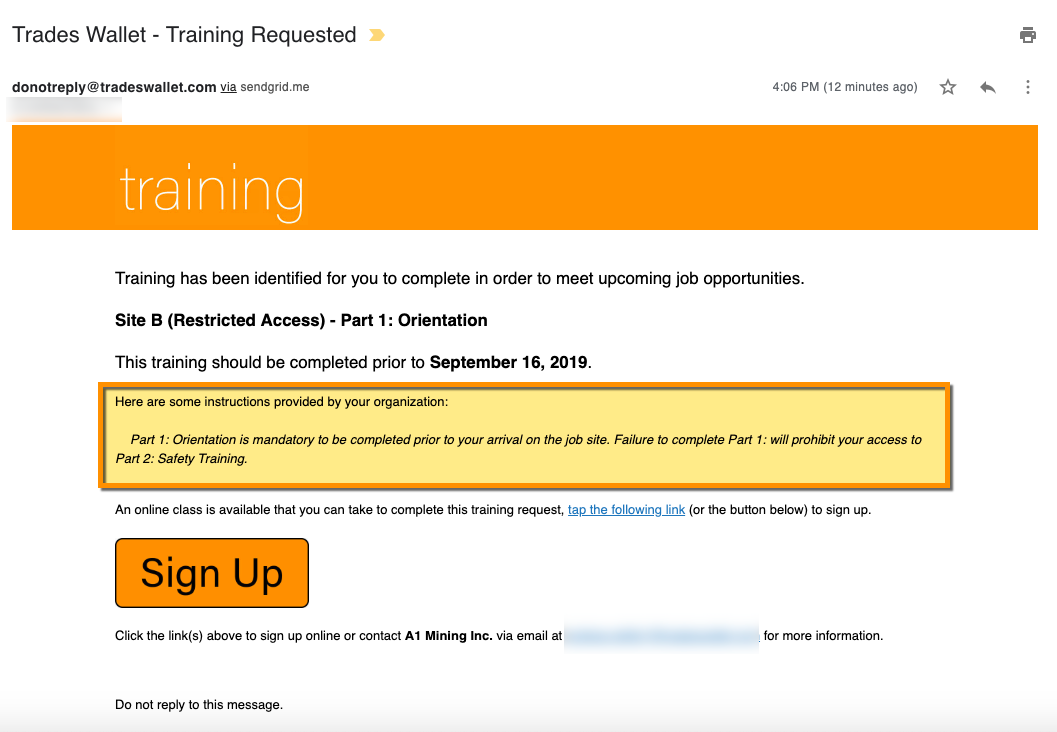
If the 'Training' requested is associated to a 'Course' that provides 'Online' classes, you will be directed to view the details by selecting the 'link' provided.
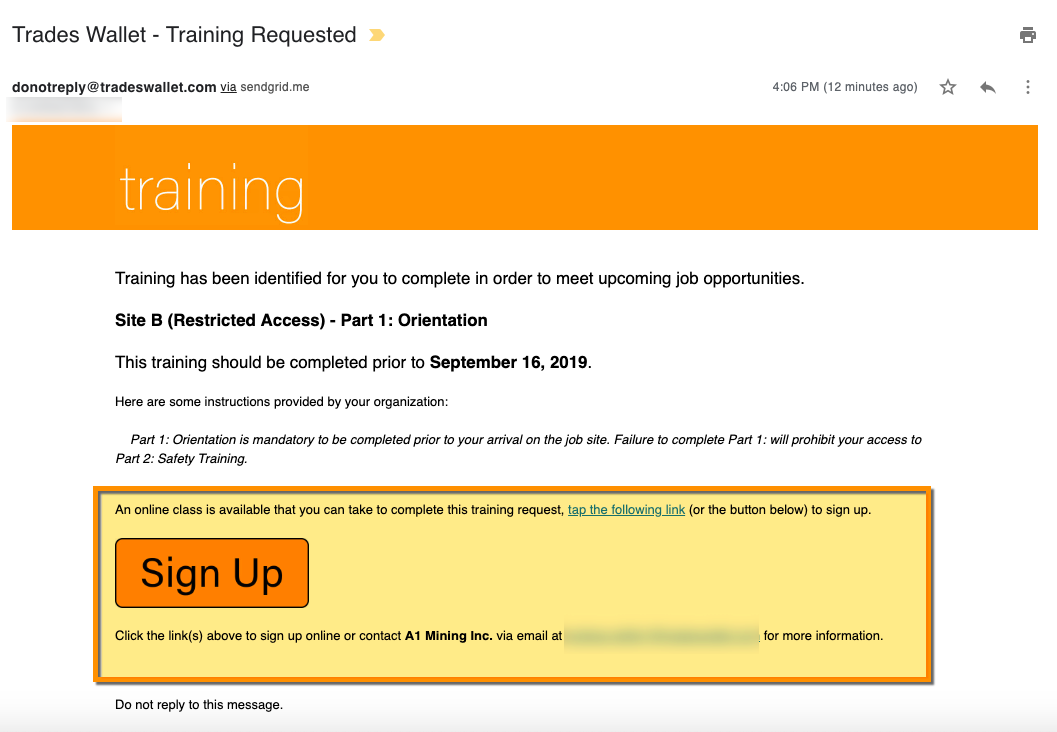
Doing so will navigate you to the online course or course registration page.
Alternatively, if the 'Course' is associated to 'Physical' classes, you will be presented with a listing of upcoming classes to choose from:
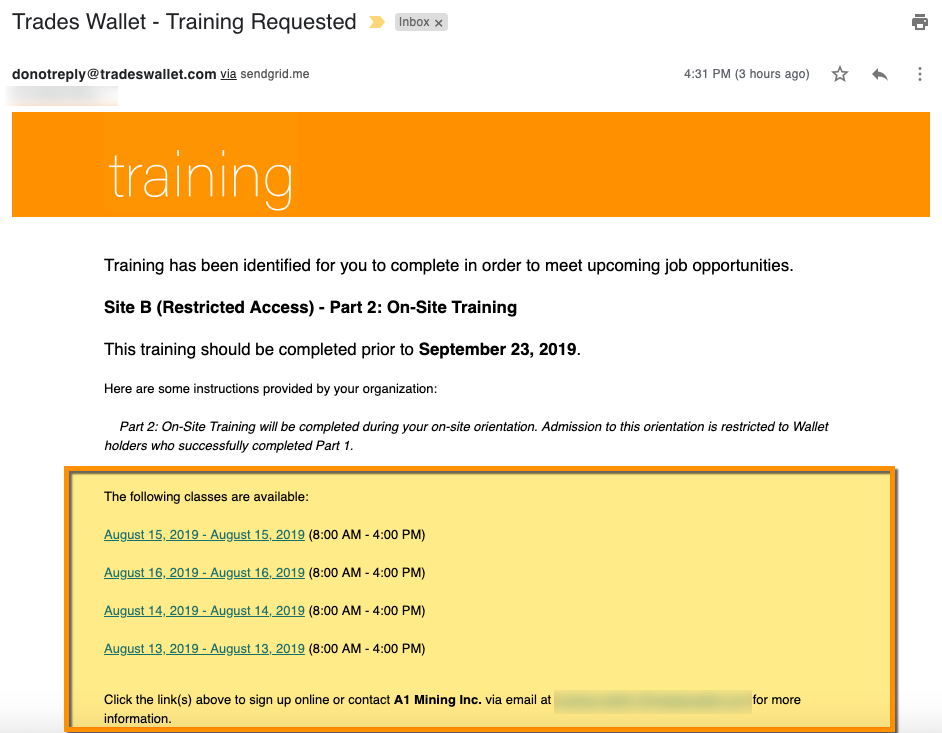
If a URL has been provided for the 'Course', the Wallet holder can select the relevant link to be directed to the Course registration page.
TradesWallet facilitates the presentation of both 'physical' and 'online' classes for 'Courses' on offer, or recommended by your organization that upon the successful completion would fulfil the training request.
For more information about available classes, click here.
The 'Training Requests' functionality within TradesWallet enables your organization to notify you of training and certification requirements directly via your TradesWallet profile. This can include anything from general orientations to role or site-specific safety certification requirements.
Each training request will be assigned an 'Expected By' date in which the relevant training is expected to be completed.
When your TradesWallet provider assigns a training request to your TradesWallet profile you will receive notification (2) ways:
Via Self Service App - If using the TradesWallet Self Service app, you will receive notifications to any mobile device to which you have the app downloaded.
NOTE: This will necessitate you allowing 'Push' notifications during the setup of your TradesWallet Self Service profile.
Via Email - If you have an Email Address associated to your TradesWallet profile, the system will email you notification of your 'Training Requests'.
You can access your 'Training Requests' via email or directly from within your TradesWallet Self Service profile.
For more information about accessing your 'Training', click here.
TradesWallet facilitates the presentation of both 'physical' and 'online' classes for 'Courses' on offer, or recommended by your organization that upon the successful completion would fulfil the training request.
For more information about available classes, click here.
TradesWallet will provide notifications 60-days in advance when a card, or set of cards, within a Wallet are about to expire.
The Self Service app uses Push Notifications to ensure you receive alerts on your locked screen when the status of a card within your wallet changes. When setting up your TradesWallet for the first time, the system will prompt you to allow the required access.
To update these settings at any time, follow the instructions below.
Launch the 'Settings' app on your iPhone or iPad.
Tap 'Notifications'
Select TradesWallet from within the list of apps within your notification center.
Toggle the 'Allow Notifications' switch on/off, depending on your notification preferences.
Launch the 'Settings' menu
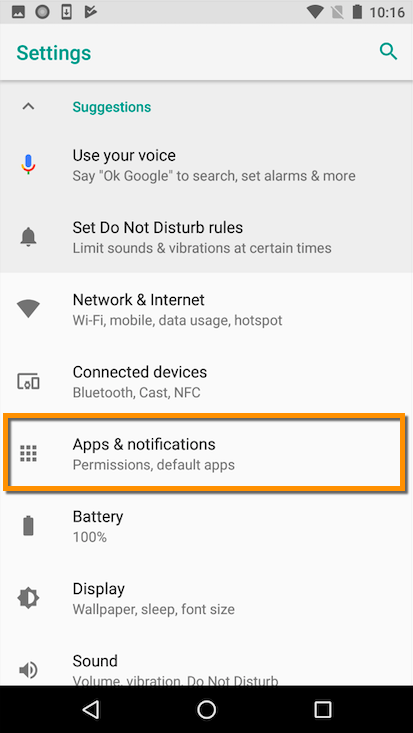
Select 'Apps and Notifications'
Select 'Notifications'
Select 'TradesWallet Self Service App'
Toggle the 'Allow Notifications' switch on/off, as per your notification preferences
If you are unable to access the camera button within the Self Service application, you may want to review and update the camera settings on your device:
Launch the Settings app on your iPhone or iPad
From the Settings menu, tap **Privacy
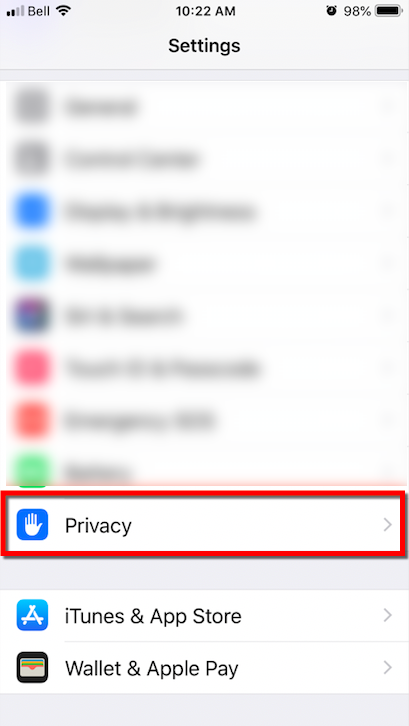 **
**
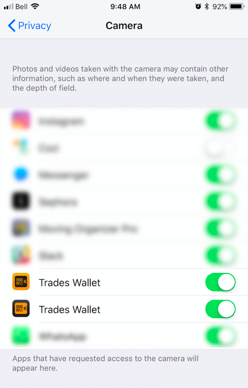
Select Camera from the list of options 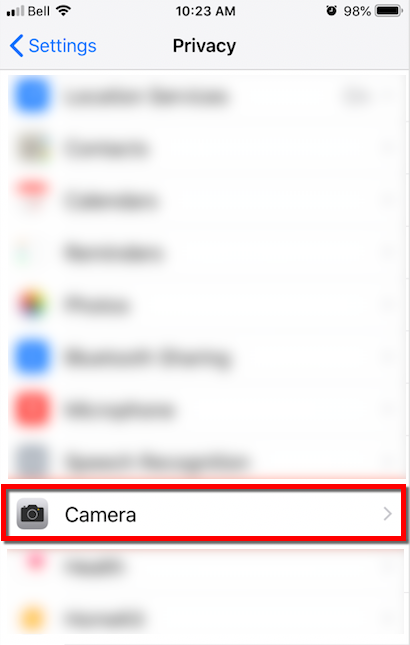
Toggle the switch associated with the TradesWallet application to the ON position
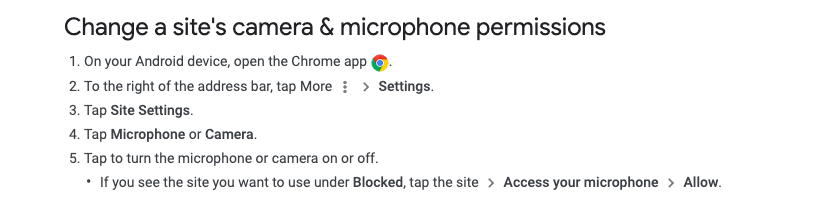
Launch the Google Chrome app
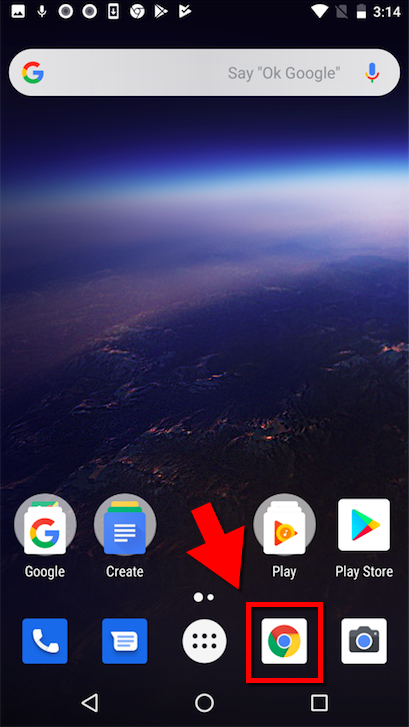
Tap Settings (3 dots upper right)
Select the Settings option 
Select the Site Settings option 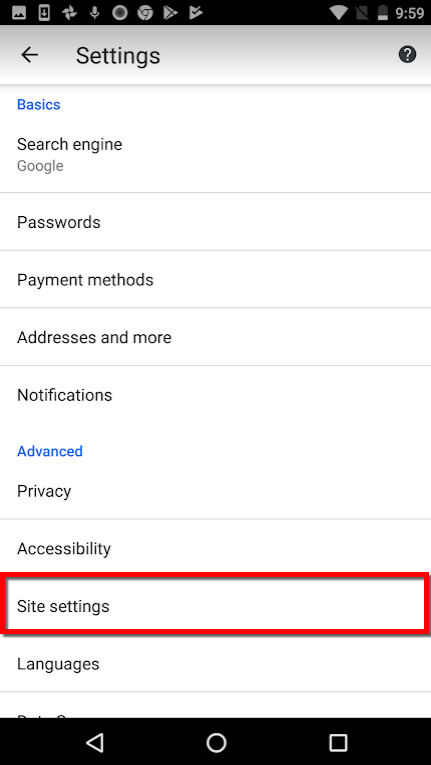
Tap on either Camera or **microphone
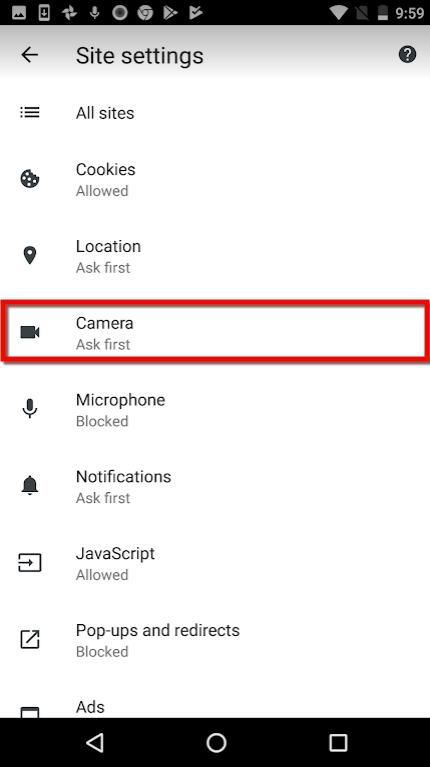 **
**
Toggle the Camera or microphone switch to **ON
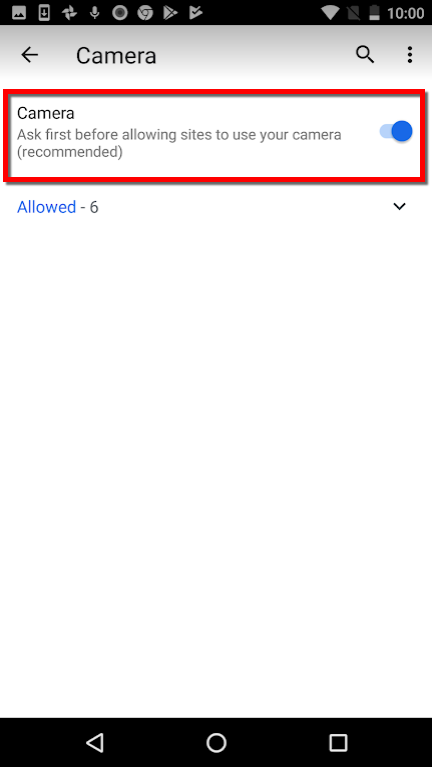 **
**
If you have recently submitted a 'Profile Picture' via the Self Service application you should note that the profile image submitted will appear within your profile as 'Pending', indicating that the image submitted is still under review by an administrator assigned by your organization:
Until you current profile image has been 'Approved', you will not be permitted to upload another image:
NOTE: For more information on the status of your 'Profile' submission, please contact and administrator from the organization who owns and manages your TradesWallet.
If you are unable to access the camera button within the Self Service application, you may want to review and update the camera settings on your device. For more information, click HERE.
When launching the TradesWallet Self Service application from an Android device, Chrome is the preferred and recommended browser due to its reliability.
As an alternative to Chrome, we also recommend using Microsoft Edge, which offers a very similar user experience. For more information about using Microsoft Edge, click HERE.
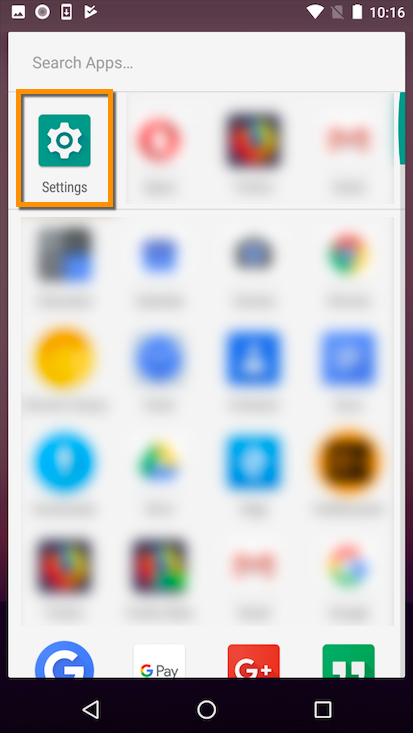
On your Android device, open 'Settings'
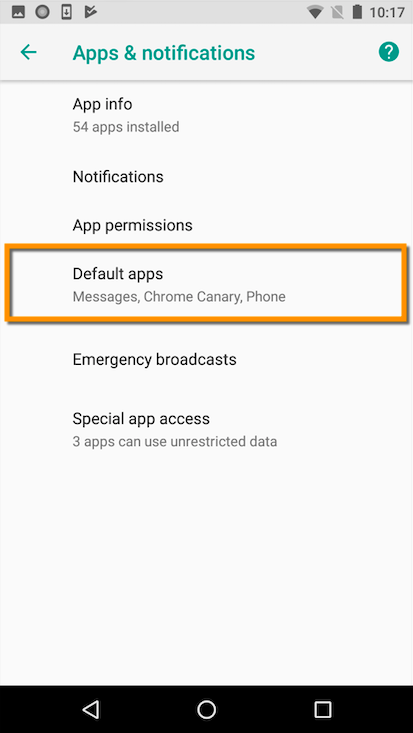
Tap 'Apps & notifications'
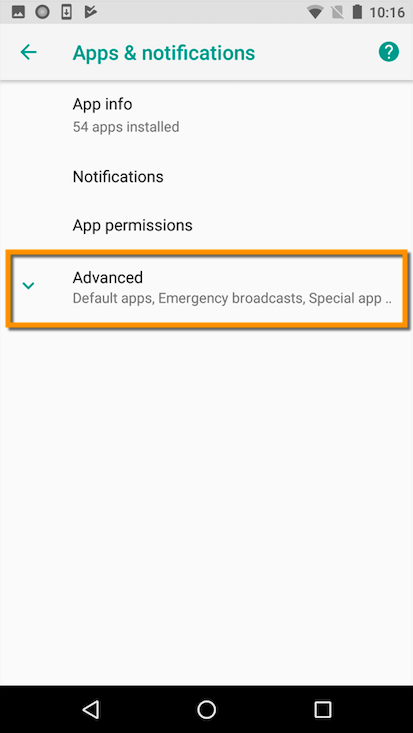
Scroll to the bottom of the page, tap 'Advanced'
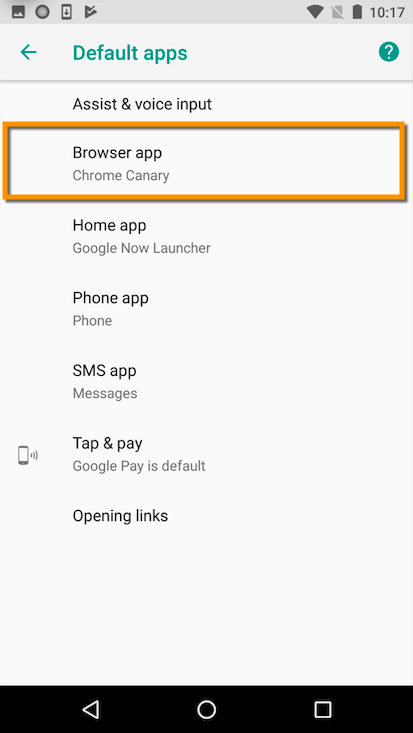
Tap 'Default apps'
Tap 'Browser App'
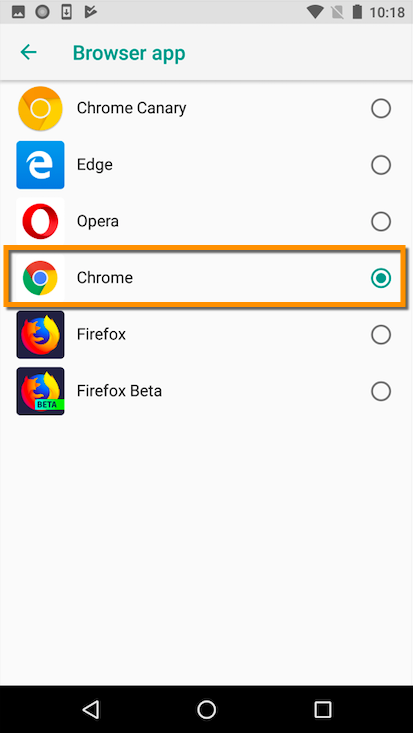
Select 'Chrome'
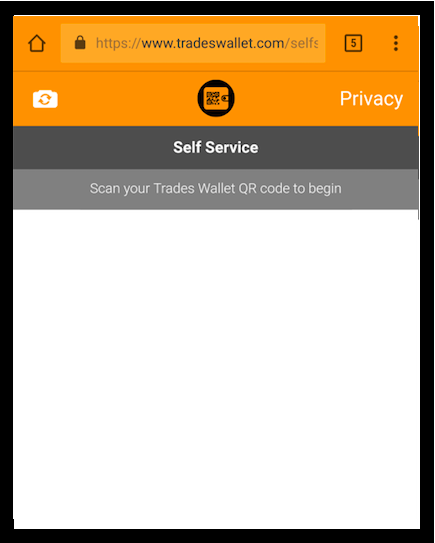
Wallet holders attempting to connect to the TradesWallet Self Service application via a Huawei P10 mobile device may be presented with issues accessing the camera feed when using the recommended Chromebrowser (see example below).
As such, we suggest using 'Microsoft Edge', in lieu of Google Chrome, as a means of accessing the Self Service Application from your mobile phone.
**  **
**
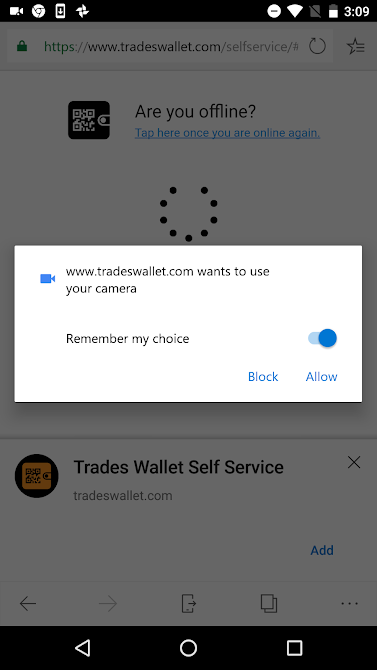
If you missed this step, or instead selected the option to block the camera access, you can reset it using the following steps:
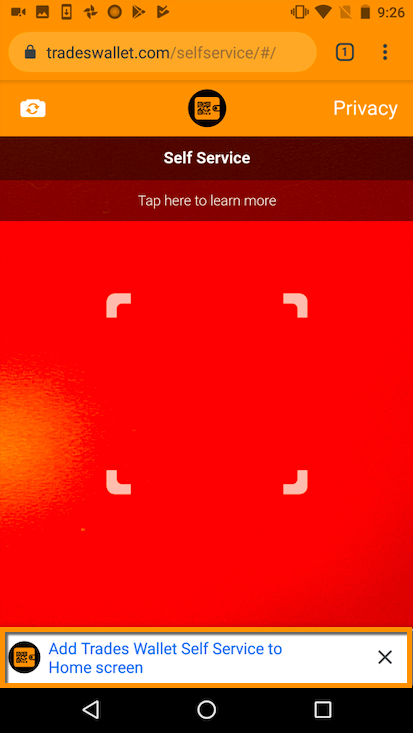
When the site fully loads, you should be presented with a dialog window requesting to 'Add to Home Screen'. Select this option.
You should now see the TradesWallet Self Service app icon located on your devices home page.
If you fail to 'Add to Home Screen' upon the initial request, you can update this at any time by following the steps below:
Once you have fully loaded the TradesWallet Self Service app onto your Android device, you may be presented with a dialog window requesting to 'Add to Home Screen'. This creates a 'shortcut' to the Self Service app on your devices Home Page:
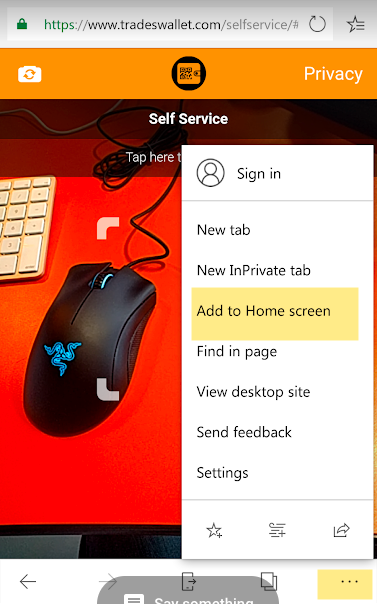
If you fail to 'Add to Home Screen' during the initial request, however, you can update this at any time by following the steps below.
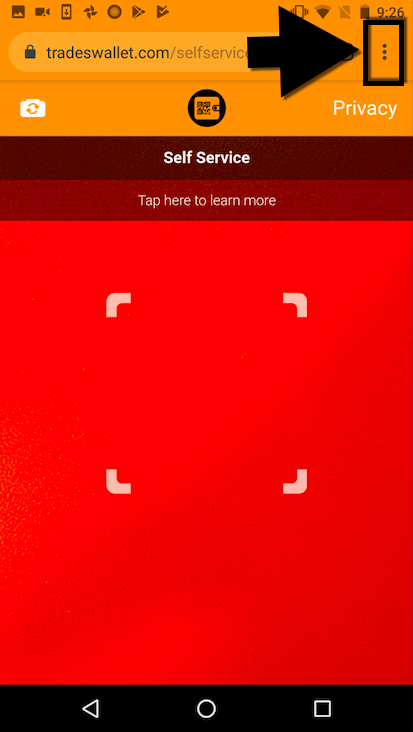
Upon launching the application, select the ellipses (three vertical dots)
Select the option to 'Add to Home Screen'
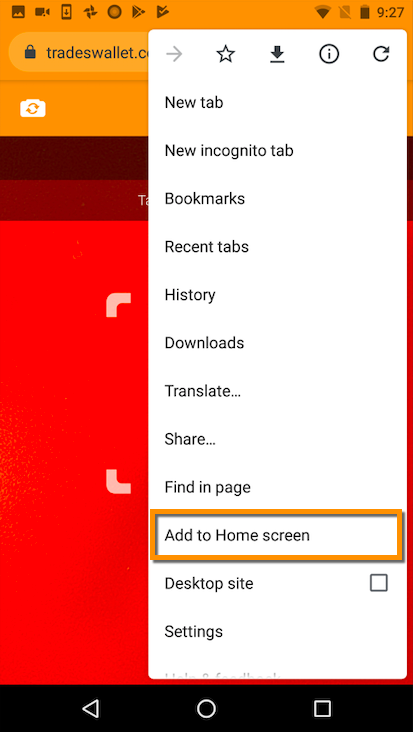
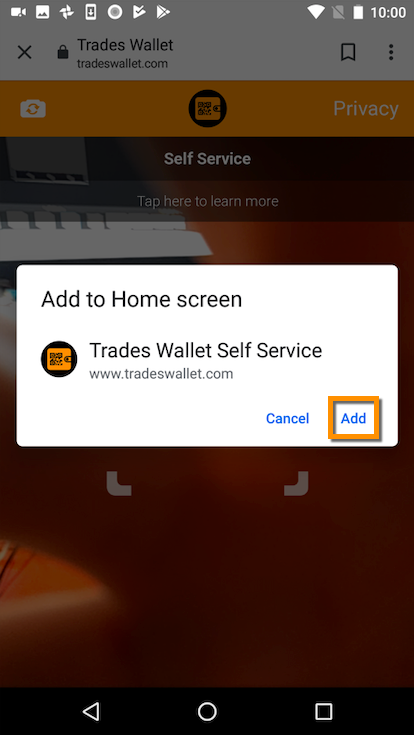
You will be presented with a pop-up window. Confirm your selection by tapping the 'Add' button
A personalized 'QR Code' will be included within the 'Welcome Email' a Wallet holder receives from TradesWallet when their Wallet profile is created. This 'QR Code' is used in lieu of a 'Username/Password' when signing in to the Self Service app.
If you cannot find your 'QR Code', please contact your TradesWallet provider to request it be re-sent.
To ensure your personal information is secure, we recommend you 'verify' the email address associated to your TradesWallet account.
With a 'Verified' Email Address established, you will be prompted to confirm your identity via Email during the 'Sign In' process. This verification will ensure that you, and only you, are able to view the contents of your TradesWallet from the Self Service app.
For more information on how to 'Sign In using your Verified Email', click HERE.
With a 'verified' Email address established, a Wallet holder will be prompted to confirm their identity via Email during the 'Sign In' process.
This verification will ensure that the only the intended Wallet holder is able to view the contents of their TradesWallet from the Self Service app.
For more information on signing in to the Self Service app using a 'verified' email, click HERE.
In order to complete the verification process, a Wallet holder will click the 'verification' link within the email to be automatically logged into the Self Service app using their 'verified' credentials.
If your Email Client is not set use 'Chrome' as your default web browser, you may experience a "Something went wrong" error.
If your Email Client is not set up to use 'Chrome' as a default browser, follow the steps below to open the 'link':
Navigate to the Email client you have associated to your TradesWallet Profile and locate the email from TradesWallet with the subject: 'Automatic Sign In'.
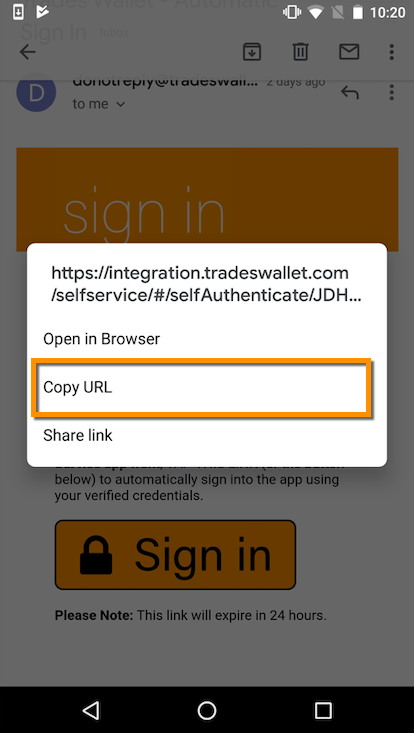
Within the Email you will be provided with a link (and a 'Sign In' button) you can use to automatically be signed into your TradesWallet profile: 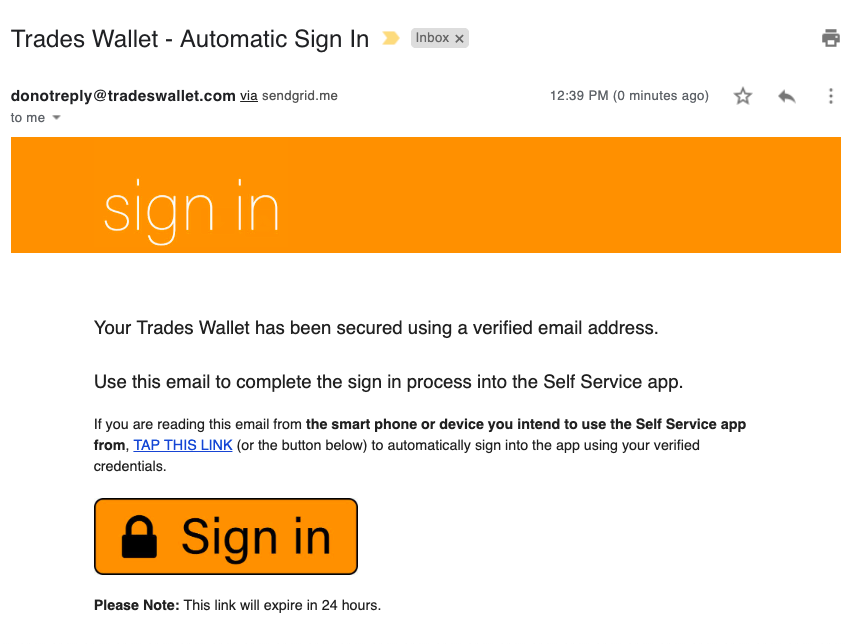
To open the link in your 'Chrome' browser, simply tap and HOLD the 'link' provided: 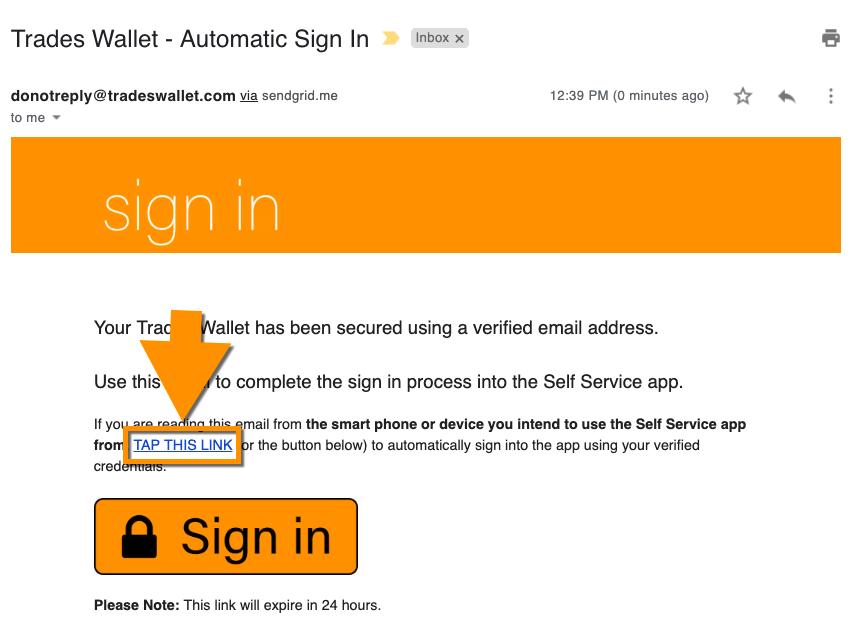
You will be presented with some navigation options. Select the option to 'Copy URL':
Navigate back to your 'Chrome' browser and 'paste' the TradesWallet link into the URL window.
Alternatively, you can set 'Chrome' as your default browser on your Android device.
For more information, click HERE.
If you experience a "Something went wrong" error when navigating to the 'Self Service' application from your Chrome browser, it may be that your device's camera is not accessible due to your browser settings.
For more help, click HERE.
Having a 'Verified' email address associated to your TradesWallet profile provides you with additional security when 'Signing In' to the Self Service application and unlocks additional functionality for managing cards within your Wallet.
For more information on the benefits of a verified email address, click here.
No, TradesWallet does not require an email address to be associated to a TradesWallet profile. However, having an email address does provide valuable functionality, including the ability to receive the 'Welcome Email' and any 'Card Status' notifications.
The benefits to verifying the address listed help to provide:
When setting up your TradesWallet Self Service app for the first time, you will be prompted to add and/or verify your email address as part of the 'Get Started' process.
Alternatively, you can add, modify and verify your email address at any time directly from the 'Settings' tab of the TradesWallet Self Service app.
For more information on how to 'verify' your email address, click here.
In order to 'Verify' the email address associated to your TradesWallet profile will require you to have access to your email client on the same mobile device as you have loaded your TradesWallet Self Service app.
When verifying your email address, TradesWallet will send an email with the subject line: 'Email Address Verification' to the address specified on the account. This email contains a special 'verification' link that, when selected, will automatically log you into your Self Service profile using your new verified credentials.
TradesWallet cannot verify credentials if accessing the 'Email Address Verification' email from an alternative device or desktop application.
In order to complete the verification process via the Self Service app, TradesWallet will issue a special 'Verification' link, via email, to the address associated to the TradesWallet profile.
If after a few moments you have still not received your email, please check your 'SPAM' folder.
If you have confirmed the address listed but still do not receive an email from TradesWallet, please contact [email protected] for further assistance.
NOTE: You must have access to your email client on the same mobile device as you have loaded your TradesWallet Self Service app. For more information on how to 'Sign In' using your verified email address, click here.
In order to complete the verification process via the Self Service app, TradesWallet will issue a special 'Verification' link, via email, to the address associated to the TradesWallet profile.
If your Email client is not set to use 'Chrome' as your default web browser, you can follow the steps below to open the 'link' in Chrome.
Navigate to the Email client you have associated to your TradesWallet Profile and locate the email from TradesWallet with the subject: 'Automatic Sign In'.
Within the Email you will be provided with a link (and a 'Sign In' button) you can use to automatically be signed into your TradesWallet profile:
To open the link in your 'Chrome' browser, simply tap and HOLD the 'link' provided:
You will be presented with some navigation options. Select the 'Copy URL' option:
Navigate back to your 'Chrome' browser and 'paste' the TradesWallet link into the URL window.
On your Android device, open 'Settings'
Tap 'Apps & notifications'
Scroll to the bottom of the page, tap 'Advanced'
Tap 'Default apps'
Tap 'Browser App'
Select 'Chrome'
Once you have 'Signed In' to the TradesWallet Self Service app you will remained signed in until you choose to 'Sign Out', regardless of whether you have associated a 'verified' email to your profile or not.
Once signed out, a Wallet holder will require his/her personalized 'QR Code' to regain access to the profile once again. The 'Verified Email Address' acts as a 'second factor authentication' to corroborate that the QR Code scanned is associated with the Wallet in question, ensuring that you and only you, can access your TradesWallet profile.
For more information on 'Signing In' via your verified email address, click here.
One your email address has been 'verified' via the Self Service app, changes or updates to this address can only be made via the 'Settings' tab of your Self Service profile. An admin will not be permitted to make any changes to your Email address via the Web Admin Portal.
For more information about updating your Email Address, click here.
With a 'Verified' Email Address established, you will be prompted to confirm your identity via Email during the 'Sign In' process. This verification will ensure that you, and only you, are able to view the contents of your TradesWallet from the Self Service app.
If you no longer have access to the email client associated with the email address you have listed within your TradesWallet profile you will be unable to complete the 'verification' process, resulting in NO access to your profile.
Once an email address has been verified via the Self Service app, it can NO longer be modified by an administrator using the Web Admin Portal. As such, to reset your Email will require you to submit a support ticket to [email protected].
When launching the TradesWallet Self Service application from an Android device, Chrome is the preferred and recommended browser due to its reliability.
As an alternative to Chrome, we also recommend using Microsoft Edge, which offers a very similar user experience. For more information about using Microsoft Edge, click HERE.
On your Android device, open 'Settings'

Tap 'Apps & notifications'

Scroll to the bottom of the page, tap 'Advanced'

Tap 'Default apps'

Tap 'Browser App'

Select 'Chrome'

With a 'verified' Email address established, a Wallet holder will be prompted to confirm their identity via Email during the 'Sign In' process.
This verification will ensure that the only the intended Wallet holder is able to view the contents of their TradesWallet from the Self Service app.
For more information about
Currently, Wallet holders using Microsoft Outlook as their default email client may experience issues when attempting to 'Sign In' to the Self Service app using their 'verified' credentials.
This is as a result of Microsoft Office flagging emails from TradesWallet as 'potential phishing attacks'.
When a Wallet holder selects the 'Sign In' link found within the 'TradesWallet - Automatic Sign In' email, they won't be automatically 'Signed In' to the app. Instead, the Wallet holder will be re-directed to a window indicating "Something went wrong".
While this is a known issue that we hope Microsoft will address, the following is a workaround should a Wallet holder find themselves stuck in this state:
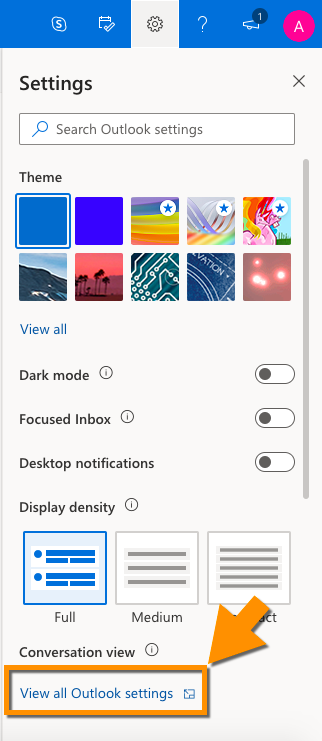
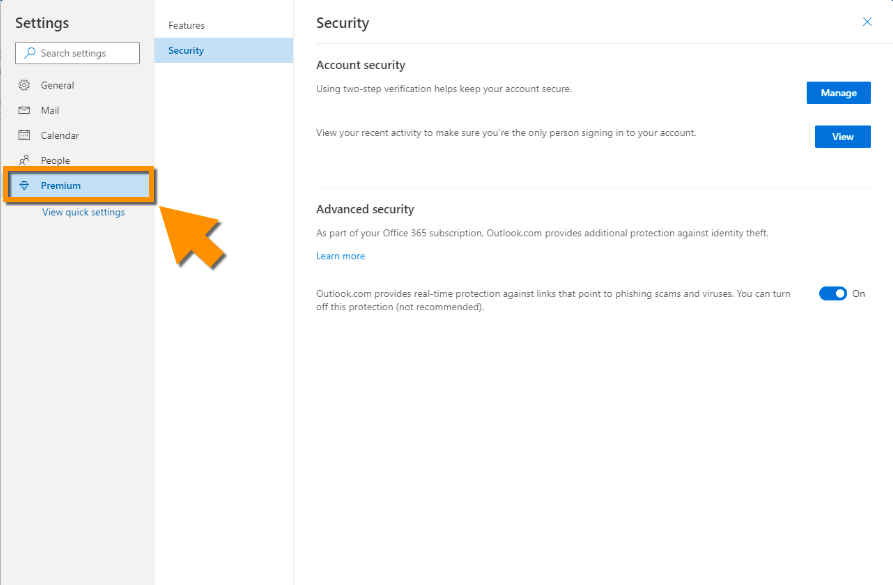
Navigate to your Outlook client and select the 'Settings' option (Gear icon)
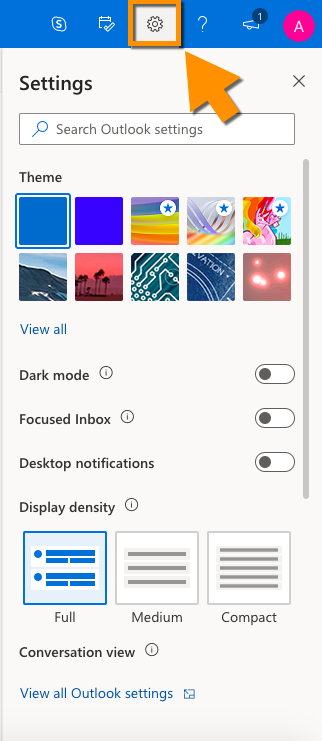
Select the 'View all Outlook settings' link
Select 'Premium' from the toolbar
Next, you will want to temporarily turn off your 'Advanced Security' settings by selecting the toggle switch such that it turns grey and reads 'Off'.
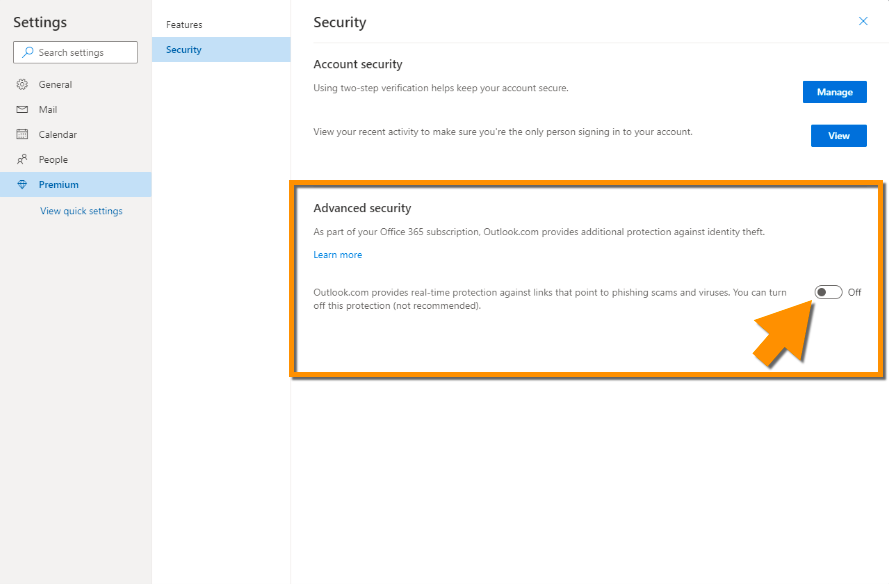
With the 'Advanced Security' settings disabled ('OFF'), you can go ahead and launch you TradesWallet Self Service app again.
Scan your 'QR Code', which will result in a NEW 'verification' link to be sent via email. Once you have received the new 'TradesWallet - Automatic Sign In', you can restore the 'Advanced Security' settings within your Email client.
For more information about 'Signing In' to the Self Service app using your 'verified' credentials, click HERE.
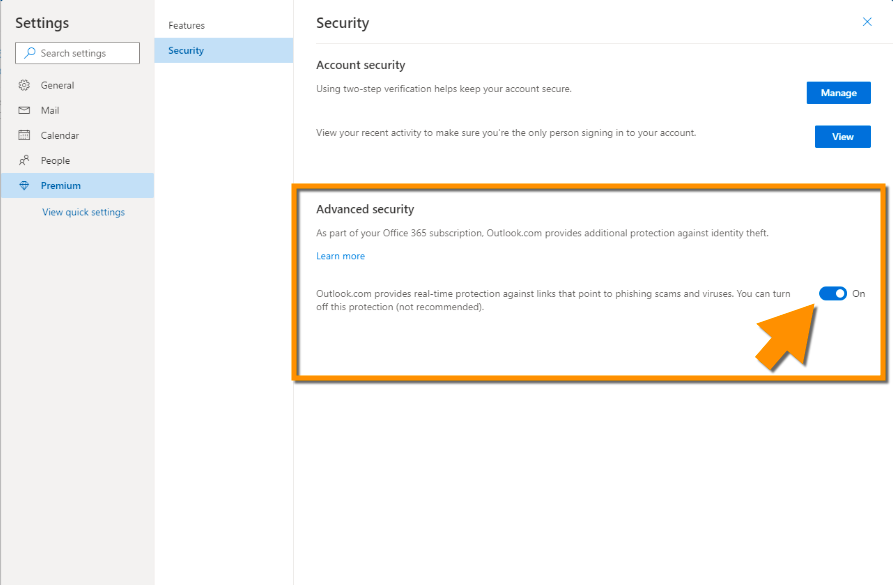
To restore the 'Advanced Security' settings, simply return to the 'Settings' section and select the toggle switch such that it turns (blue) and reads 'ON'.
Currently, Wallet holders attempting to connect to the TradesWallet Self Service application via a Huawei P10 mobile device may be presented with issues accessing the camera feed when using the recommended 'Google Chrome'browser.
 The Fix: Microsoft Edge
We suggest using 'Microsoft Edge', in lieu of Google Chrome, as a means of accessing the Self Service Application from your mobile phone.
For more information on using 'Microsoft Edge' as an alternative to 'Chrome', click HERE.
Currently, Wallet holders using an iPhone on iOS 13.1 or 13.2 (13.2 is the latest available) to download the TradesWallet Self Service mobile app may encounter issues when attempting to 'Sign In' using the 'Automatic Sign In' link OR when signing in using their 'Verified' email address.
NOTE: This is a known issue with iOS 13.1 and 13.2 (hopefully Apple fixes this).
Upon scanning their unique 'QR Code', a Wallet holder will be presented with the following notification, advising to complete the verification process via their Email client.
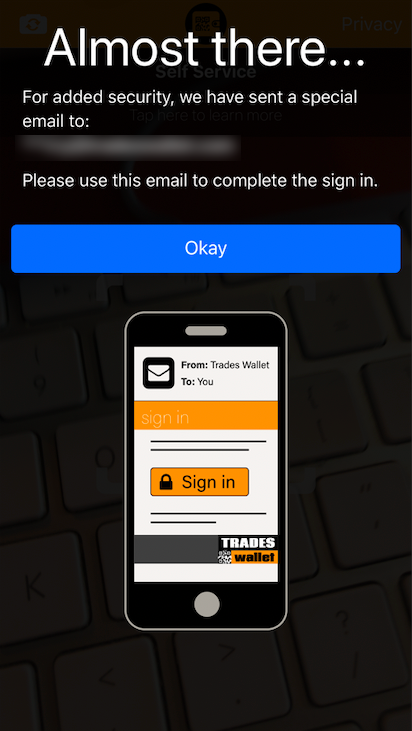
Within their Email Client, the Wallet holder should have received the following email from TradesWallet:
Upon selecting the relevant 'link', the Wallet holder will *not* be automatically signed into the app, but will instead be directed to a Safari window indicating "Something went wrong".

While this is a known issue that we hope Apple will address, the following is a workaround should a Wallet holder find themselves stuck in this state.
For more information about 'Signing In' to the app using a 'verified' email address, click HERE.
Wallet holders using a Samsung Galaxy S10 series phone may experience a "Something went wrong" error when attempting to 'Sign In' to the mobile TradesWallet Self Service app.
We believe this issue is restricted to Wallet holders using a Samsung Galaxy S10 series devices and have have logged "bugs" as appropriate with both Chromium and Samsung.

In the interim, we have a solution for users as detailed below.
As a 'workaround', Wallet holders using a Samsung Galaxy S10 series device to log into their Self Service app to view their TradesWallet profile can simply disable their 'notification' settings from the app itself:
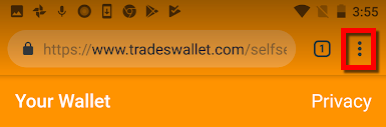
From the Chrome browser on your phone, select the 'Settings' option (three dots upper right). Select the 'Settings' option.
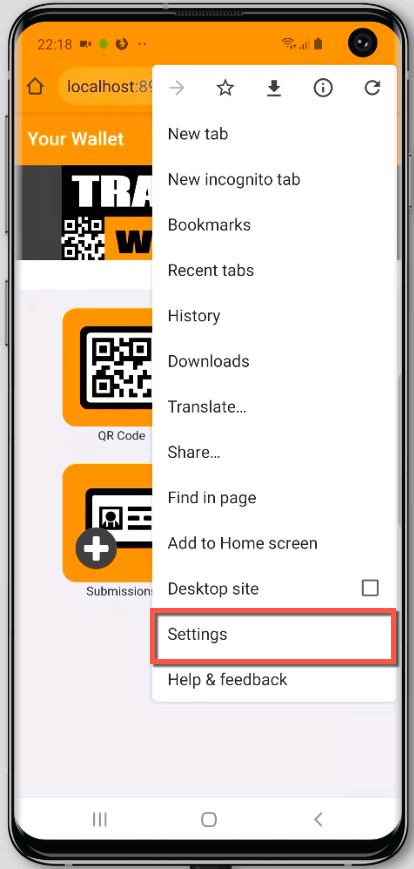
Select the option for 'Site Settings'
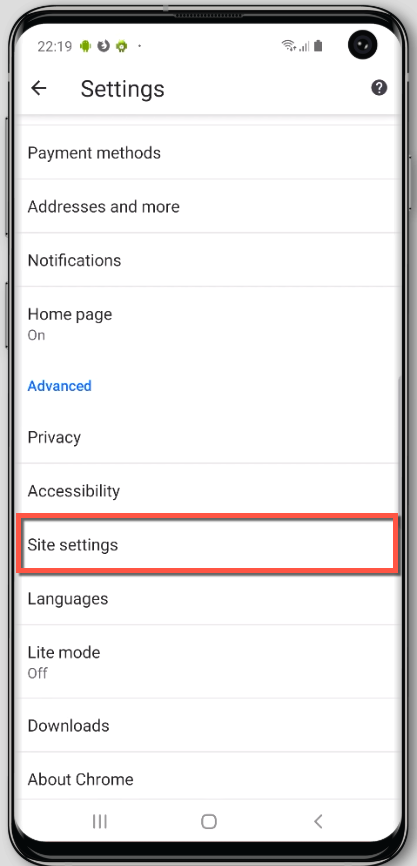
Select 'Notifications'

You should note that 'https://www.tradeswallet.com' is 'Allowed'. We're going to disable this feature. Select 'TradesWallet' from the listing provided.
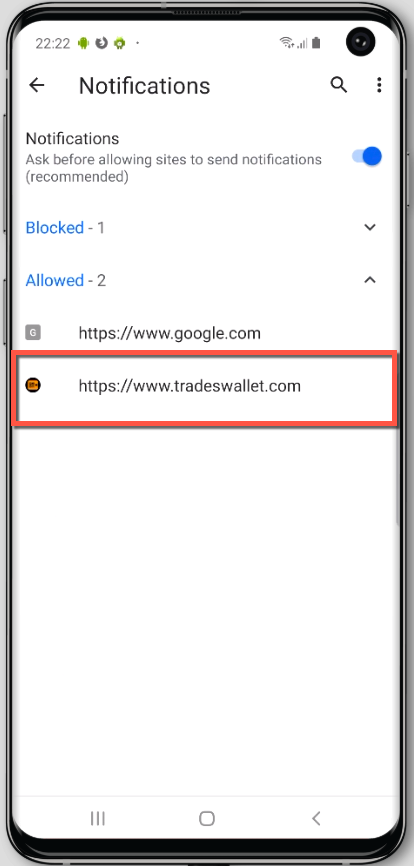
Again, select the option for 'Notifications'.

Here you should note the notification settings previously established for the app
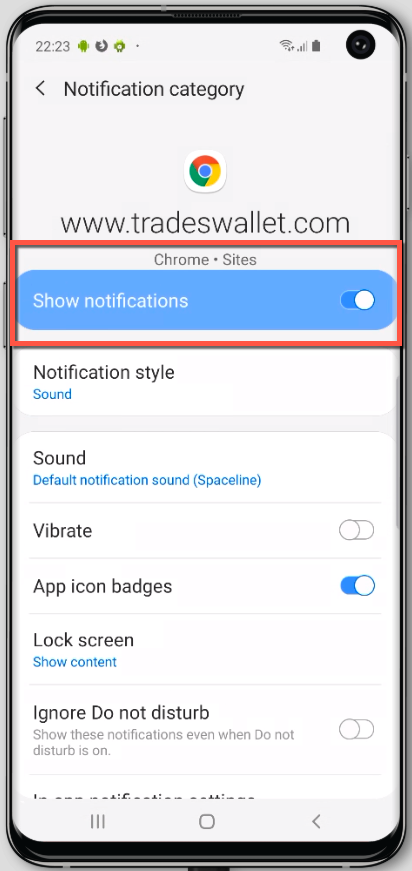
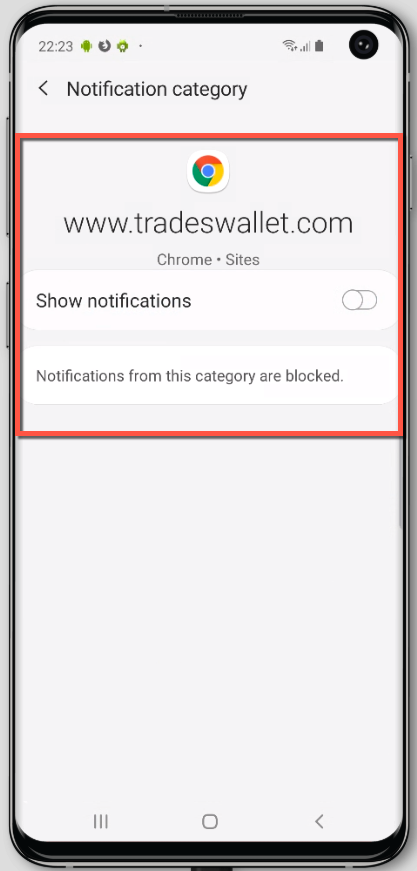
Select the 'Show notifications' toggle such that it turns OFF, inherently blocking notifications from TradesWallet to your device.
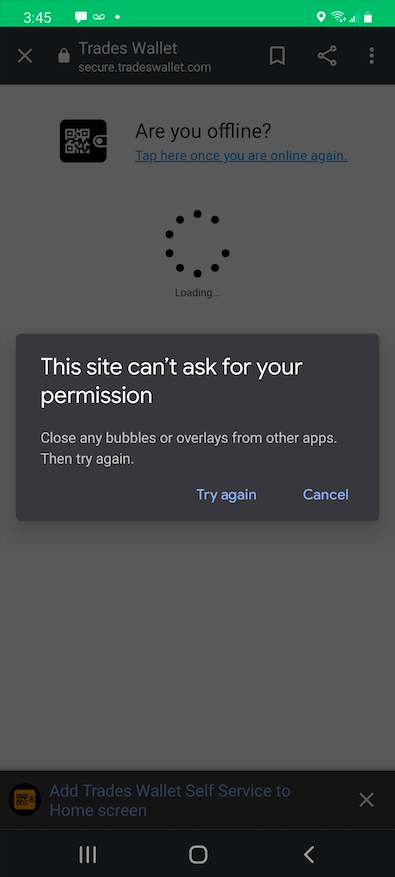
If you are presented a 'Screen overlay detected' error (see example image below) when trying to log into your TradesWallet Self Service app on your Android device, this is a result of a conflict between a running app and a newly installed app requesting permission to display info on multiple screens (e.g., messengers, alerts, battery status, etc.)
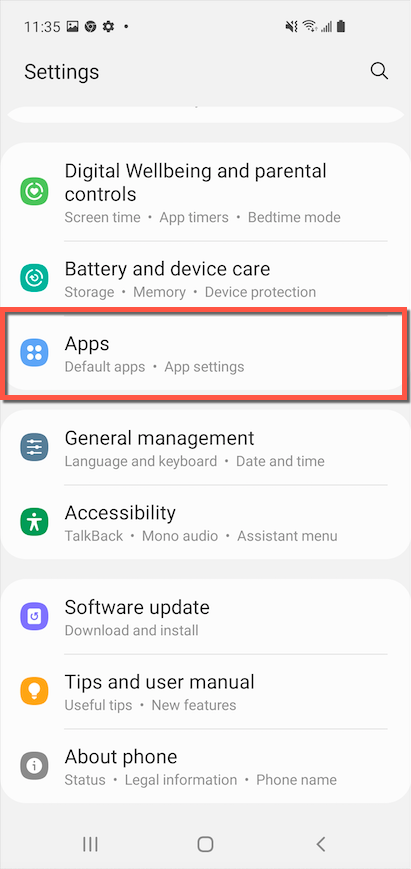
From a Home screen, navigate: Apps > Settings.
NOTE: If you're unable to access settings, first place your device into Safe Mode.
Tap the Search icon (at the top), then enter over other apps into the search field.
Tap one of the following:
Tap any app on the list, then tap one of the following to turn off  :
:
From a Home screen, relaunch the TradesWallet Self Service app
If prompted, tap the available permissions (e.g., Permit Drawing over other apps, Contacts, etc.) to turn on or off.
NOTE: Repeat steps (4-6) as needed to identify the app causing the error
You can view a short video on closing bubbles and overlays HERE.
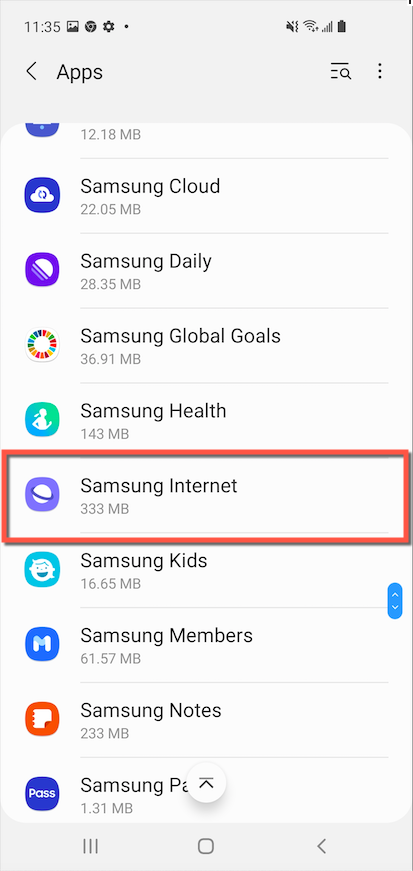
From your "Settings" option, select "Apps"
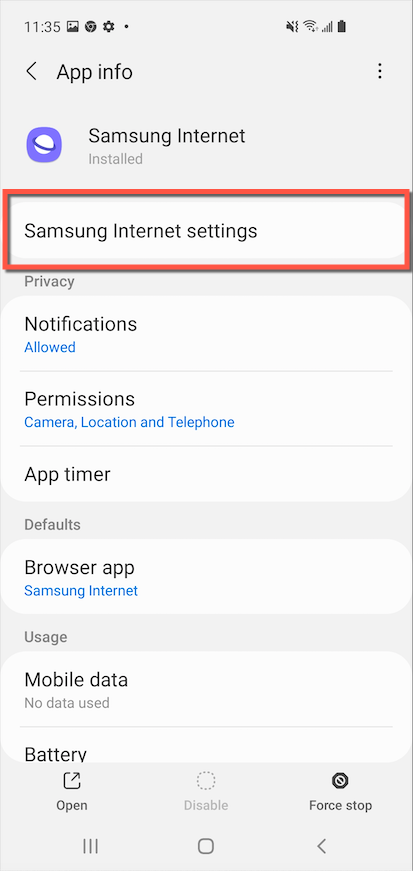
Open "Samsung Internet"
Open "Samsung Internet Settings"
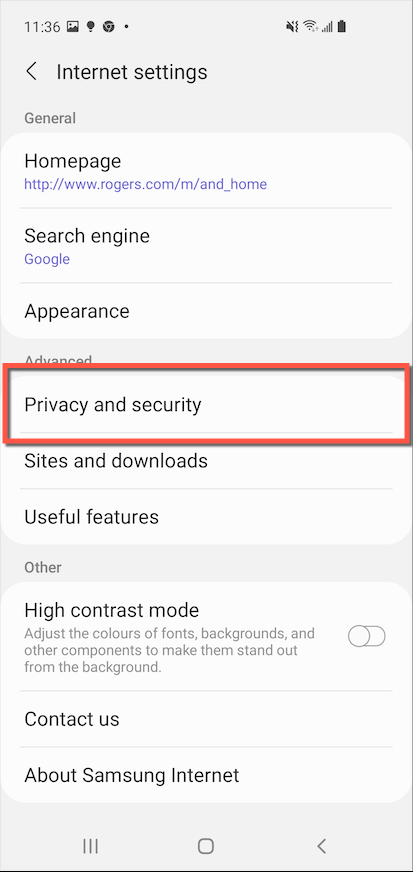
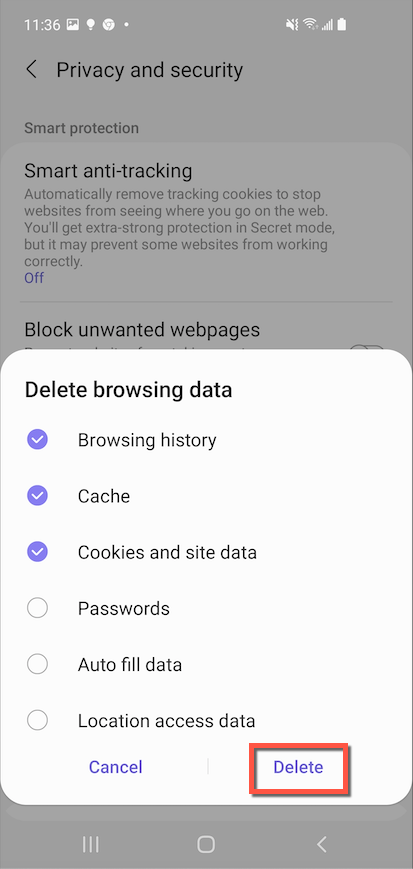
Open "Privacy and Security"
Open "Delete Browsing Data"
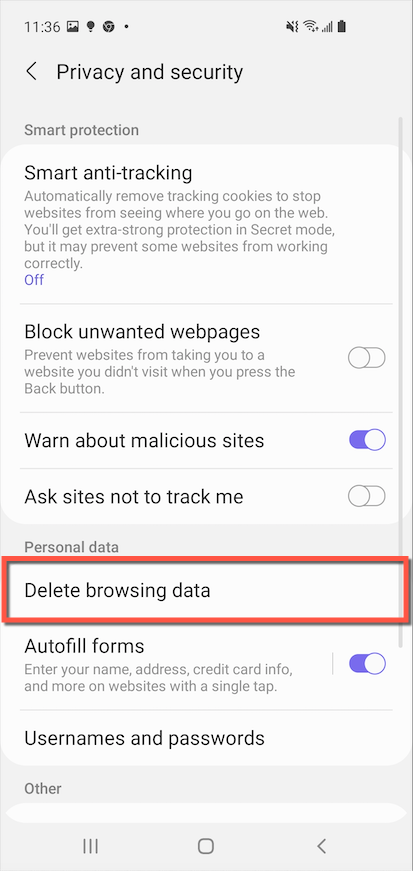
Select the relevant options then tap 'Delete' to reset your Samsung internet Site Preferences
TradesWallet suggests using Google Chrome or Microsoft Edge to launch the Self Service application. To update your default browser to use Chrome, follow the steps below:
From your "Settings" option, select "Apps"
Open "Samsung Internet"
Open "Samsung Internet Settings"
Select the 'Default Browser app'
To sign in to the TradesWallet mobile Self Service application on your mobile device will require you to either scan your personalized QR Code OR request an automatic sign in link via email.
Launch the Self Service app and select the 'Request Login Email' option (bottom)

Next, enter the email address associated to your Wallet profile, then click the green 'Send Automatic Sign In Email' button.
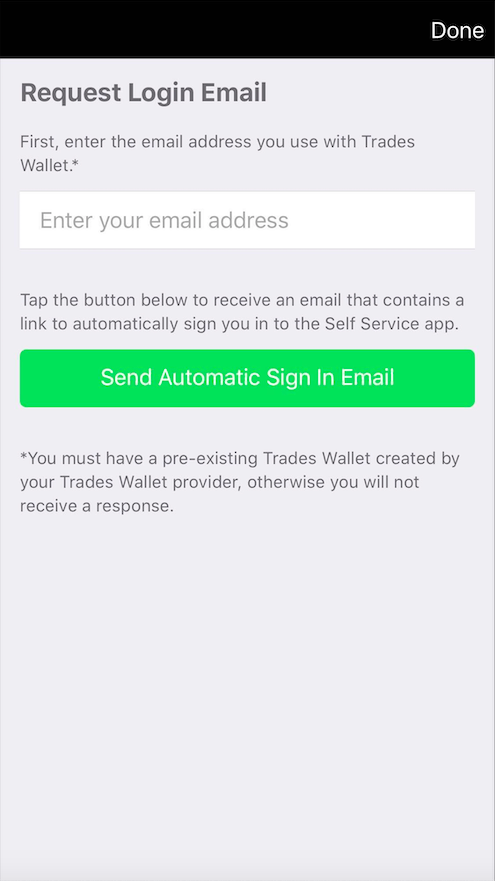
Check your email client for an email from TradesWallet with the Subject line: 'Automatic Sign In'. Use the links within the email to be automatically signed into the app using your 'verified' credentials.
Prior to any new submissions being added to your TradesWallet, they are first submitted to an Administrator, assigned by the Union or organization who owns your TradesWallet, to review and approve their origin and authenticity.
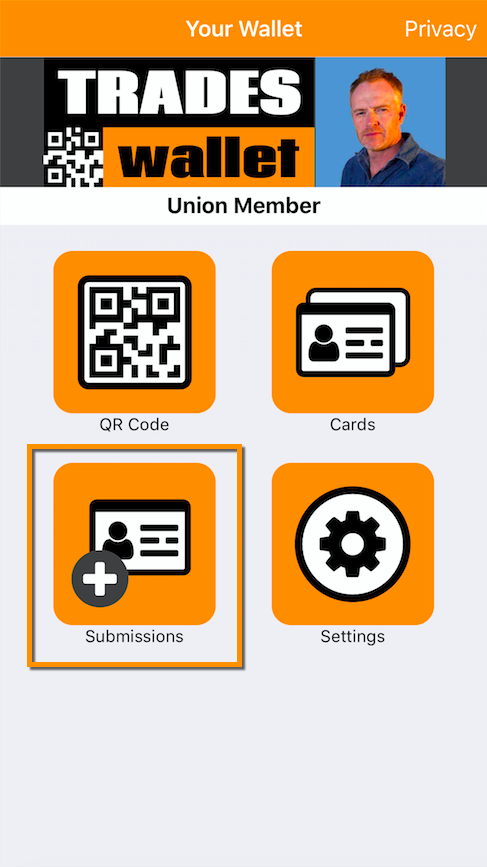
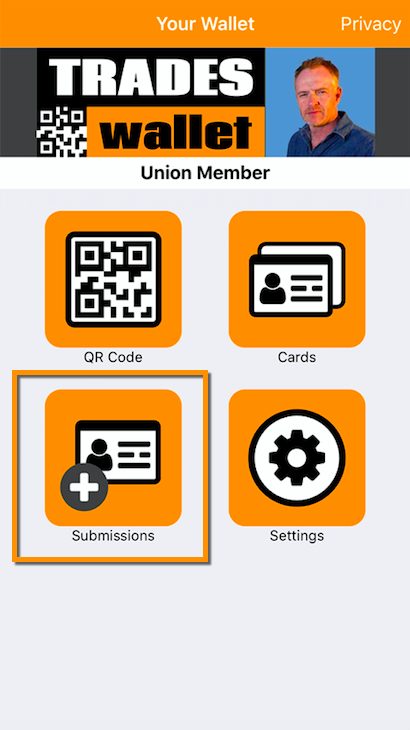
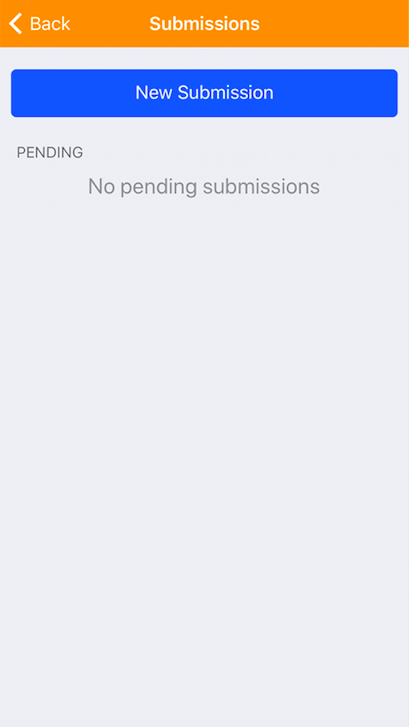
From the Home Page of the Self Service app, select the 'Submissions' button:
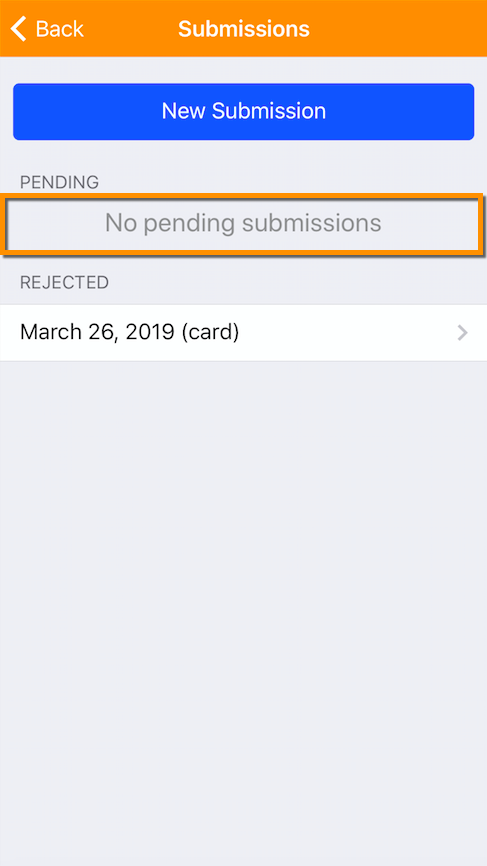
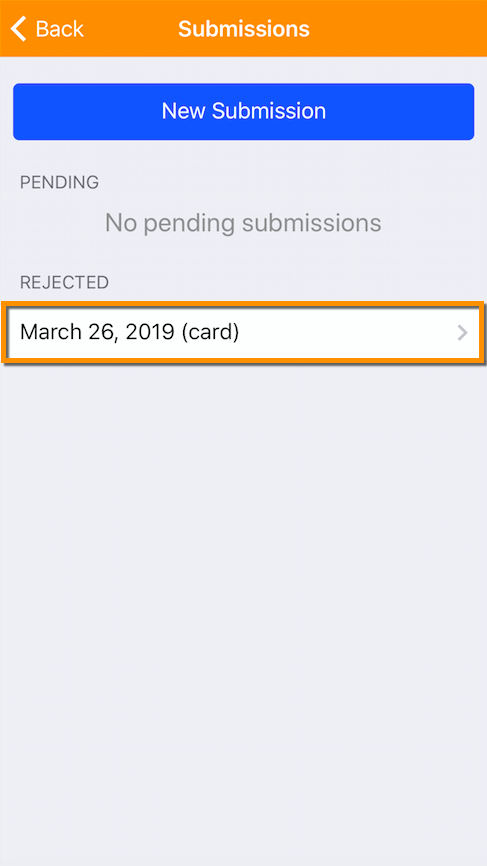
From the 'Submissions' page, you will be presented with any 'Pending' or 'Rejected' submissions:
NOTE: If your submission has been 'Approved' it will be presented from the 'Cards' tab of your Self Service app.
If your submission is listed as 'Pending' this means that it has not yet been reviewed by an administrator:
NOTE: If you require your submission to be reviewed immediately, please contact your Union administrator.
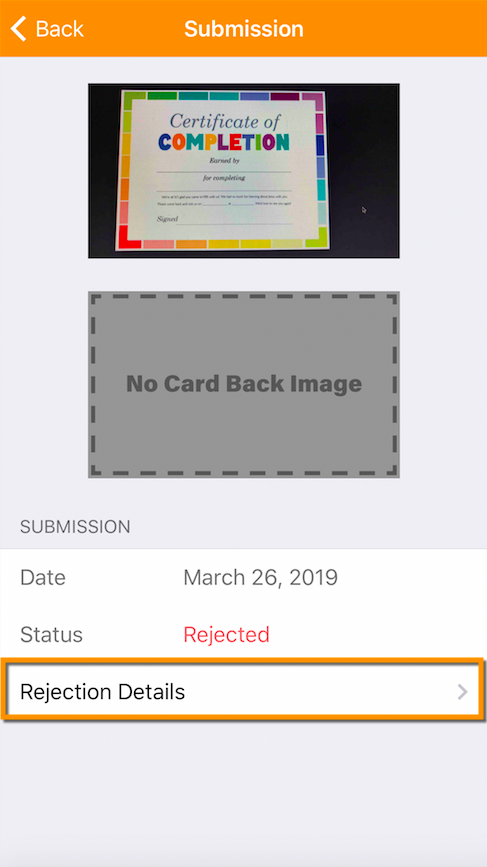
If your submission could not be approved for any reason, it will be listed as such. Select the relevant entry in order to view the details of the rejection:
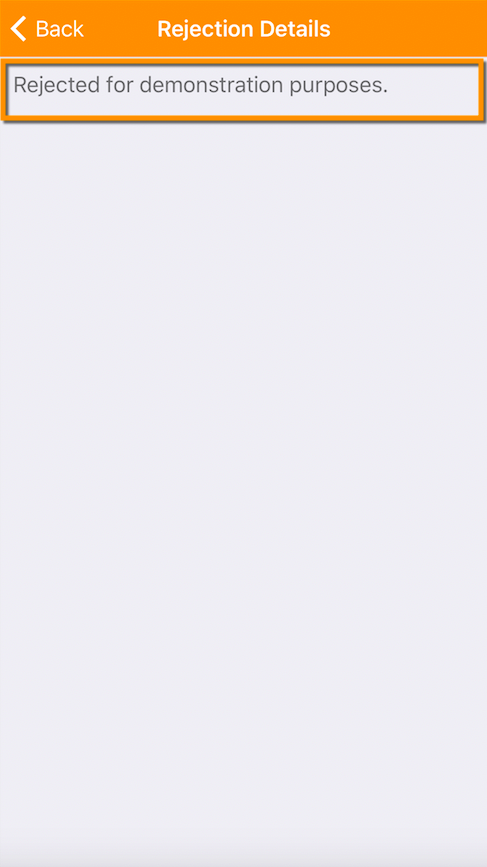
NOTE: Rejected submissions will not be made available within the TradesWallet and will have to be re-submitted for review.
When uploading images to your Self Service app, you are in complete control of how much information you share with the TradesWallet Community.
Public Cards: For cards or certifications that are required to be presented to a potential employer, you'll simply upload a 'Public Card'.
For more information on uploading a 'Public' card to your Wallet, click here.
Mask a Photo: If you deem the information contained within a relevant submission sensitive, or private, you may choose to 'Mask' those details during the submission process from your Self Service app (i.e. the address listed on your Government Issued ID).
For more information on redacting sensitive information on an image, click here.
Private Cards: You may wish to keep the card or certification completely 'Private' - visible only to you. A card that is marked 'Private' within a Wallet is not shared with the TradesWallet Community unless expressly directed by you.
NOTE: You must be signed into the Self Service application using your 'Verified Email Address' in order to upload a 'Private' card.
For more information about how to 'Verify Your Email Address', click here.
From the Home Page of your Self Service app, select the 'Submissions' button:
You will arrive on the 'Submissions' page. From here, you can review the status of any previous submissions, or select the (blue) 'New Submission' button to create a new entry:
You will arrive at 'Step 1: Submission Type':
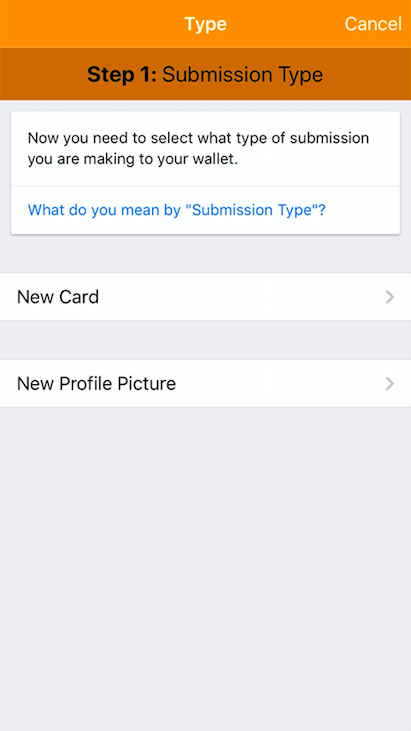
From the Self Service app, you have the option submit pictures of the cards or certifications you would like to see added to your wallet, OR, you can instead update the existing profile picture associated to your Self Service profile.
For more information about adding a new 'Profile Picture' to your Wallet profile, click here.

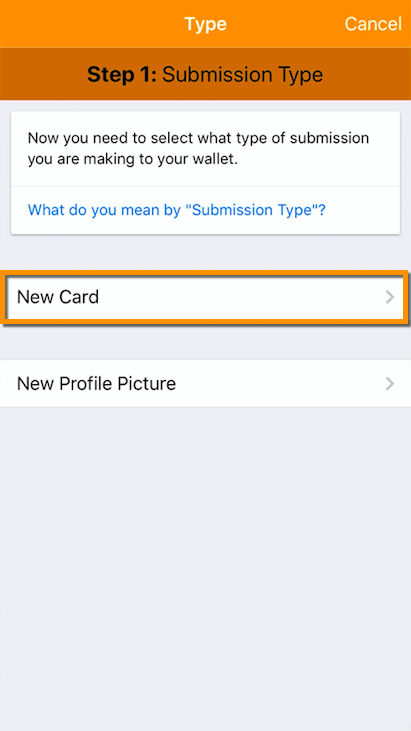
Select the option to add a 'New Card':
You will arrive at 'Step 2: Privacy Level':
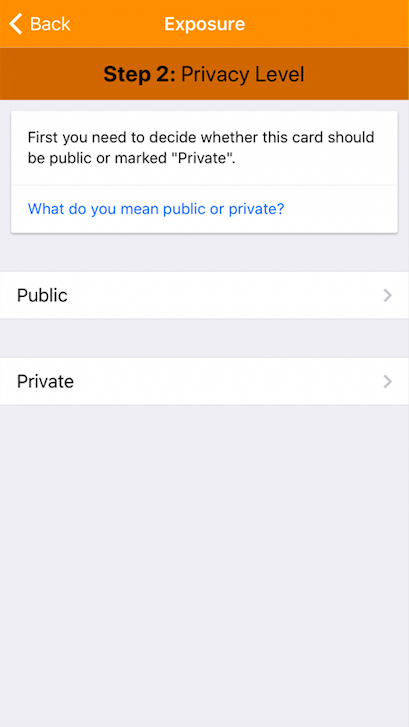
Public cards will be displayed within your TradesWallet profile to the administrators who own or manage your TradesWallet, and to any employers who scan your unique QR Code on a job site.

NOTE: If you have not signed in to the Self Service app using your 'Verified Email Address', the option for a 'Private' submission will be disabled:
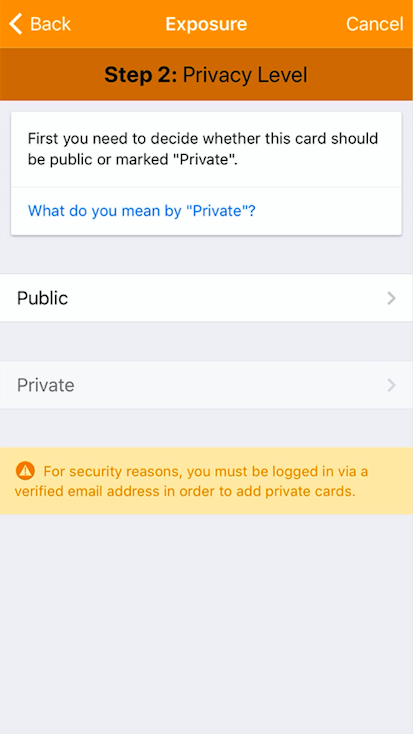
For more information about signing in via your 'Verified' email address, click here.
Select the option for 'Private':
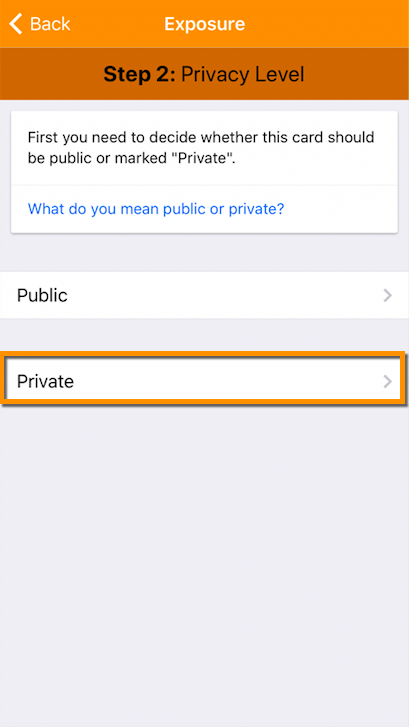
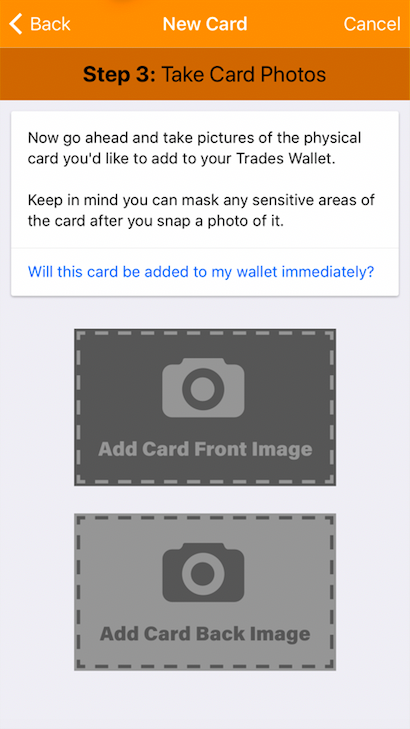
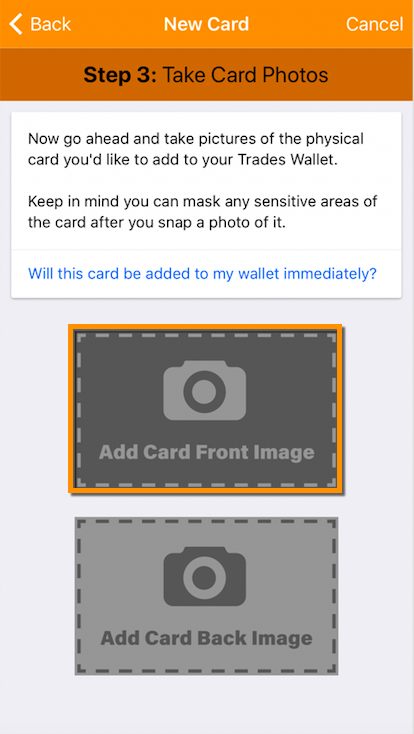
You will arrive at 'Step 3: Take Card Photos':
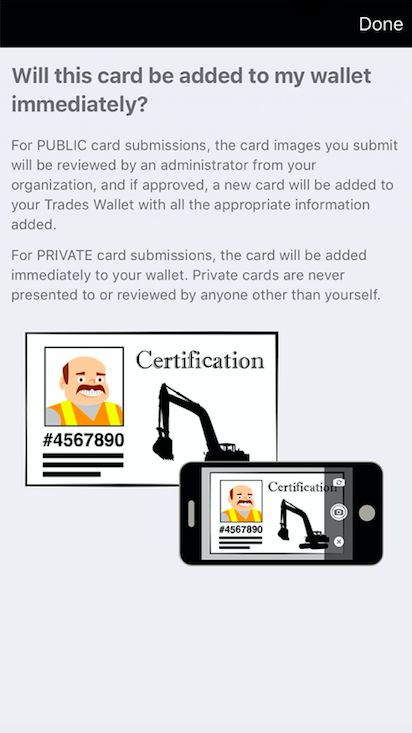
Public Cards - No. The images associated with the 'Public' card entry are first submitted to an administrator, assigned by the Union or organization who owns your TradesWallet, to review and approve their origin and authenticity.
For more information on checking the status of your 'Submissions', click here.
Private Cards - Yes. 'Private' card submissions will never be presented nor reviewed by anyone other than yourself.
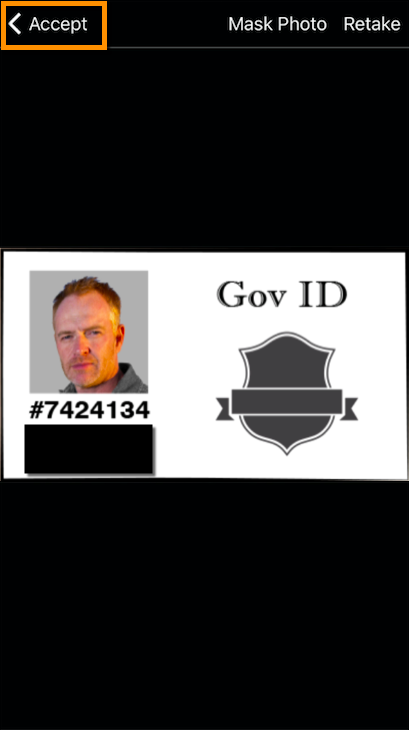
Next, tap on the 'Add Card Front Image' button to launch the camera and take a picture of the physical card this entry will be based on:
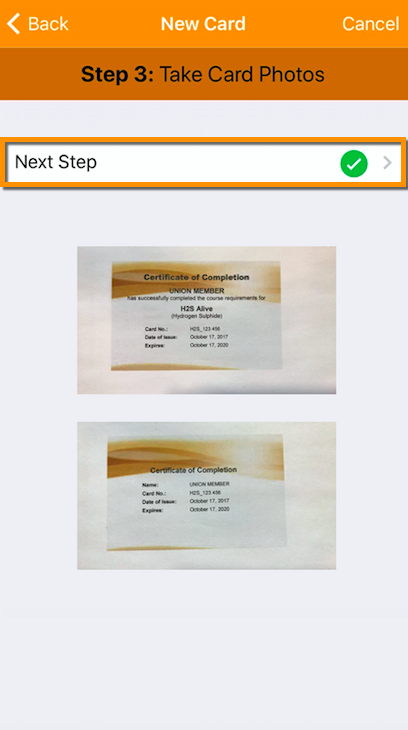
If you are happy with the image, select the 'Accept' button OR select 'Retake' to launch the camera and take a new picture.
Alternatively, should you wish to redact (or mask) a portion of the 'Card' for privacy, select the 'Mask Photo' option.
For more information on how to 'Mask' a photo, click here.

NOTE: Repeat the steps above to 'Add Card Back Image' if needed.
Once your images have been uploaded successfully, select the 'Next Step' navigator:
You will arrive at 'Step 4: Issued Date':
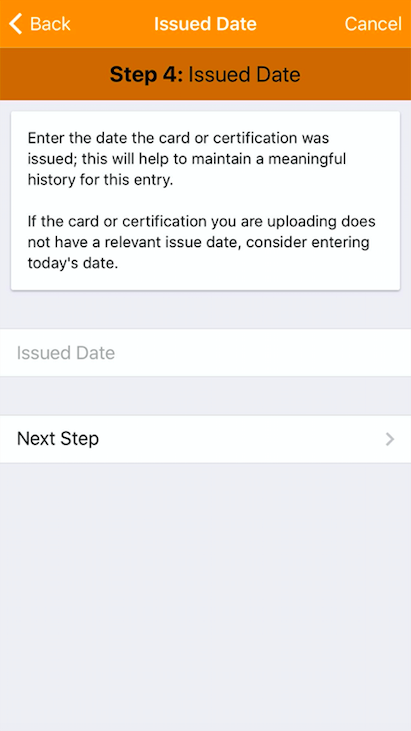
NOTE: If the entry you are uploading does not have a relevant 'Issue Date', consider entering today's date.
To enter an 'Issued Date' tap within the field and utilize the 'Calendar Control' to select the relevant date:
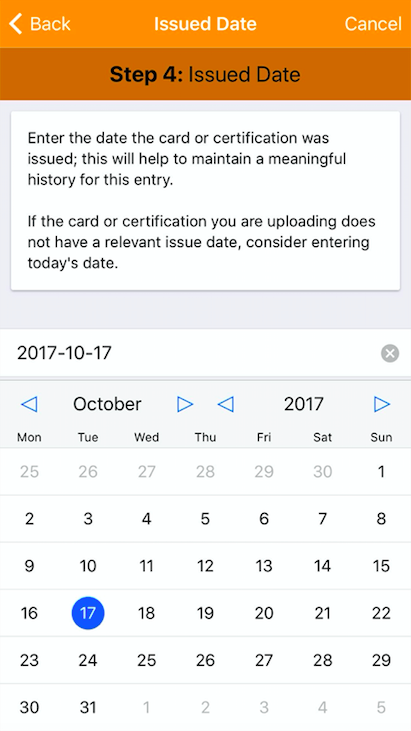
Tap the 'Next Step' navigator:
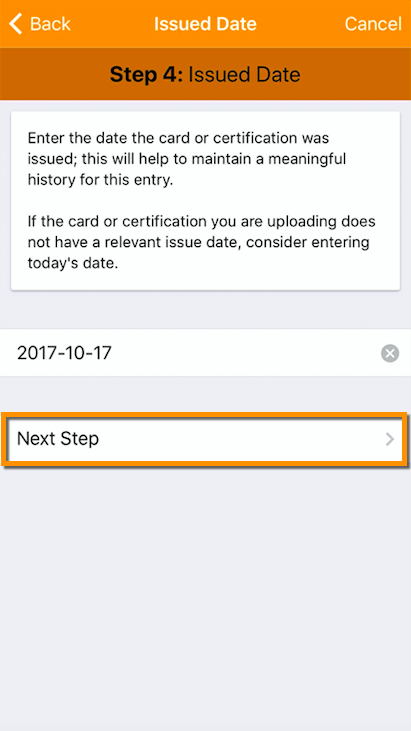
You will arrive at 'Step 5: Expiry Date':
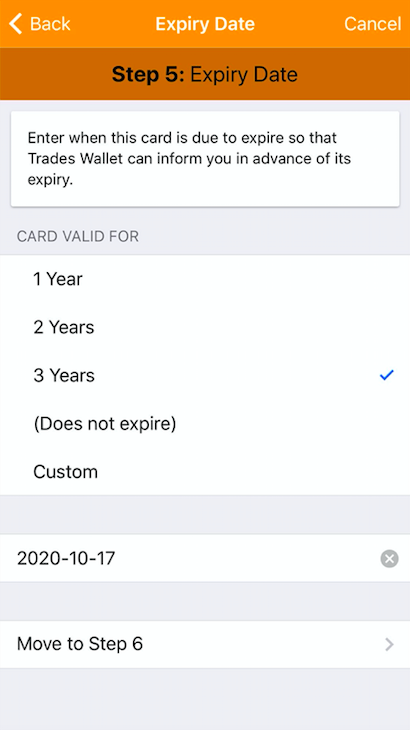
Select one of the pre-populated options (1 year, 2 years, 3 Years or Does Not Expire):

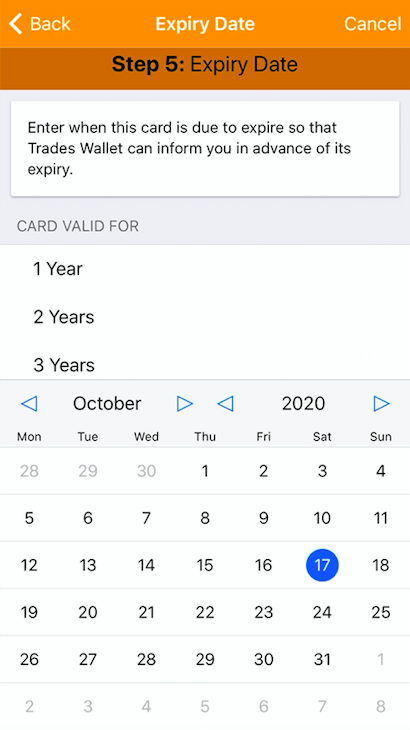
OR, you can instead Use the 'Calendar Control' to select a 'Custom Expiry Date':
Tap the 'Next Step' navigator:
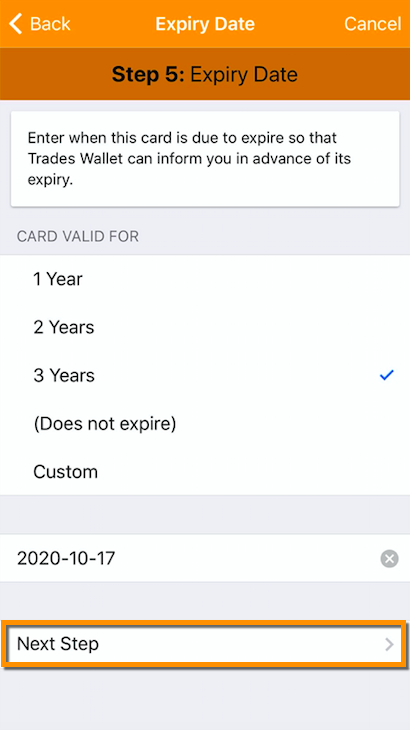
You will arrive at 'Step 6: Enter Title':
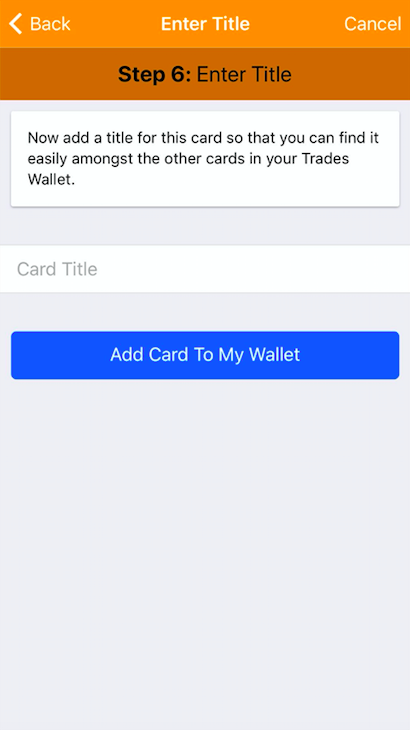
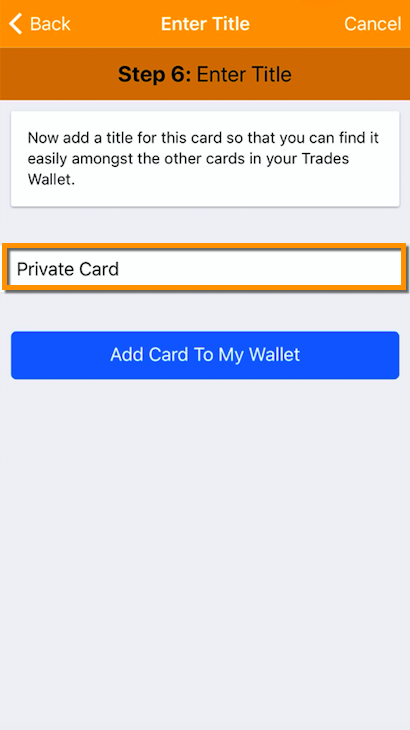
Enter the 'Card Title' within the field provided:
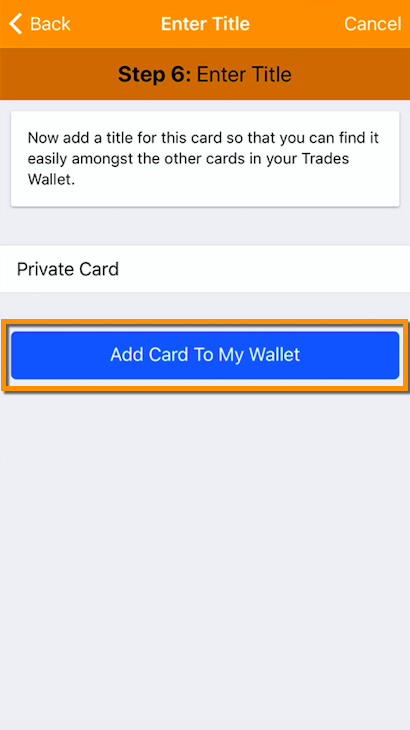
Once you're done, select the (blue) 'Add to my Wallet' button:
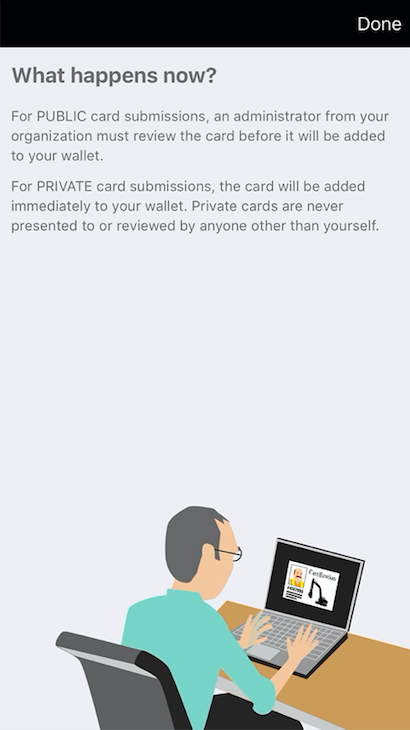
Public Cards - The images associated with the 'Public' card entry are submitted to an administrator, assigned by the Union or organization who owns your TradesWallet, to review prior to being added to your TradesWallet.
For more information on checking the status of your 'Submissions', click here.
Private Cards - Your 'Private' card submission will be immediately available within your TradesWallet.
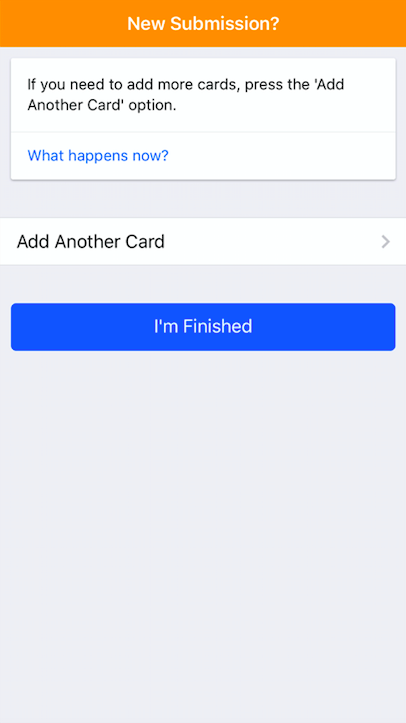
You can continue to 'Add New Cards' or return to the main menu by selecting the (blue) 'I'm Finished' button.
If you have an existing card within your Wallet that you would like to make 'Private', you can edit this from the 'Card Details'.
For more information on how to mark an existing card 'Private', click here.
A card that is marked 'Private' within a Wallet is not shared with the TradesWallet Community unless expressly directed by you. To share one of these credentials, you will be required to display the relevant Card entry directly from the 'Cards' tab of your Self Service App:
When uploading images to your Self Service app, you are in complete control of how much information you share with the TradesWallet Community.
Public Cards: For cards or certifications that are required to be presented to a potential employer, you'll simply upload a 'Public Card'.
For more information on uploading a 'Public' card to your Wallet, click here.
Mask a Photo: If you deem the information contained within a relevant submission sensitive, or private, you may choose to 'Mask' those details during the submission process from your Self Service app (i.e. the address listed on your Government Issued ID).
For more information on redacting sensitive information on an image, click here.
Private Cards: Alternatively, you may wish to keep the card or certification completely 'Private' - visible only to you. A card that is marked 'Private' within a Wallet is not shared with the TradesWallet Community unless expressly directed by you.
For more information on uploading a 'Private' card to your TradesWallet, click here.
From the Home Page of your Self Service app, select the 'Submissions' button:
From the 'Submissions' page, select the (blue) 'New Submission' button:
From the Self Service app, you have the option submit pictures of the cards or certifications you would like to see added to your wallet, OR, you can instead update the existing profile picture associated to your Self Service profile.
For more information about adding a new 'Profile Picture' to your Wallet profile, click here.
Select the option to add a 'New Card'.
You will be presented with the option to create either a 'Public' or a 'Private' card by selecting either of the option buttons:
NOTE: If you do not yet have a 'Verified' Email address associated to your TradesWallet profile, you will not be permitted to upload a 'Private' card.
For more information on how to 'Verify Your Email Address', click here.
Public cards will be displayed within your TradesWallet profile to the administrators who own or manage your TradesWallet, and to any employers who scan your unique QR Code on a job site.
If you want to add cards to your Wallet that are NOT visible to anyone other than yourself, you can instead create a 'Private' card.
For more information on creating a 'Private' card, click here.
Select the option for 'Public':
Next, you'll tap the 'Add Card Front Image' button to launch the camera and take a picture of the physical card this entry will be based on:
If you are happy with the image, select the 'Accept' button or select 'Retake' to launch the camera and take a new picture.
Alternatively, should you wish to redact (or mask) a portion of the 'Card' for privacy, select the 'Mask Photo' option.
For more information on how to 'Mask' a photo, click here.
NOTE: Repeat the steps above to 'Add Card Back Image' if required.
Public Cards - No. The images associated with the 'Public' card entry are first submitted to an administrator, assigned by the Union or organization who owns your TradesWallet, to review and approve their origin and authenticity.
For more information on checking the status of your 'Submissions', click here.
Private Cards - Yes. 'Private' card submissions will never be presented nor reviewed by anyone other than yourself.
Once your images have been uploaded successfully, select the 'Next Step' navigator:
Next, you'll have the option to enter the 'Issued Date' relevant to the card or certification you are creating an entry for. Alternatively, you can bypass this page by selecting the 'Skip' link.
To enter an 'Issued Date' tap within the field and utilize the 'Calendar Control' to select the relevant date:
Tap the 'Next Step' navigator:
Next, you'll have the option to enter the 'Valid For' relevant to the card or certification you are creating an entry for.
Select one of the pre-populated options (1 year, 2 years, 3 Years or Does Not Expire):
OR, you can instead Use the 'Calendar Control' to select a 'Custom Expiry Date':
Once you're done, select the (blue) 'Submit for Review' button:
Public Cards - The images associated with the 'Public' card entry are submitted to an administrator, assigned by the Union or organization who owns your TradesWallet, to review prior to being added to your TradesWallet.
For more information on checking the status of your 'Submissions', click here.
Private Cards - Your 'Private' card submission will be immediately available within your TradesWallet.
You can continue to 'Add New Cards' or return to the main menu by selecting the (blue) 'I'm Finished' button:
Prior to any new submissions being added to your TradesWallet, they are first submitted to an Administrator, assigned by the Union or organization who owns your TradesWallet, to review and approve their origin and authenticity.
For more information on how you can check the status of a 'Submission', click here.
This section details the functionality within the Self Service app for managing the cards and credentials within your TradesWallet.
If your organization provides in-house training, or has recommended training providers linked through TradesWallet, they can assign 'Classes' that will be presented to you via email and your Self Service profile.
These 'Classes' can be used to fulfill a 'Training Request' assigned by your TradesWallet provider OR may be used to renew an expiring or expired credential within your Wallet.
TradesWallet facilitates the presentation of both 'physical' and 'online' classes relevant to the 'Courses' on offer by your organization.
Online classes do not require a Wallet holder to be physically present within a classroom or training facility. Training can be completed via a Learning Management System (LMS) online using a desktop or mobile device.
Online classes are available 24/7.
Physical classes do require a Wallet holder to complete the required practical and/or theory requirements within a classroom or training facility.
Scheduled Class dates / times will be listed for the Wallet holder to select from.
For more information on available classes relevant to a 'Training Request(s)', click here.
For more information on renewing your cards and credentials, click here.
If you have a Card or certification within your Wallet that is approaching the end of its validity term, you can review any upcoming classes for a Course on offer, or recommended, by your organization that upon the successful completion would result in the recertification of your credentials.
TradesWallet tracks each card entry within a Wallet by its 'Issued' and 'Expires' dates and will alert the Wallet holder 60-days in advance of a card entry reaching the end of its validity term. This is true for both 'Public' and 'Private' card entries.
In order to receive email notifications will require that you have a valid email address associated to your Wallet profile.
For more information about how to add an email via the Self Service app, click here.
TradesWallet utilizes 'Push Notifications' to enable alerts to your mobile device when you are not actively using the app. When setting up your TradesWallet Self Service profile for the first time, you will be asked to allow TradesWallet to send 'Push Notifications' to your phone or mobile device.
Within the app, you will be presented with warning notifications on your Home Page directing you to your 'Cards' tab.
For more information about Card Notifications, click here.
If your organization provides in-house training, or if they have recommended training providers linked through TradesWallet, a Wallet holder can view any upcoming classes for the relevant course directly from their email OR their Self Service app.
If you have expiring or expired cards within your Wallet, you will receive an email containing the 'Title' of the credential and the date it is set to expire.
If your organization provides in-house training, has preferred or recommended training providers linked via TradesWallet, you may also be presented with upcoming 'Classes' for a course that, upon successful completion, would result in the recertification of your credentials.
Select the relevant links to be directed to the 'Course' registration page.
From the Home Page of the TradesWallet Self Service app, select the 'Cards' tab:
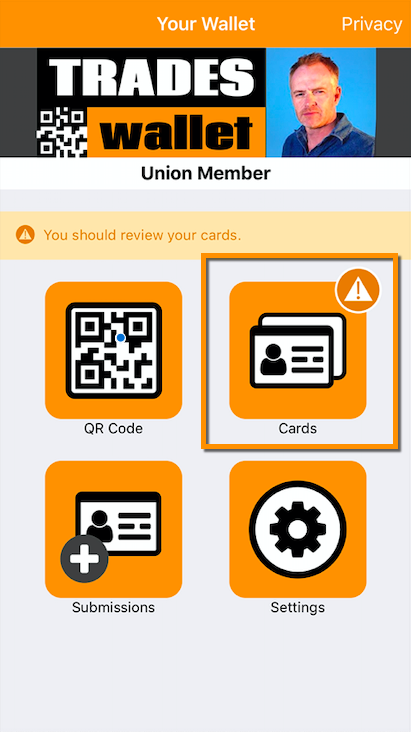
Here, you will be presented with a listing of Cards within your Wallet.
NOTE: If a Card within your Wallet is about to, or has already expired, the entry will be indicated with the relevant icon.
Select the relevant entry from the listing provided:
From here, you can review a listing of 'Classes' that have been scheduled for a relevant Course on offer, or recommended by, your organization:
Select a relevant date entry to view its details:

Tap the (blue) 'Sign Up' button to be directed to the external site that manages the Course:
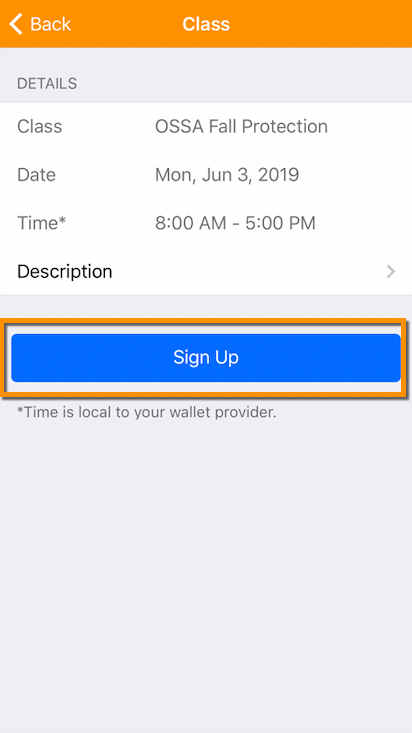
NOTE: If your organization has integrated with a third-party course management system, you can register for the Course without having to enter any additional information.
If you have a Card or certification within your Wallet that is approaching the end of its validity term you can review any upcoming classes for a Course on offer, or recommended, by your organization that upon the successful completion would result in the recertification of your credential.
If your organization provides in-house training, or if they have recommended training providers linked through TradesWallet, you can view and even sign up for upcoming classes directly from your TradesWallet profile.
TradesWallet tracks each card entry within a Wallet by its 'Issued' and 'Expires' dates and will alert the Wallet holder 60-days in advance of a Card entry reaching the end of its validity term. This is true for both 'Public' and 'Private' card entries.
Via Self Service App - If using the TradesWallet Self Service app, you will receive notifications to any mobile device to which you have the app downloaded. You can review a listing of upcoming classes from within the 'Card Details' page that upon successful completion will result in the recertification of your credential.
NOTE: You will be asked to allow 'Push' notifications during the setup of your TradesWallet Self Service profile.
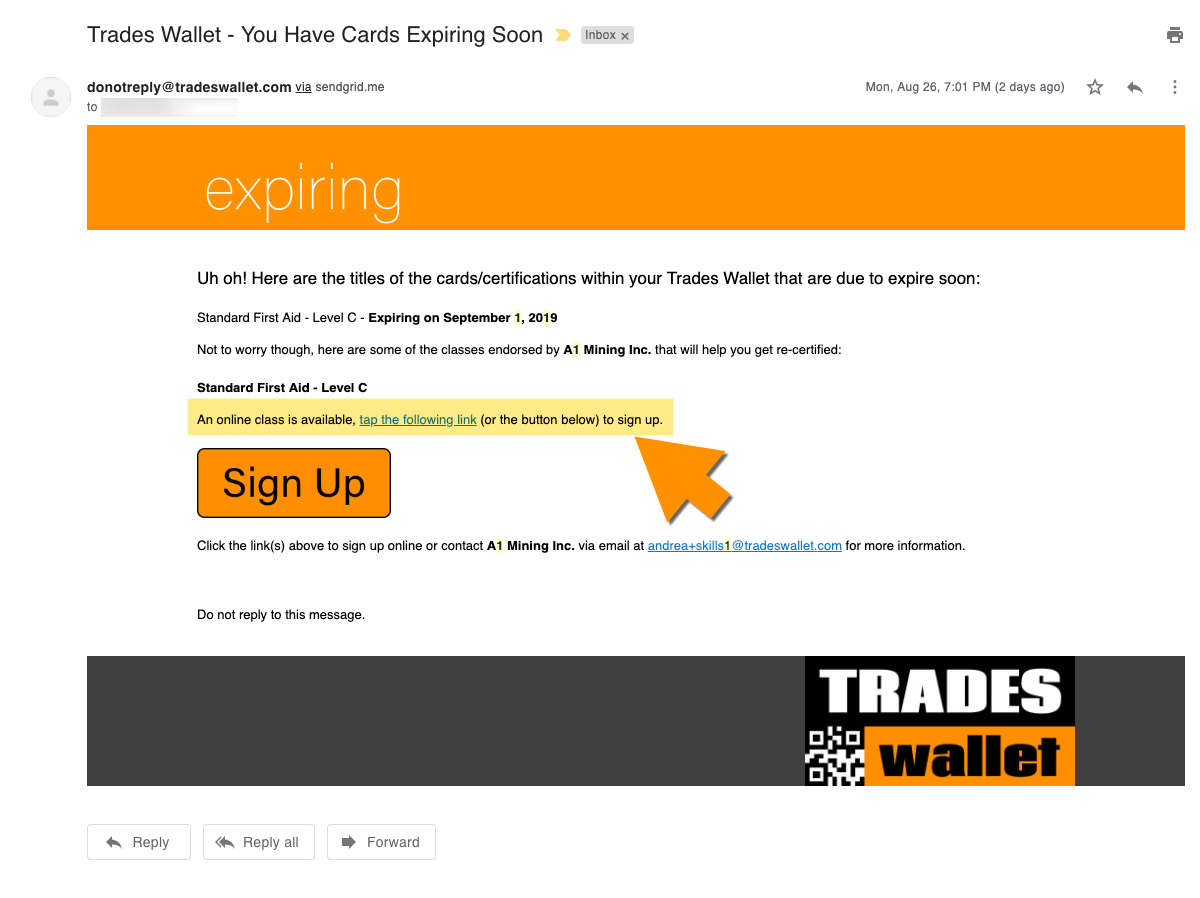
Via Email - If you have an Email Address associated to your TradesWallet profile you will be notified via email. You can select the relevant link associated to an available 'Class' that upon successful completion will result in the recertification of your credential.
For more information about 'Notifications', click here.
If your organization provides in-house training, or if they have recommended training providers linked through TradesWallet, you can view any upcoming classes for any relevant 'Course(s)' via your TradesWallet Profile.
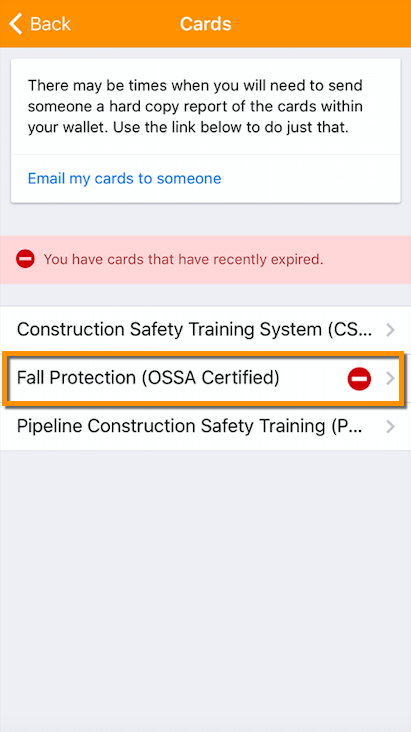
From the Home Page of the TradesWallet Self Service app, select the 'Cards' tab:

Here, you will be presented with a listing of Cards within your Wallet. Select the relevant entry from the listing provided within the 'Cards' section.

NOTE: 'Expired' and 'Expiring' cards are indicated with the appropriate icons.
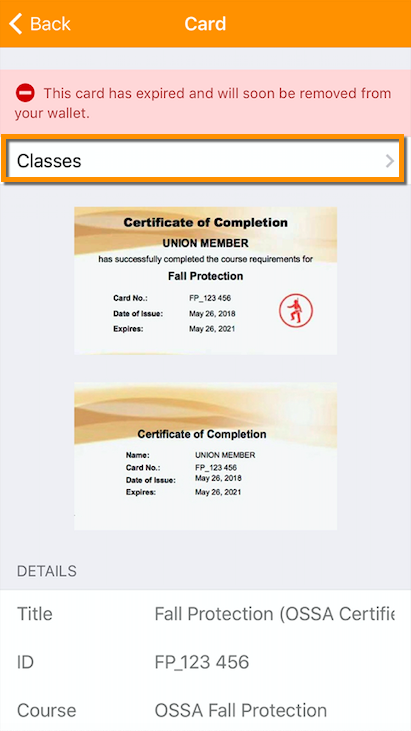
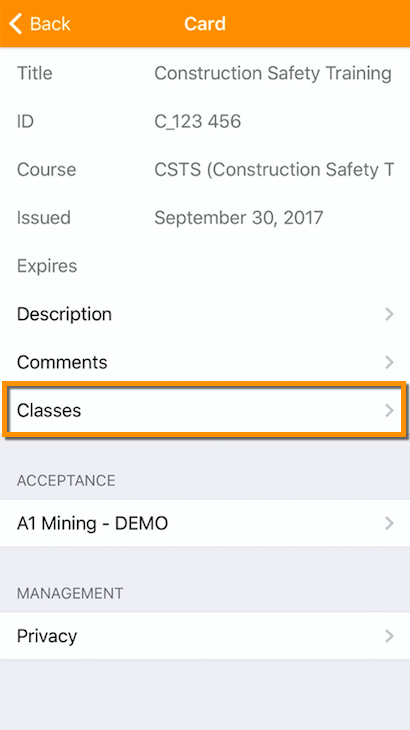
Select the 'Classes' navigator

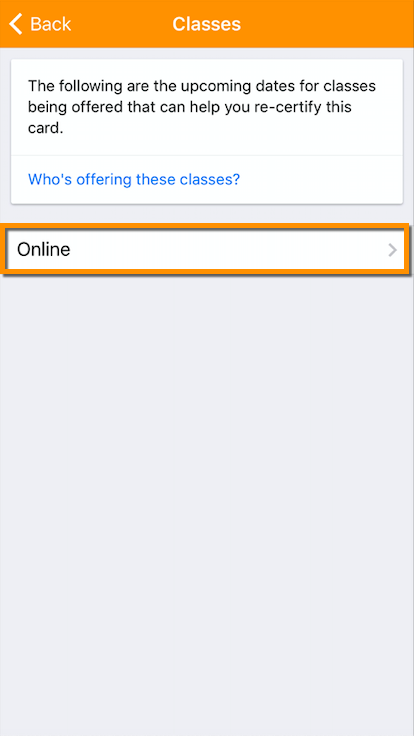
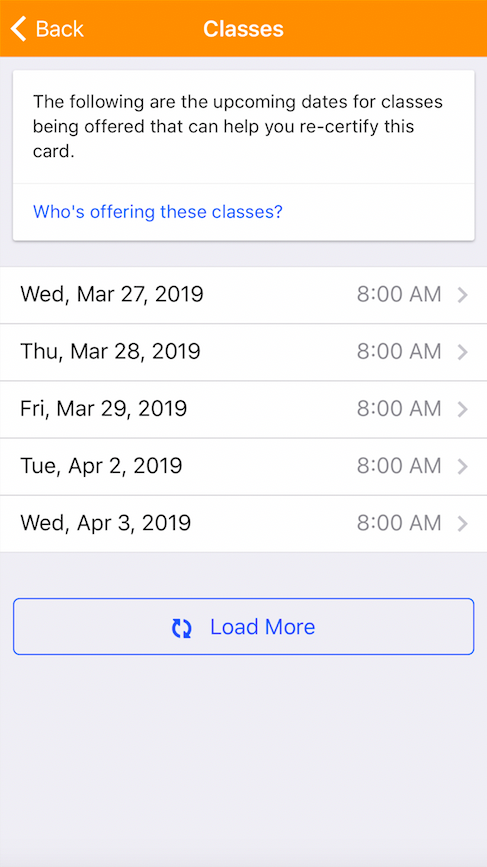
From here, you can review a listing of 'Classes' that have been scheduled for a relevant 'Course' on offer, or recommended by, your organization.
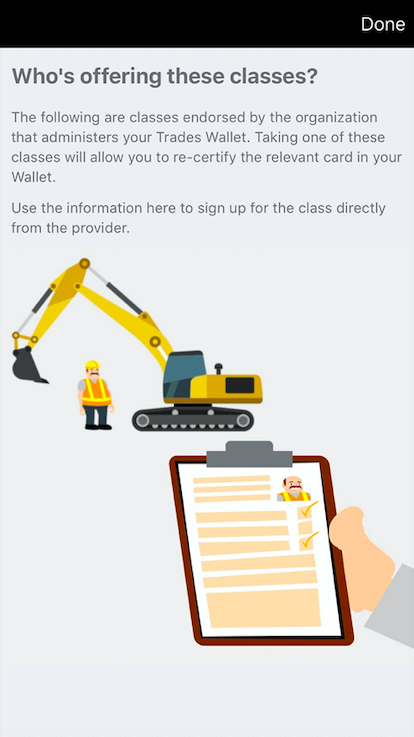
To learn more about who's offering the 'Classes', select the (blue) 'Who's offering these classes?' link.
TradesWallet facilitates the presentation of both 'physical' and 'online' classes relevant to the 'Courses' on offer by your organization.
Select the option entitled 'Online'.
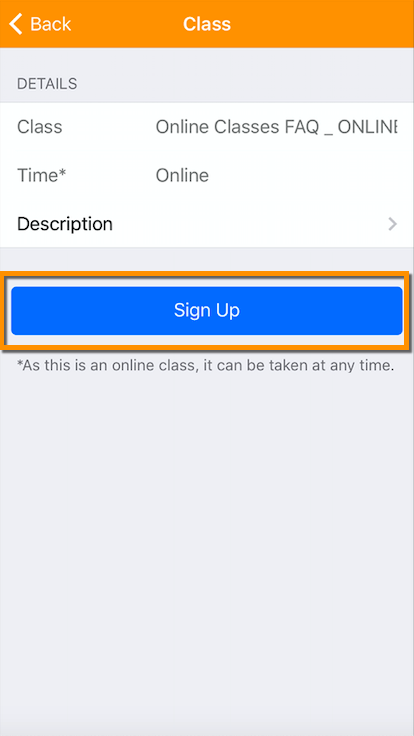
You can view the details of the 'Class' here:

Tap the (blue) 'Sign Up' button to be directed to the external site that manages the 'Course'.
If the 'Classes' on offer must be attended in person (not online) you will see a listing of available dates and times listed:
Select a relevant time/date from the listing provided:
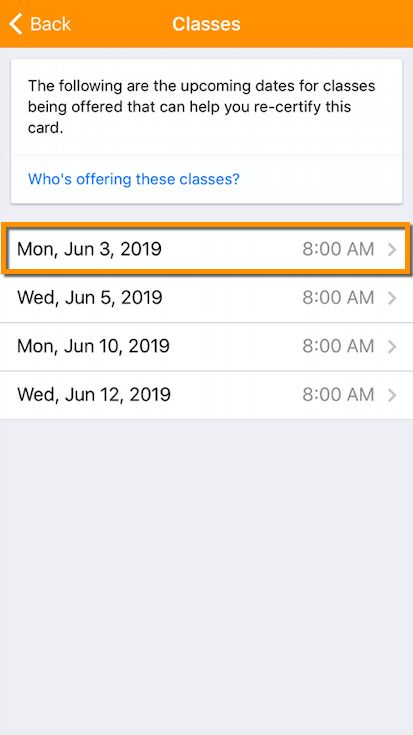
Again, you will note the details of the class listed in the top section. Tap the (blue) 'Sign Up' button to be directed to the external site that manages the 'Course'.

NOTE: If your organization has integrated with a third-party course management system, you can register for the 'Course' without having to enter any additional information.
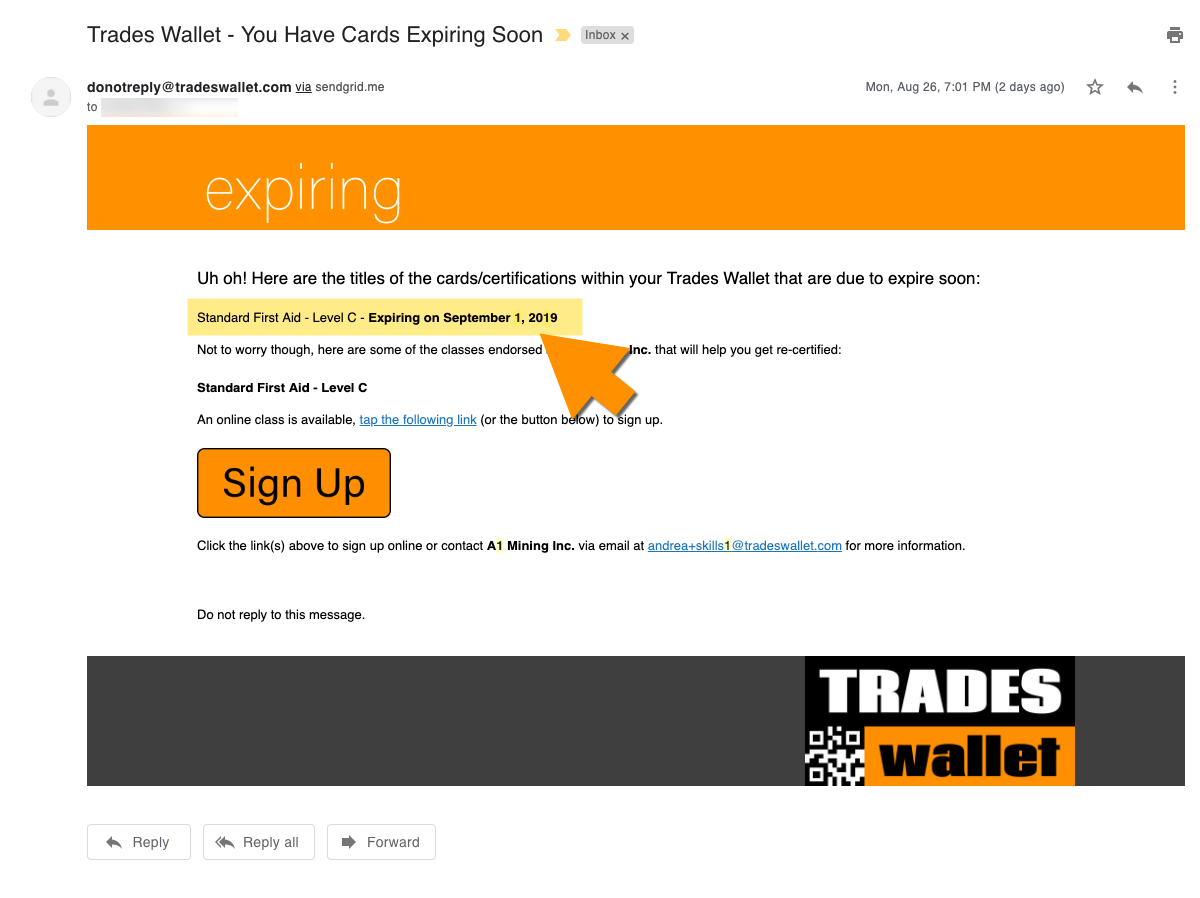
If you have associated your TradesWallet profile to an email address, TradesWallet will send you an email 60-days prior to let you know which Card(s) within your Wallet are about to expire.
Within the Email you should note instructional verbiage stating the title of the 'Card' within the Wallet that is due to expire, along with the relevant expiry date.
You will be provided with links relevant to available 'Classes' that upon the successful completion would result in the recertification of the credential.
When renewing your credentials, it is essential that your new 'Cards' are uploaded to your TradesWallet profile.
If your organization manages 'Course' offerings you may find that your successful 'Card' image is automatically uploaded into your TradesWallet profile. This necessitates that your organization has integrated with TradesWallet and utilizes the 'Class Completion' functionality.
Please contact your TradesWallet administrator to enquire whether your 'Course' credentials will be automatically added to your profile.
If your organization has integrated their Learning Management software with TradesWallet, or if you completed training via the TradesWallet Online store, your successful certificate may be automatically added to your Wallet profile by way of the 'Class Completion' process.
Alternatively, you have the option to submit images of your successful 'Card' or certification via the mobile Self Service app.
For more information about 'Card' submissions, click here.
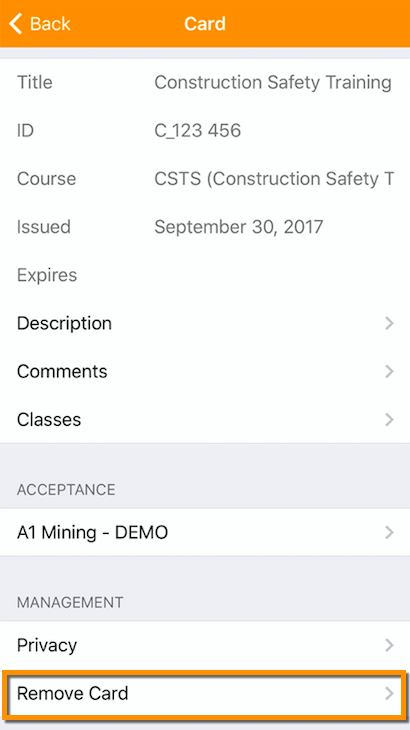
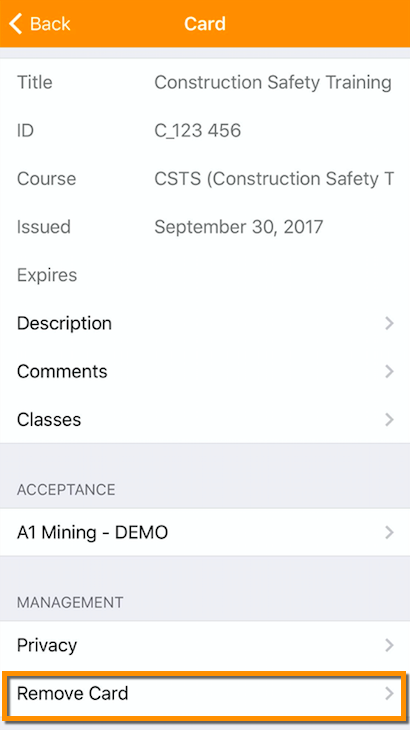
Should you wish to remove a 'Private' card from your Wallet, select the 'Remove Card' navigator:
You will arrive on the 'Confirmation' page:
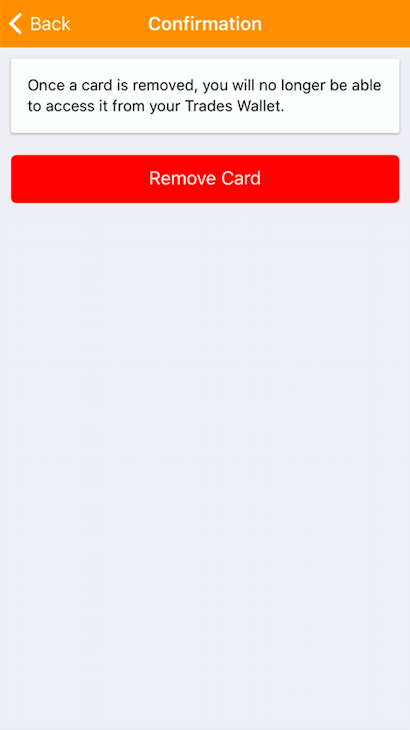
Selecting the (red) 'Remove Card' button will permanently delete the card from your Wallet:
NOTE: Public Cards cannot be removed from your Wallet via the Self Service application. Please contact your Union or organization administrator to request a public card be removed.
You are in complete control of how much information you share with the TradesWallet Community:
Public Cards: Cards or certifications that are required to be presented to a potential employer.
For more information on uploading a 'Public' card to your Wallet, click here.
Mask a Photo: If you deem the information contained on a relevant card sensitive, or private, you may choose to 'Mask' those details (i.e. the address listed on your Government Issued ID).
For more information on redacting sensitive information on an image, click here.
Private Cards: You may wish to keep a card or certification completely 'Private' - visible only to you. A card that is marked 'Private' within a Wallet is not shared with the TradesWallet Community unless expressly directed by you.
Below are the details of marking an existing card within the Wallet 'Private'.
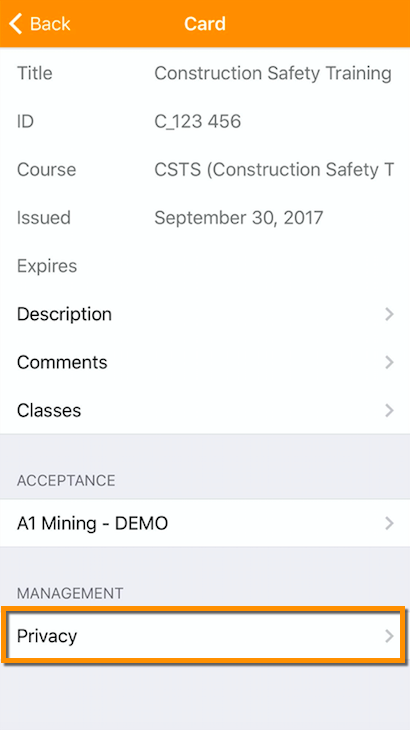
Select the 'Cards' tab from the Wallets main menu:
Select the relevant 'Card' you would like to make 'Private':
Within the 'Card Details', scroll to the 'Management' section of the Wallet and select the 'Privacy' navigation:
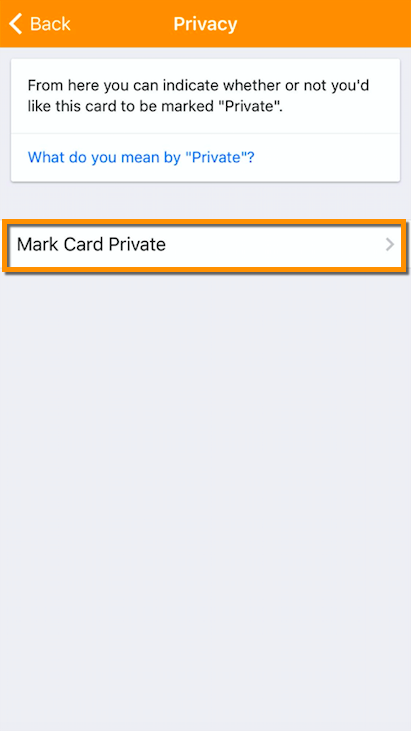
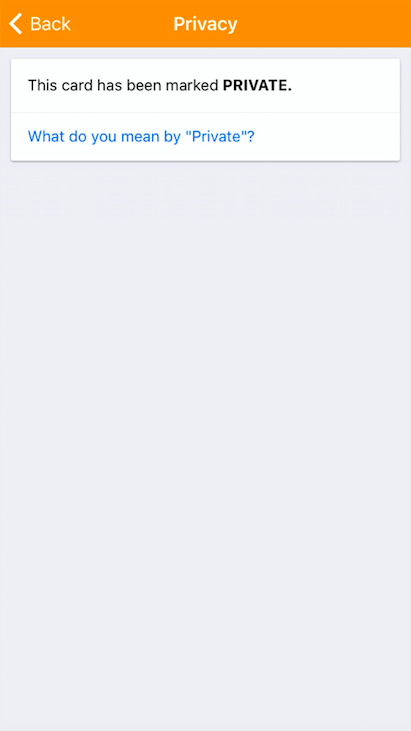
You will arrive on the 'Privacy' page. From here, you can indicate whether or not you would like this card to be marked 'Private':
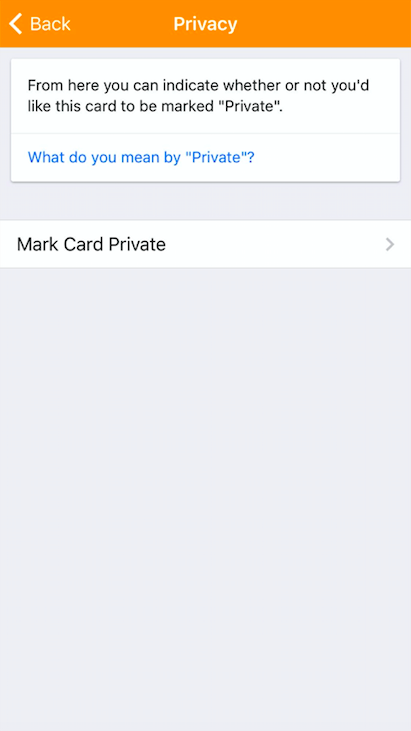
'Private' cards are visible only within your Self Service profile. They will not be shared with the Union or organization that own or manage your TradesWallet, nor any employers who scan your unique QR Code on a job site. 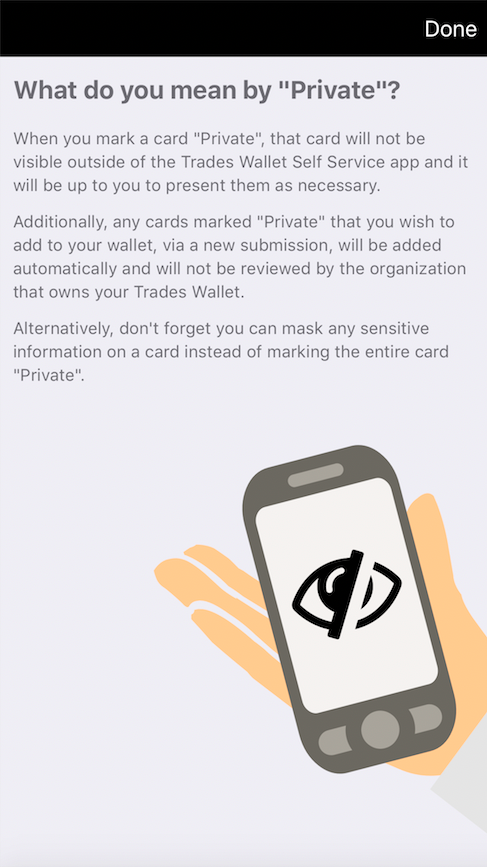
Select the 'Mark Card Private' navigator:
You arrive on the 'Confirmation' page:
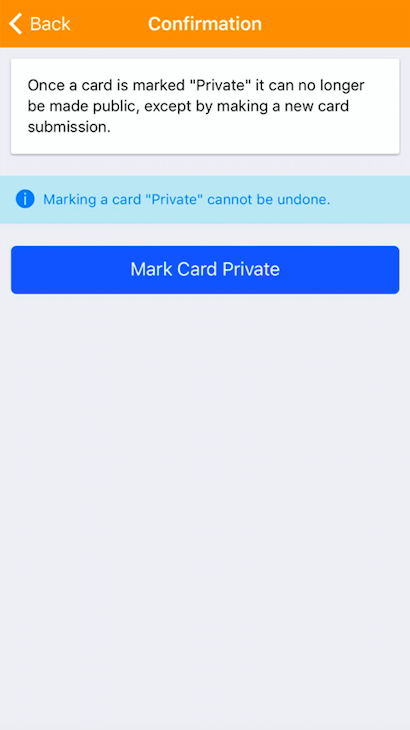
NOTE: Once a Card has been marked 'Private' it cannot be unmarked. To share a 'Private' card with the TradesWallet community will require the Card to be re-submitted as a 'Public' card.
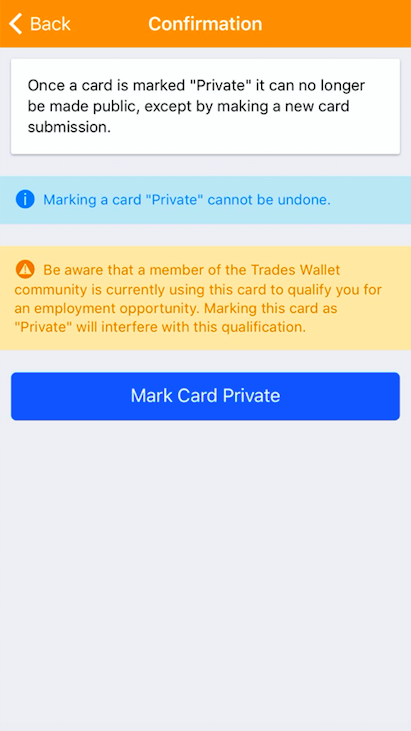
BE AWARE: If the existing card within your Wallet is being used by a member of the TradesWallet to qualify you for a potential employment opportunity, marking a card 'Private' could interfere with that qualification.
TradesWallet will advise as such and it will be up to you to decide whether to continue:
Select the (blue) 'Mark Card Private' button:
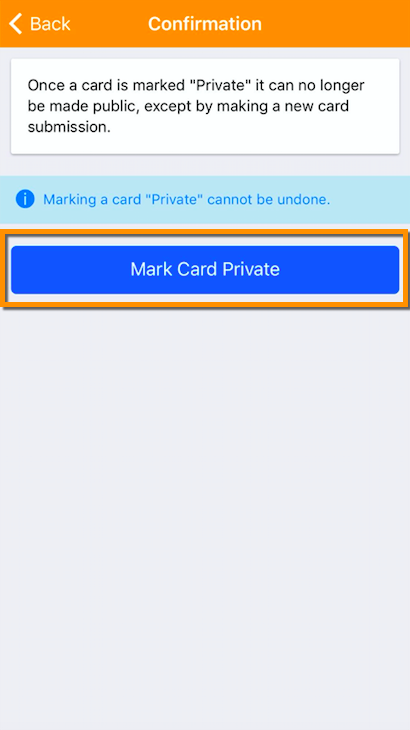
The card will now be marked 'Private':
Back within the main cards listing, it will appear within your listing of cards with the following icon:
Alternatively, you can add a new 'Private' card to your TradesWallet Profile via the Submission process.
For information on how to upload a new 'Private' card to your Wallet, click here.
When uploading images to your Self Service app, you are in complete control of how much information you share with the TradesWallet Community.
Public Cards: For cards or certifications that are required to be presented to a potential employer, you'll simply upload a 'Public Card'.
For more information on uploading a 'Public' card to your Wallet, click here.
Private Cards: You may wish to keep the card or certification completely 'Private' - visible only to you. A card that is marked 'Private' within a Wallet is not shared with the TradesWallet Community unless expressly directed by you.
For more information on uploading a 'Private' card to your TradesWallet, click here.
Mask a Photo: If you deem the information contained within a relevant submission sensitive, or private, you may choose to 'Mask' these details (i.e. the address listed on your Government Issued ID).
You are NOT permitted to edit any portion of your submitted 'Profile Picture' as this will be presented to potential employers, however, masking relevant details of your Government ID and any submitted Card images is permitted.
When deciding to 'Mask' or hide relevant portions of your submitted images remember:
There are (2) ways to 'Mask' an image within the Self Service profile:
When uploading a new submission via the Self Service application you will utilize the camera to take a picture of your Government ID (for initial Profile Submissions) or of the physical card or certification the new card entry is based on.
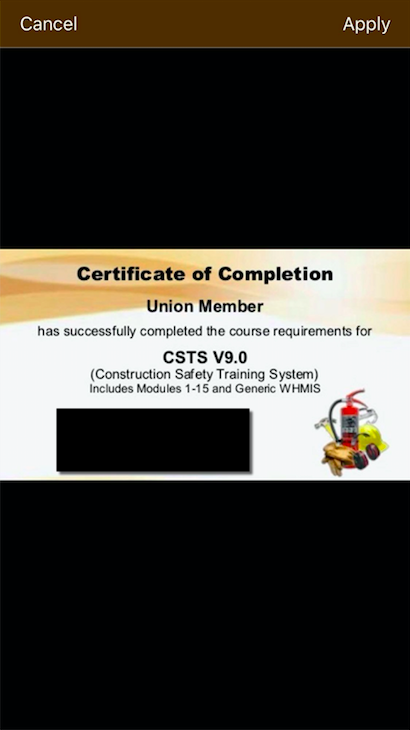
Upon taking a picture, you can review, edit, and then either approve or reject the image prior to submission:
To hide a section of the image, select the 'Mask Photo' button:
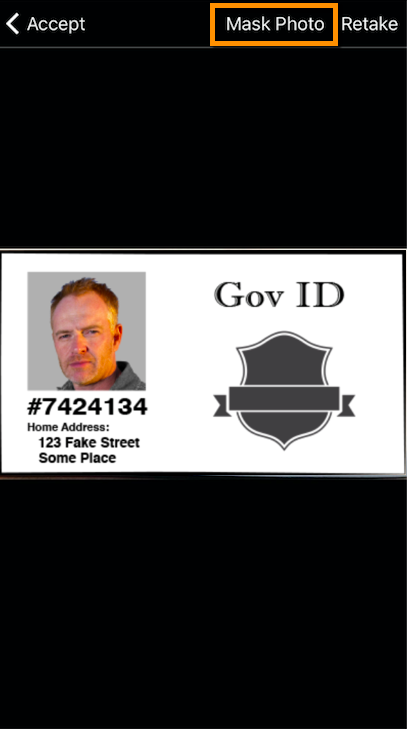
You will be brought to the 'Photo View' window where you can 'Mask' the photo as necessary.
NOTE: Details of how to use the 'Mask' editor are outlined below.
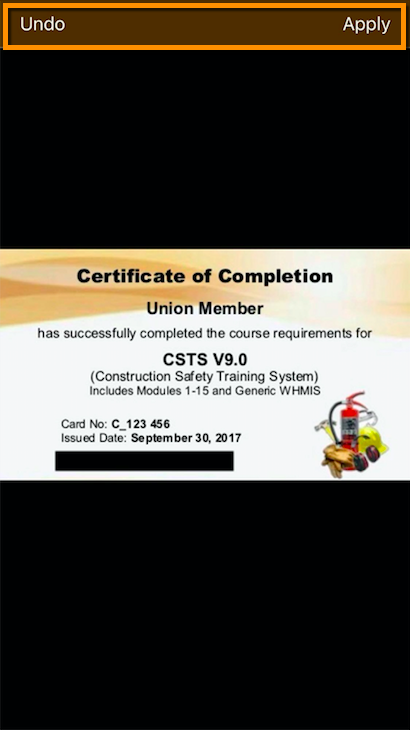
You can 'Cancel' at any time, or select the 'Apply' to save the edits to the image:
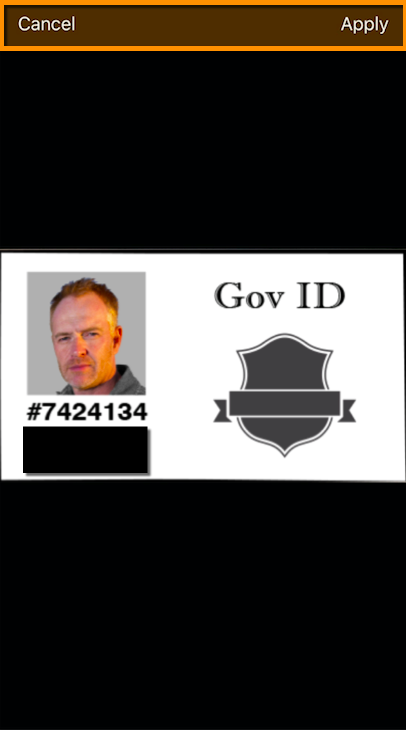
When you have finished redacting the image, select the 'Accept' button:
Continue to process the rest of your submission.
Alternatively, you may wish to 'Mask' an image previously existing within your TradesWallet.
NOTE: In order to 'Mask' an existing image within your TradesWallet you must be signed in using your 'Verified' credentials. For more information on how 'sign in' using your your email address, click here.
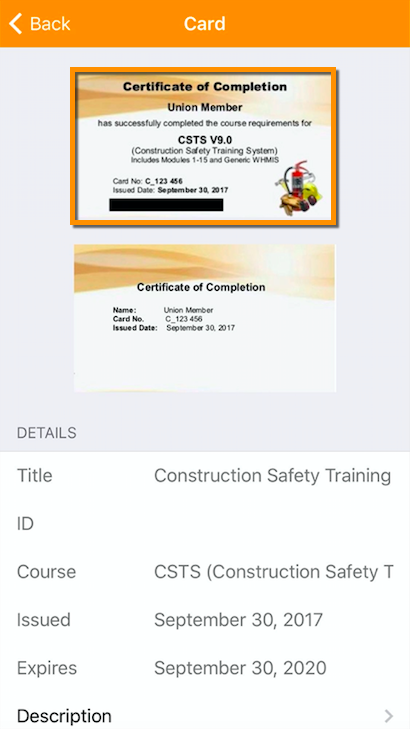
Navigate to the 'Cards' tab of your Wallet and select the relevant 'Card' entry to view the details:
Within the 'Card' details, you will find the images that have been associated to this card, followed by the relevant details entered against the 'Card':

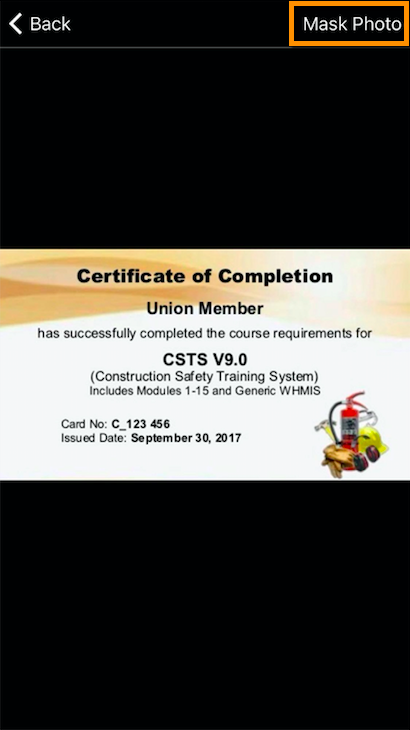
Tap on the image you would like to 'Mask'. The image will be presented within a viewer where you can select the 'Mask Photo' button:
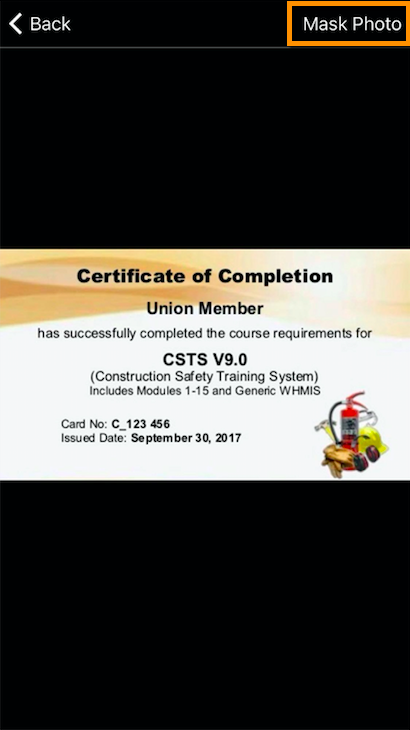
You will be brought to the 'Photo View' window where you can 'Mask' the photo as necessary.
NOTE: Details of how to use the 'Mask' editor are outlined below.

When you're happy with the image, select the 'Apply' button OR you can choose to 'Cancel':
Select the 'Back' button to return to the 'Card' details page:
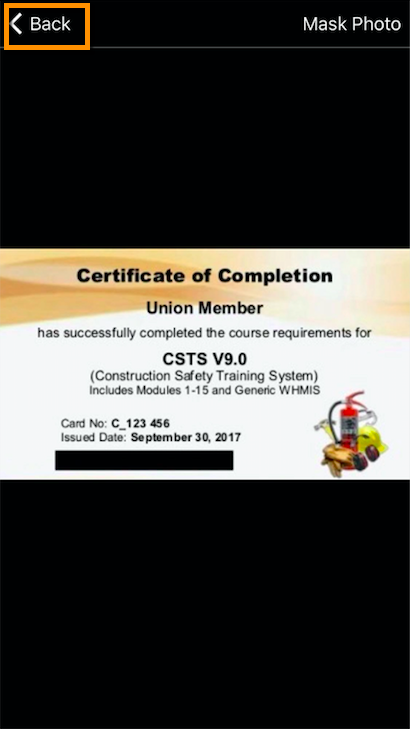
You should now note the 'Card' image is save with the updated 'Masking' applied:
Whether uploading a new image OR selecting an existing image from your TradesWallet, you will be presented with the following 'Image View'.
Select the 'Mask Photo' button to begin the process of redacting your image:
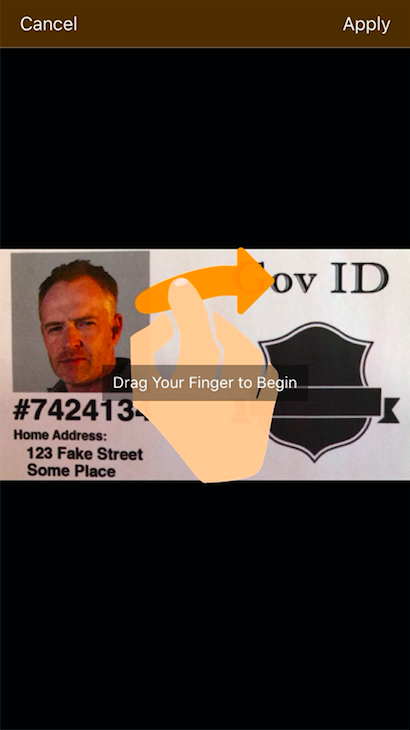
If this is the FIRST time you are masking an image, you will be presented with the following instructional overlay:
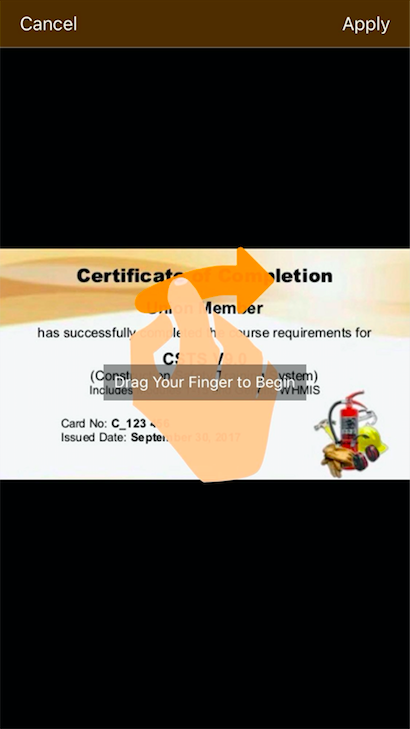
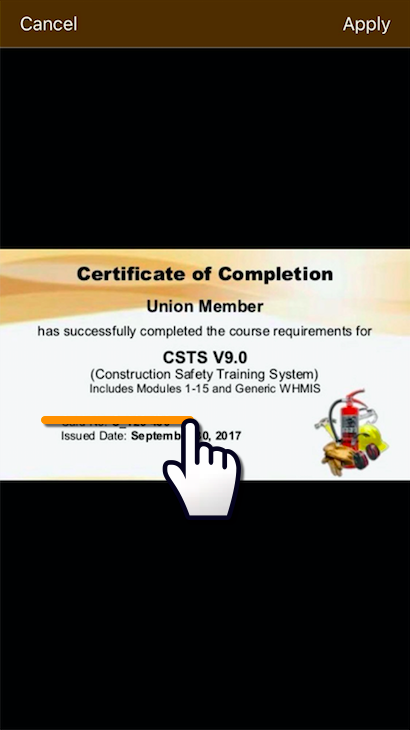
To 'Mask' sensitive areas of your photo you will simply use your finger to draw directly on the image on your screen. TradesWallet will redact the area around the line you have drawn. For example:
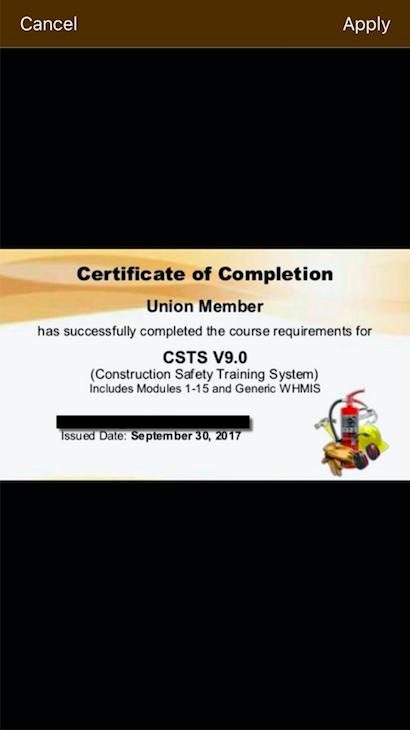
Drawing a straight horizontal or vertical line will result in the following masking to be applied:
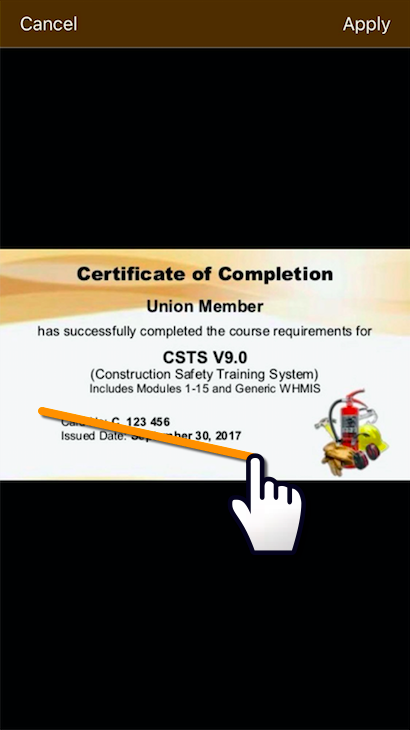
Drawing a diagonal line will result in the following masking to be applied:
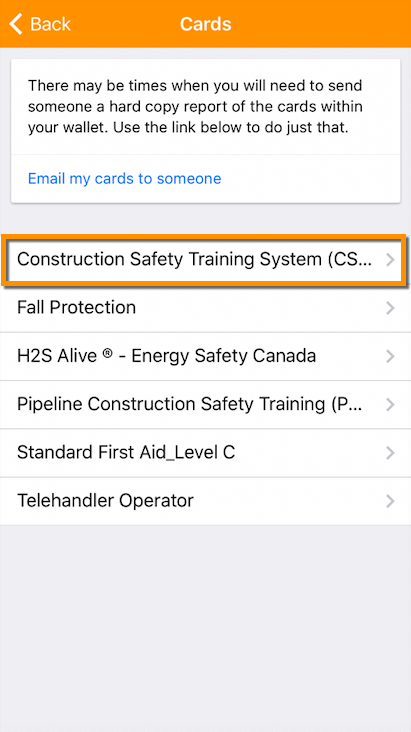
Should you wish to share the contents of your TradesWallet with a potential employer, or another interested party, you can send a summary report containing the images associated to each Card entry via email, directly from within your Self Service app:
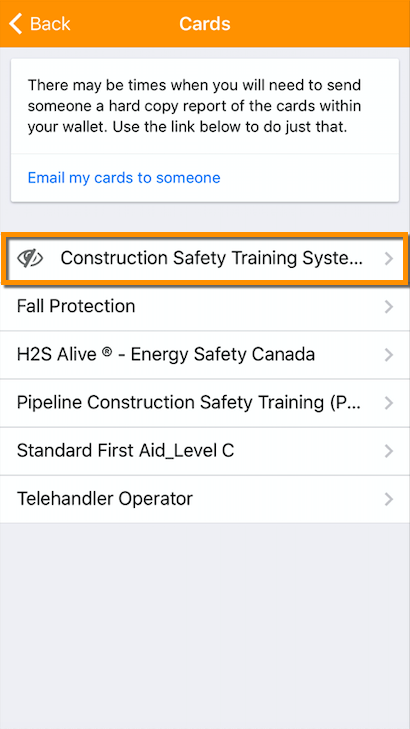
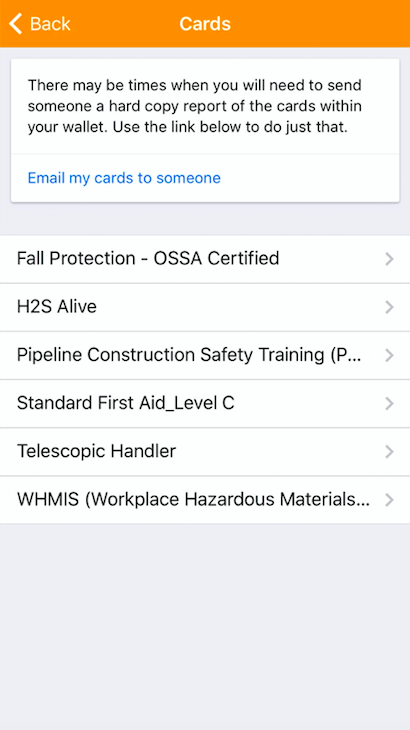
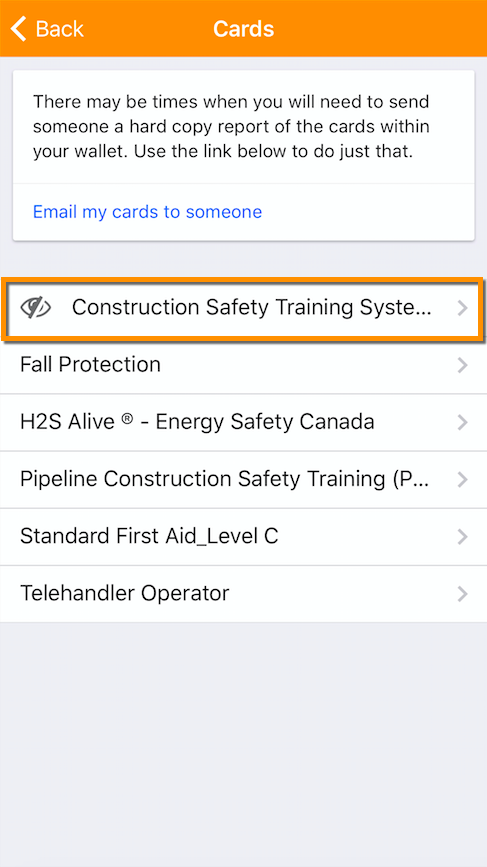
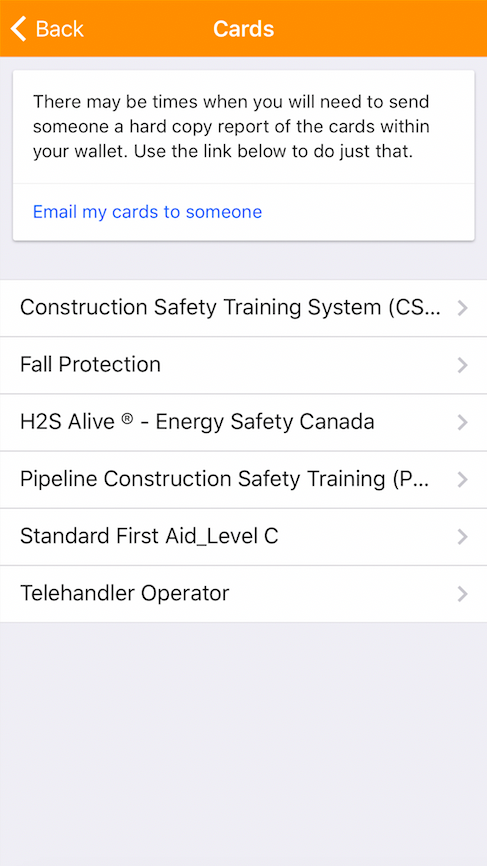
Select the 'Cards' tab from your Wallet Home Page:

On the 'Cards' tab, you will be presented with a complete listing of cards and credentials associated to your TradesWallet profile.
NOTE: 'Private' cards will be indicated with the following icon:
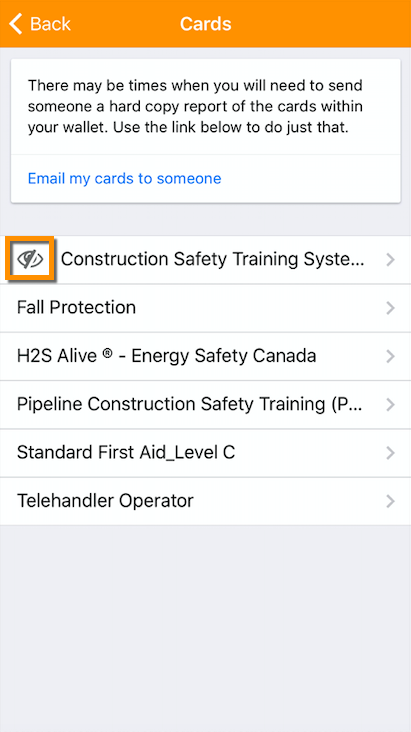
Here, you also have the option to Email a pdf summary report of your cards to a potential employer, or otherwise interested party.
Select the 'Email my cards to someone' link:
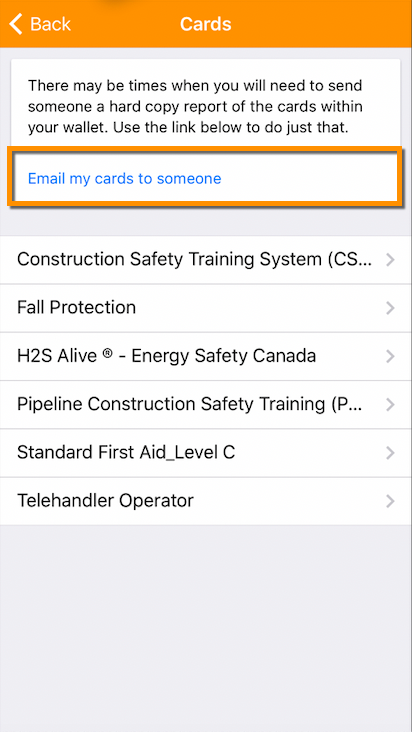
Input the 'Email Address' of the intended recipient into the field provided:
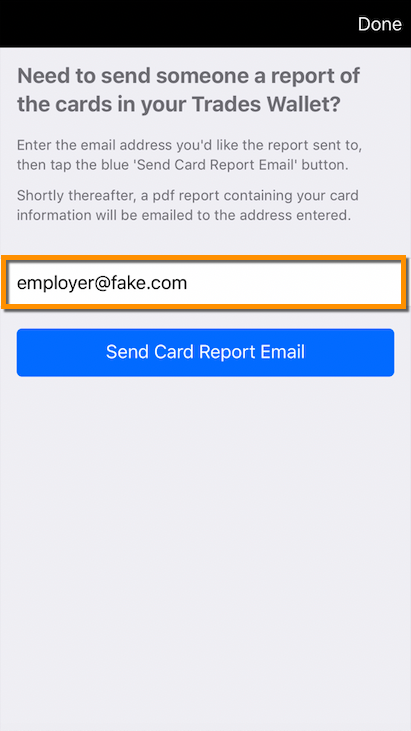
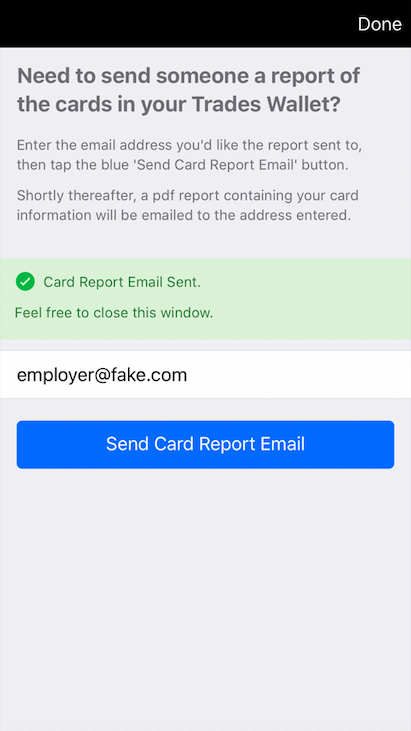
Select the (blue) 'Send Card Report Email' button:
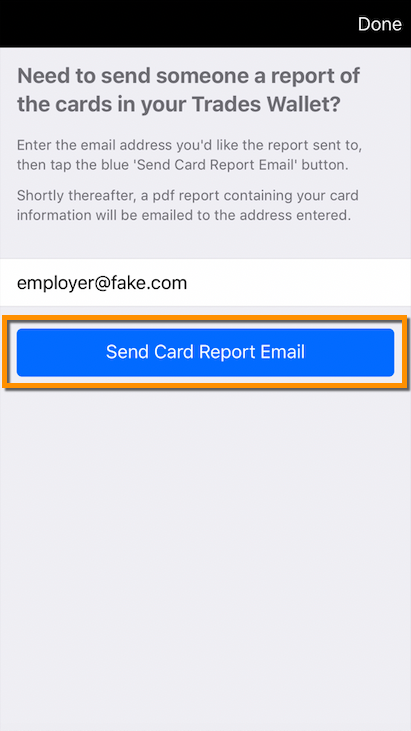
TradesWallet will process the request. Within minutes, a pdf report will be issued to the Email Address specified:
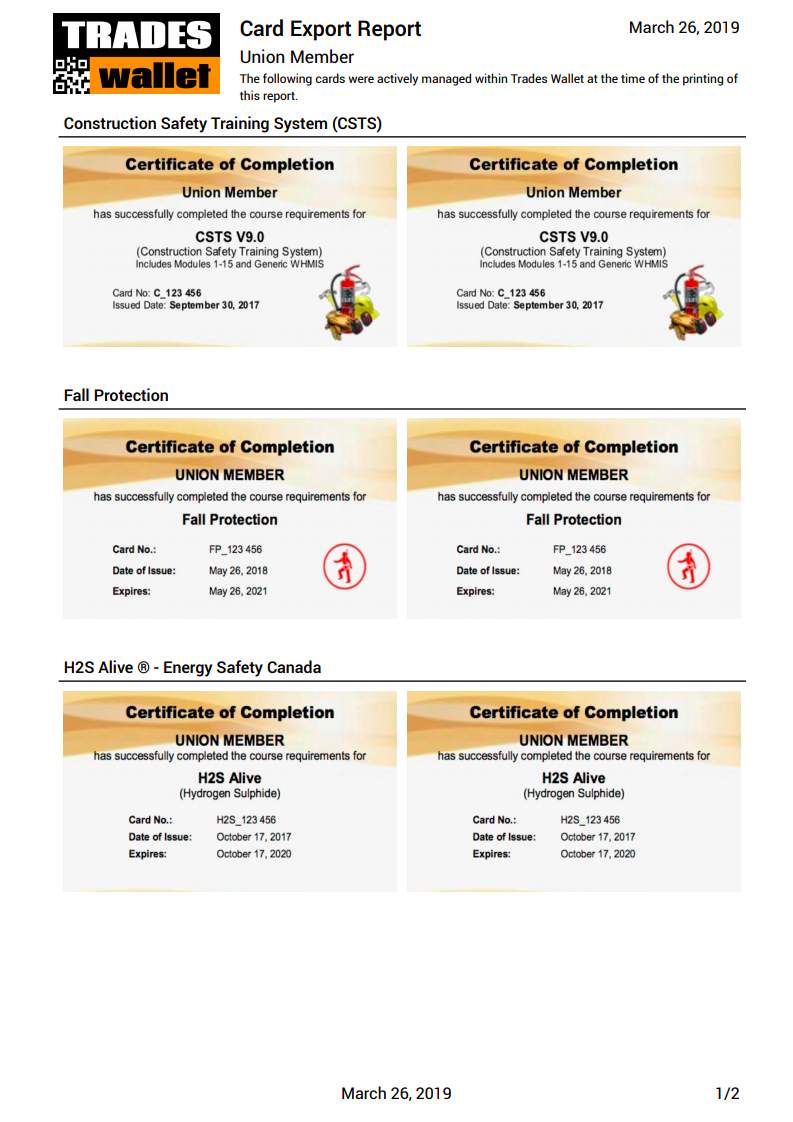
NOTE: Only active public cards will be included within the Card Export Report issued. Private, Expired, or Archived cards will not be included.
When you select the 'Send Card Report Email' button, the system will send an email, containing a pdf attachment of the 'Images Only' report, to the recipient indicated within the Self Service app.
The Email will advise the recipient that the cards within the report were actively managed within TradesWallet at the time the report was Emailed.
Upon opening the pdf, the report will be date stamped, again indicating that the cards presented were valid as of this date.
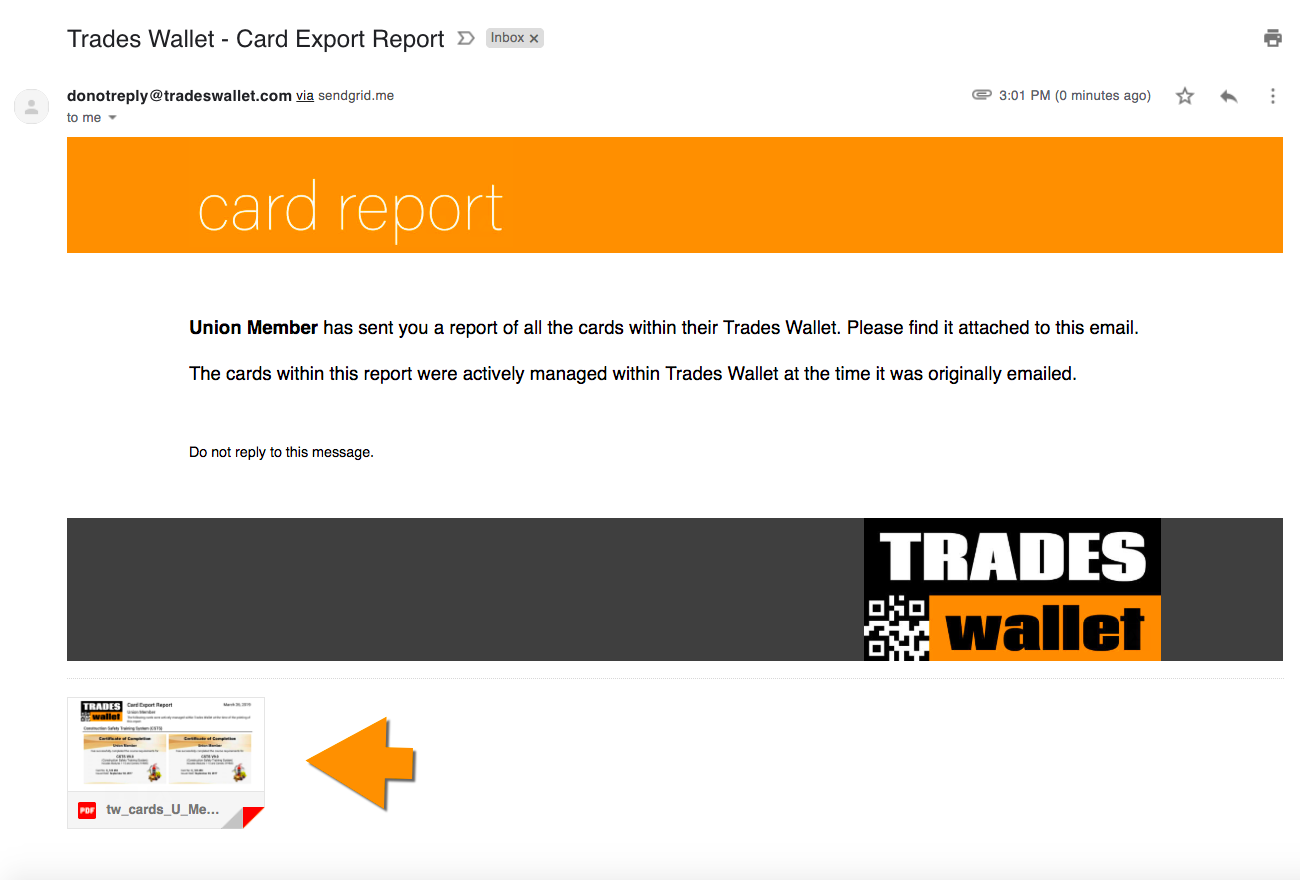
Open the attachment to review the images of the active cards within the Wallet:
This FAQ covers the following topics:
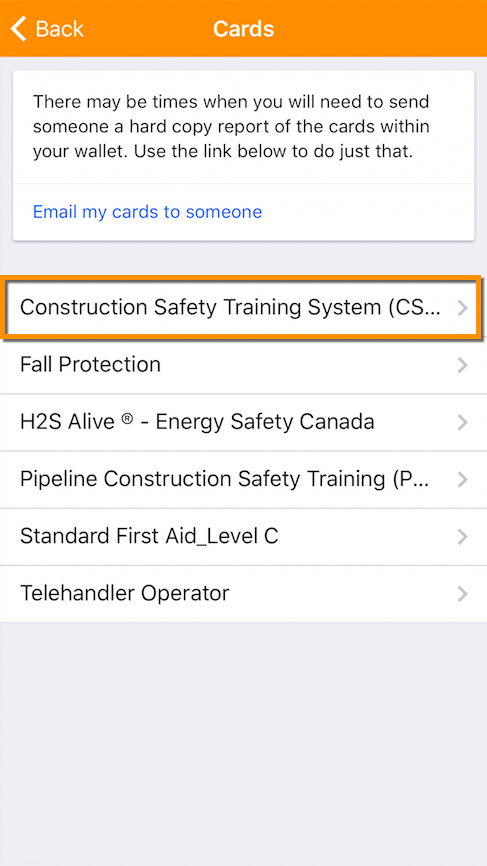
You can review the details of the cards and credentials within your TradesWallet profile directly from the 'Cards' tab:
Select the 'Cards' tab from your TradesWallet Home Page:
On the 'Cards' tab, you will be presented with a complete listing of cards and credentials associated to your TradesWallet profile. NOTE: 'Private' cards will be indicated with the following icon:

Here, you also have the option to Email a pdf summary report of your cards to a potential employer, or otherwise interested party by selecting the 'Email my cards to someone' link.
For more information on the 'Card Export Report', click here.
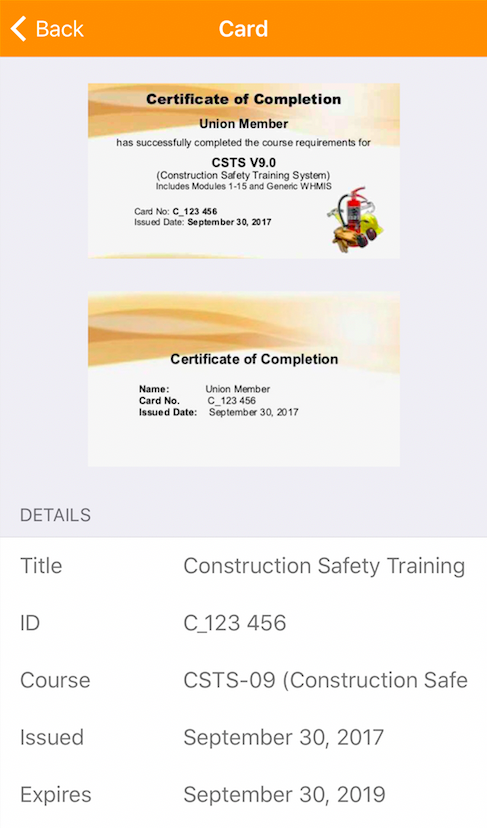
Tap a 'Card' entry to view the details of the relevant certification:

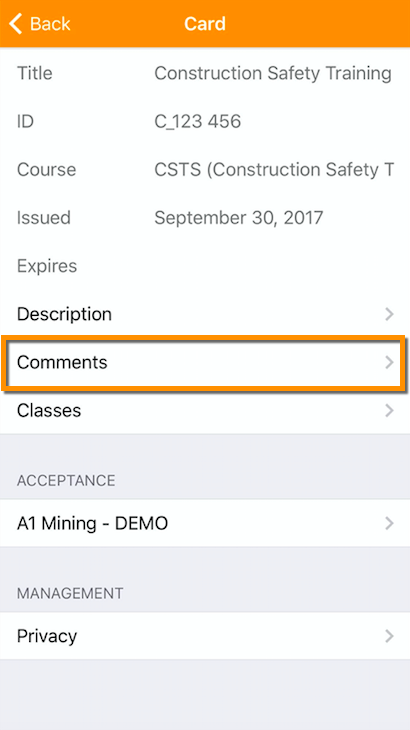
The 'Card' page displays the images that have been associated to the card, followed by the relevant details:
Select this navigation to read a description of the Card or certification entered:
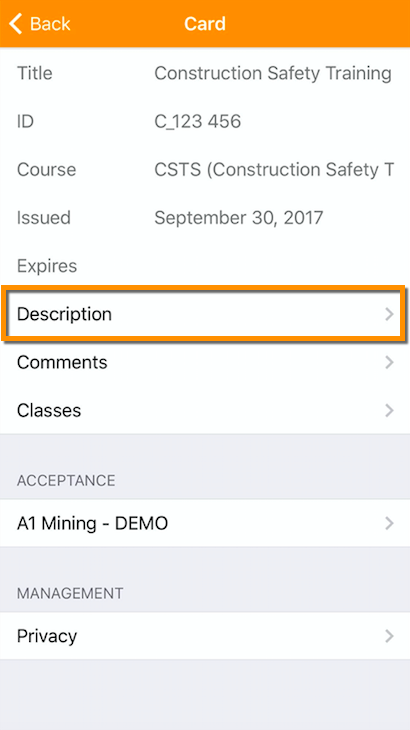
Select this navigation to read any comments entered against this card by the administration who owns your TradesWallet:
Select this navigation to to view a listing of upcoming 'Classes' on offer by your Union, organization, or preferred training provider:
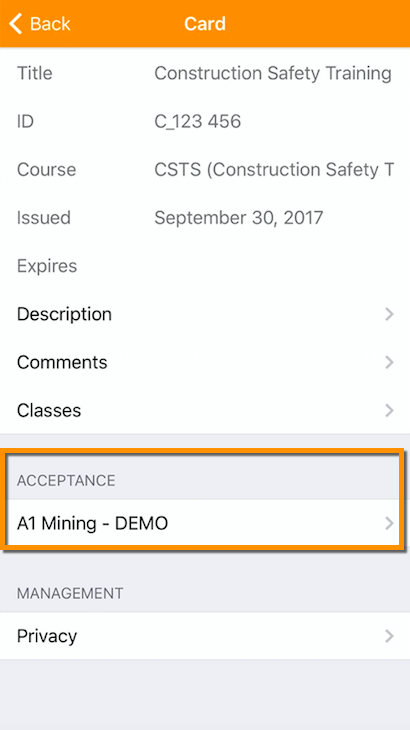
Provides a listing of Unions and/or organizations who have 'Accepted' this entry as valid:
When adding cards and certifications to your TradesWallet profile, you are in complete control of how much information you share with the TradesWallet Community.
For more information on marking an existing card 'Private', click here.

Should you wish to remove a 'Private' card from your Wallet, select the 'Remove Card' navigator.
For more information about 'Removing' a private card, click here.
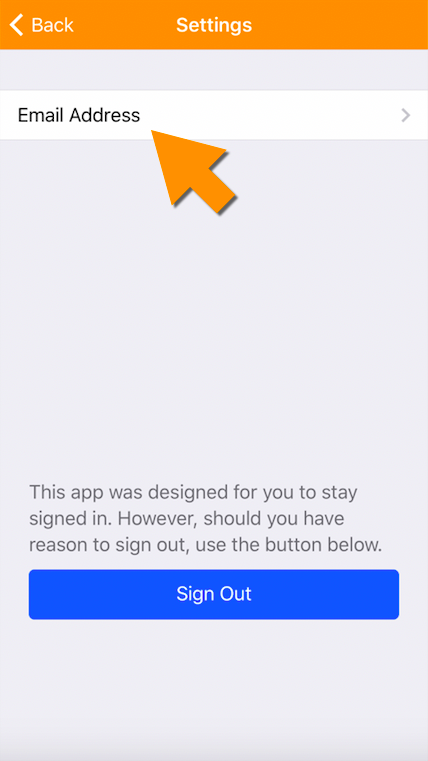
The TradesWallet Self Service app was designed to allow users to stay 'Signed In' for quick and easy access to their wallet details. However, a member can 'Sign Out' at any time:
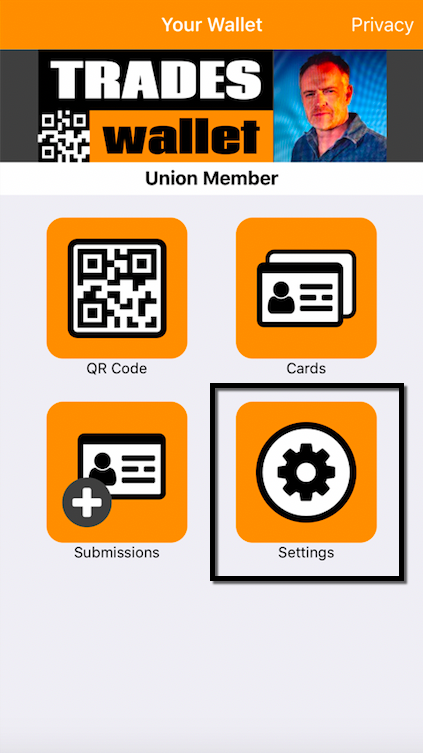
Tap on the 'Settings**'** button from the wallets Home Page:
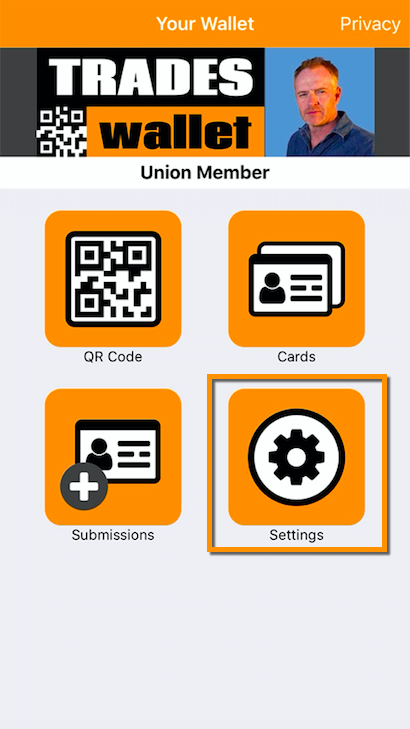
Select the (blue) 'Sign Out' button:
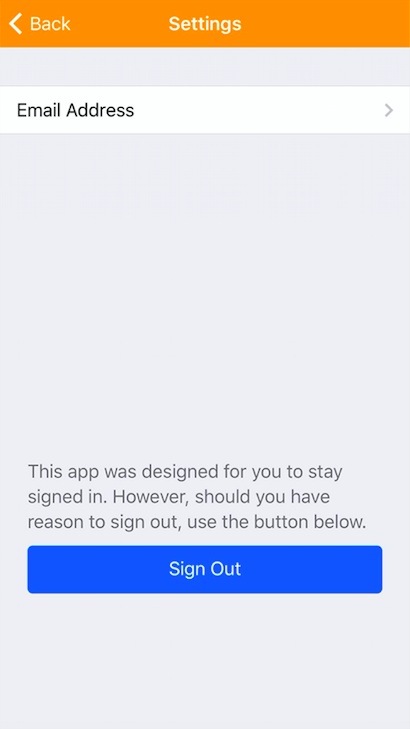
NOTE: Once you have signed 'Out' of the app, you will be required to sign back IN using your QR Code OR via your 'Verified' email.
Wallet Holders can now add or modify their Email Address directly from within their Self Service app!
Select the 'Settings' option from the Wallets main menu:
Select the option for 'Email Address':
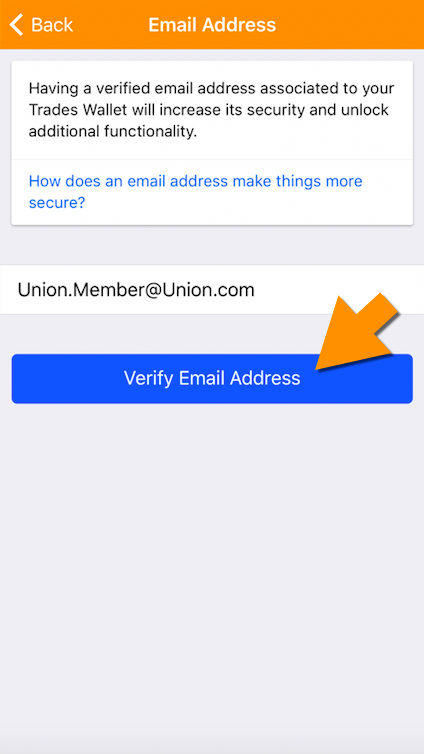
Populate or edit the field with the Email Address you would like to associate to your TradesWallet profile:
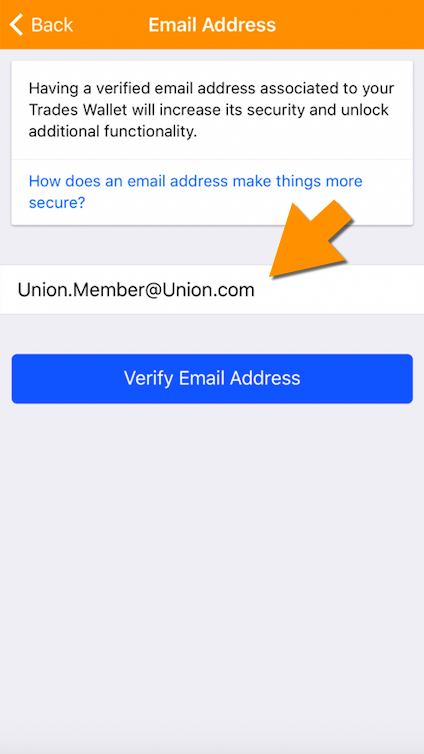
Select the (blue) 'Verify Email Address' button:
Next, check your Email Client to complete the verification of your Email. Locate the email from TradesWallet with the subject line: 'Email Address Verification'.
NOTE: Navigate to your Email Client using the same mobile device onto which you have downloaded the TradesWallet app.
Within the email you will find some instructional verbiage and an (orange) 'Verify Email Address' link:
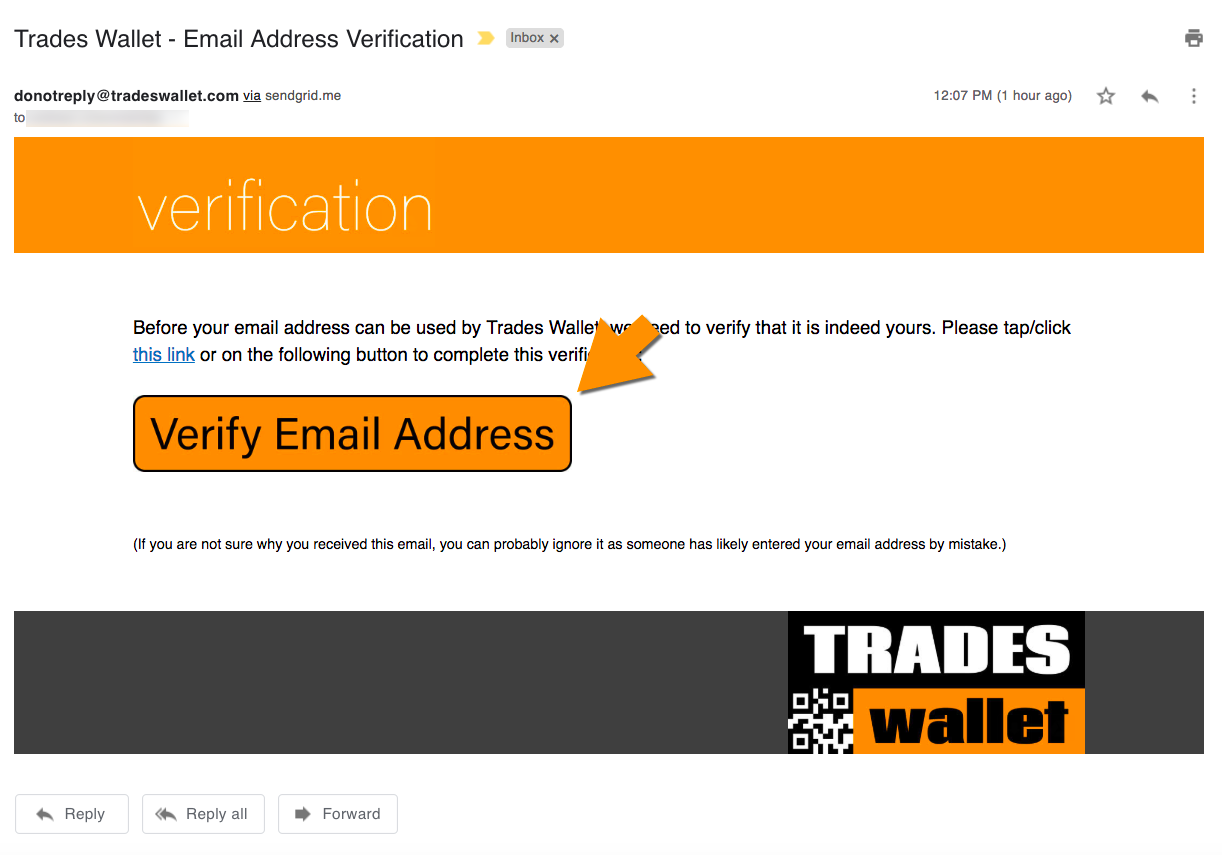
Click this link to complete the verification process and be automatically logged into the application using your credentials.
With a 'Verified' Email Address established, you will be prompted to confirm your identity via Email during the 'Sign In' process.
This verification will ensure that you, and only you, are able to view the contents of your TradesWallet from the Self Service app.
For more information on how to 'Verify your Email Address', click here.
Upon launching the application, you will be presented with the following 'Camera View':

To Sign In, you can either scan you unique 'QR Code' OR select the "Help" option in the top right hand corner to request an "Automatic Sign In Link" be provided via email. For more information on how to request a link, click HERE.
NOTE: Your personalized QR Code can be found within the 'Welcome Email' you received when your wallet was set up. Additionally, you may have been provided with a physical TradesWallet card containing your QR Code.
Please contact your Union Administrator should you need to have either of these re-issued to you.
For more information on your 'QR Code', click here.
If you do not yet have a verified Email Address, you will be presented with the following notification on your Home Screen:
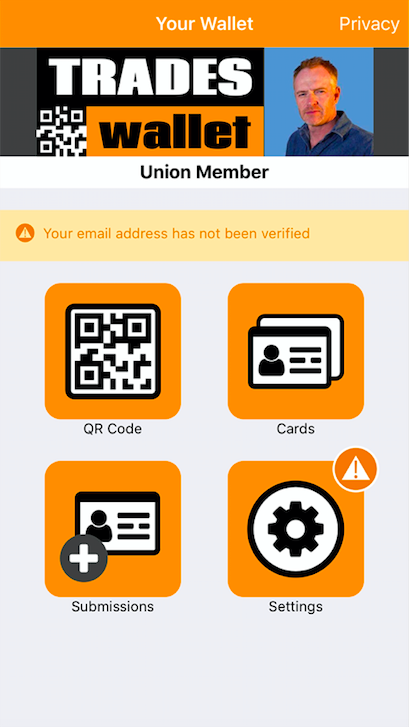
NOTE: For more information on how to 'Verify your Email Address', click here.
If you do have a 'Verified Email Address' established, you will be prompted to confirm your identity via Email.
Select the (blue) "Okay" button:
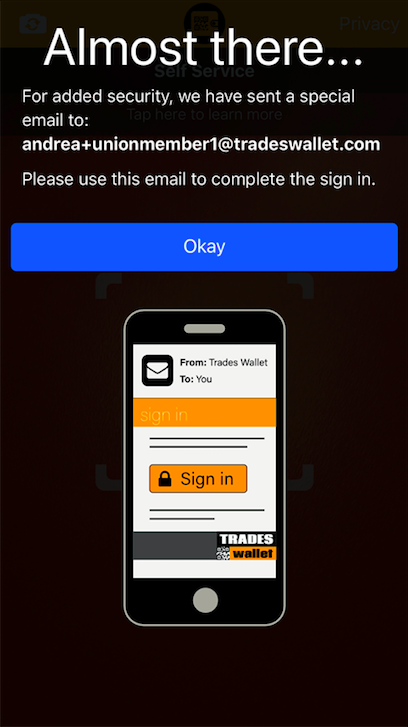
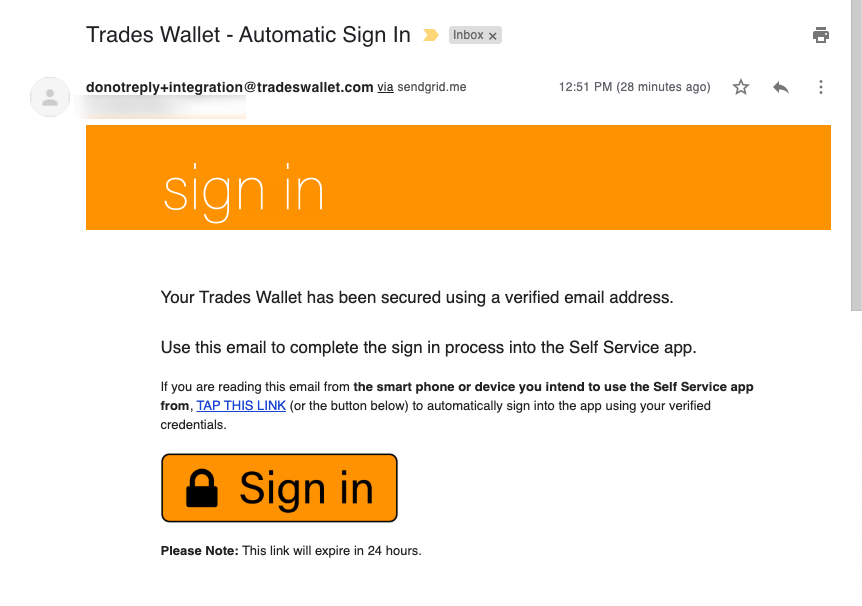
To confirm your identity, navigate to the Email client associated with the 'Verified Email Address' you are using for your TradesWallet profile and locate an email from TradesWallet with the subject line: "TradesWallet - Automatic Sign In".
NOTE: Navigate to your Email Client using the same mobile device onto which you have downloaded the TradesWallet app.
Within the email you will find some instructional verbiage and an (orange) 'Sign In' link:
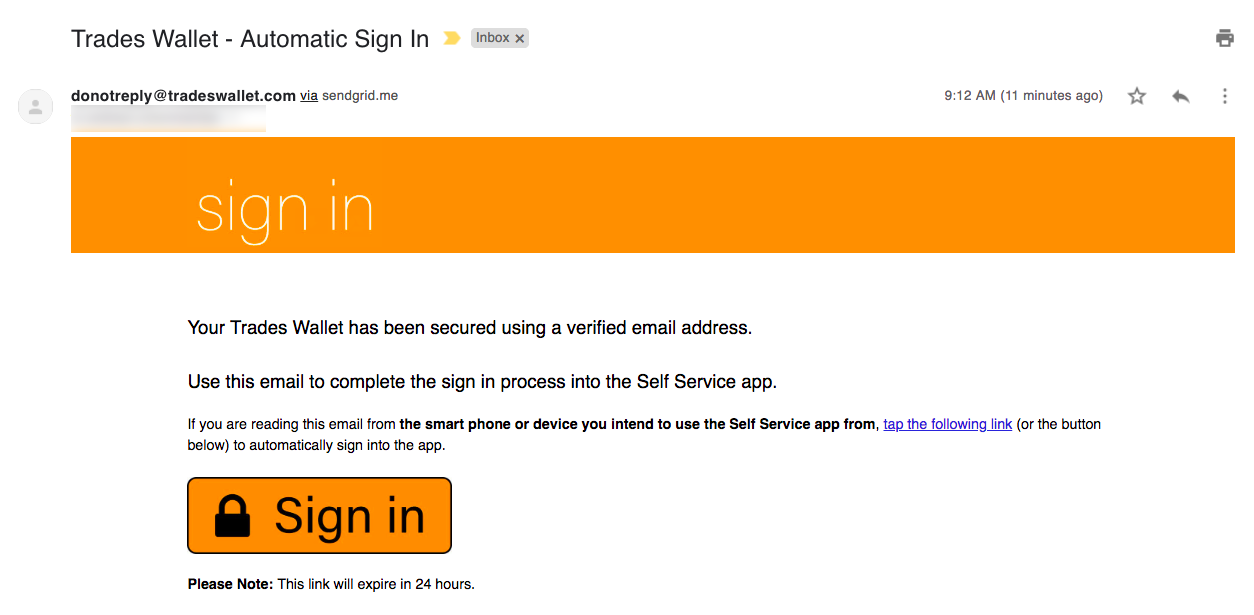
NOTE: The link will expire in 24 hours.
Click this link to complete the 'Sign In' process. You will be automatically logged into the Self Service app using your 'verified' credentials:
The TradesWallet Self Service app was designed to allow users to stay 'Signed In' for quick and easy access to their wallet details. However, a member can 'Sign Out' at any time.
For more information about 'Signing Out' of the app, click here.
This section details the relevant steps required to download and access your mobile Self Service application.
In order to access your TradesWallet profile will require the information provided to you within your TradesWallet 'Welcome' email.
If you have not yet received your welcome email, or cannot locate it, please contact an administrator from the organization who owns your TradesWallet, to request it be (re)sent.
For more information about how to get started using your TradesWallet profile, click HERE.
A profile picture is one of the most important means of authentication within TradesWallet, used to confirm that the Wallet presented belongs to the Tradesperson in question.
The steps required to complete a Profile Submission are listed below. You can also watch a short tutorial video on the 'Self Service' App here.
When SIGNING IN to the Self Service app for the FIRST time, a Wallet holder will be immediately prompted to upload a current 'Profile Image' to their Wallet profile.
NOTE: This step is mandatory and must be completed in order to access the rest of the application's options.
Upon 'Signing In' to the Self Service app, the Wallet holder will be presented with the following 'Welcome!' page.
Select the (blue) 'Get Started' button to initiate the process of creating a Self Service profile:
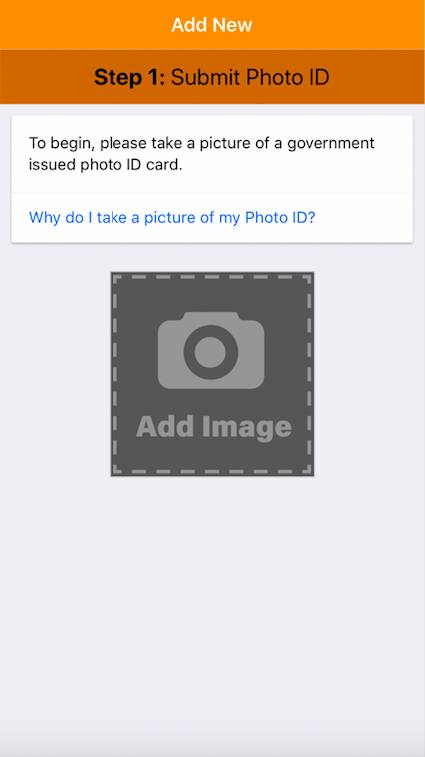
As a means of authenticating the TradesWallet, the initial profile submission from within the Self-Service application will require the Wallet holder to upload a photo of a valid piece of 'Government ID' (i.e. your Driver's License).
NOTE: The type of ID required is determined by the Union or organization who owns the TradesWallet.
The ID is used by an administrator, assigned by the Union or organization who owns the TradesWallet, to verify the profile picture against a piece of ID that only the Wallet holder would have.
Once verified, the ID will be removed from the system.
Select the 'Add Image' button to launch the camera.
Holding the phone in 'Landscape Mode' (horizontally), use the camera to take a photo of the Government ID:
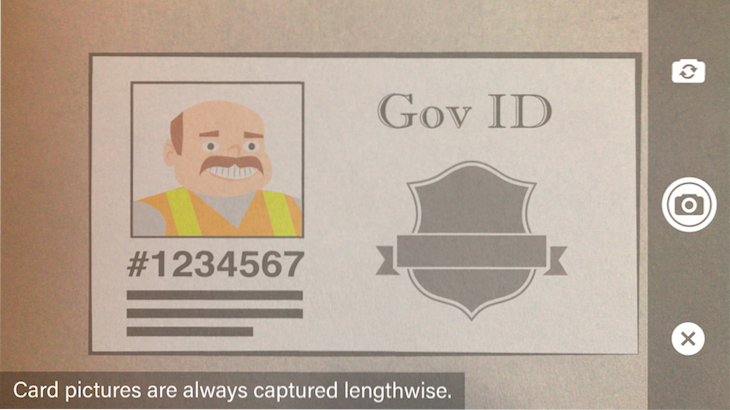
NOTE: Use the image overlay to line up the card within the viewer.
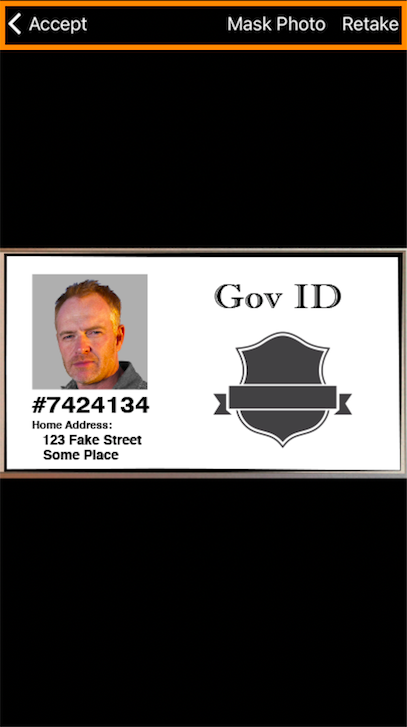
If the image is good, select the 'Accept' button OR select 'Retake' to launch the camera and take a new picture.
Alternatively, should a Wallet holder wish to redact (or mask) a portion of their Government issued ID for privacy, select the 'Mask Photo' option.
NOTE: The Government ID is used by an administrator, assigned by the Union or organization that owns the Wallet to confirm identity. As such, leave the 'Full Name' and image clear of any markings.
For more information about 'Masking' an image, click here.
Once the photo has been 'Accepted', select the 'Next Step' button:
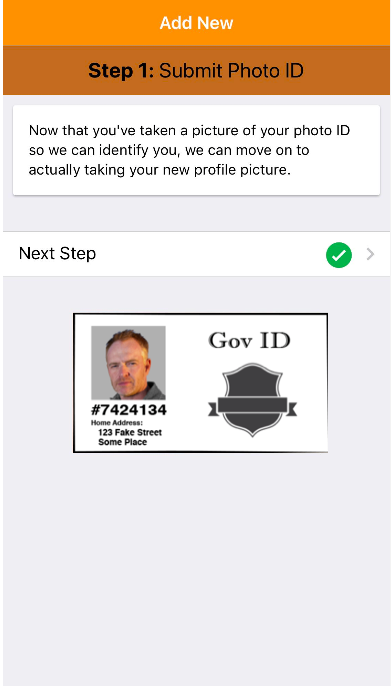
Select the 'Add Image' button again to launch your camera. Use the camera to take a picture of to be used for your profile.
NOTE: This is the image that will be presented to potential employers. As such, ensure the image is clear and that you are the only identifiable person in the frame.
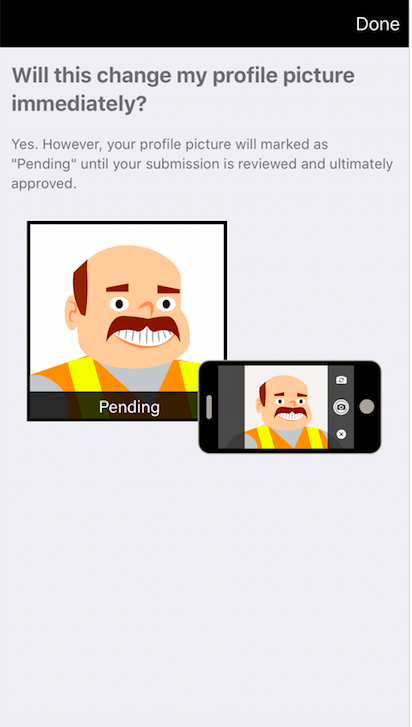
Yes, however, your profile picture will be marked as 'Pending' until your submission has been reviewed and approved by an administrator assigned by your Union or organization:
If you are happy with the image, select the 'Accept' button. Alternatively, select the 'Retake' button to activate the camera again.
NOTE: You cannot 'Mask' any portion of your Profile Picture. For more information about 'Masking' a Card within the Self Service app, click here.
Once you are happy with your Profile Picture, select the (blue) 'Submit for Review' button.
This will send your uploaded images to your TradesWallet admin to review, during which time the profile image will appear within the Self Service app with a 'Pending' banner, indicating it is currently under review.
NOTE: You will not be able to submit a new profile picture while your current picture is awaiting approval.
Once you've hit the 'Submit for Review' button, you'll be directed to the 'Email Address' page.
Having a 'Verified' Email address associated to your TradesWallet profile provides you with additional security when 'Signing In' to the Self Service application and unlocks additional functionality for managing cards within your Wallet.
For more information, click here.
When downloading the TradesWallet Self Service app for the FIRST time you will be presented with the following 'Get Started' screen:
Simply follow the prompts within the application to create your personalized TradesWallet profile:
When you launch the TradesWallet Self Service app for the first time, the app will prompt you to allow some relevant permissions that enable the app to work effectively. Please say 'Yes' to enable both of the following:
NOTE: If you are presented with an error message "This site can't ask for permission" when launching the app, you will need to close bubbles and overlays. For more information on the Screen Overlay Detected error for Android, click HERE.
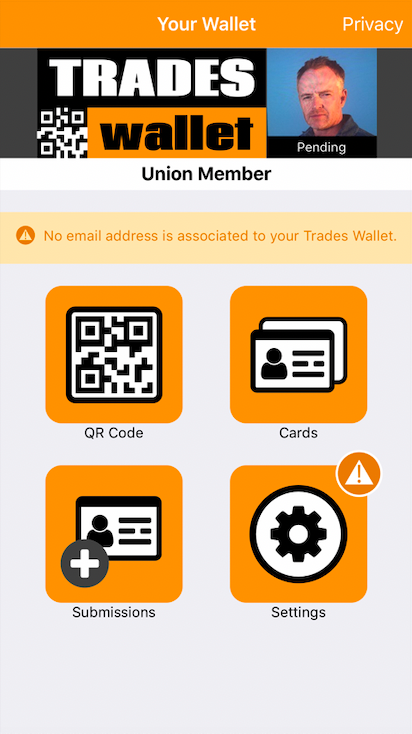
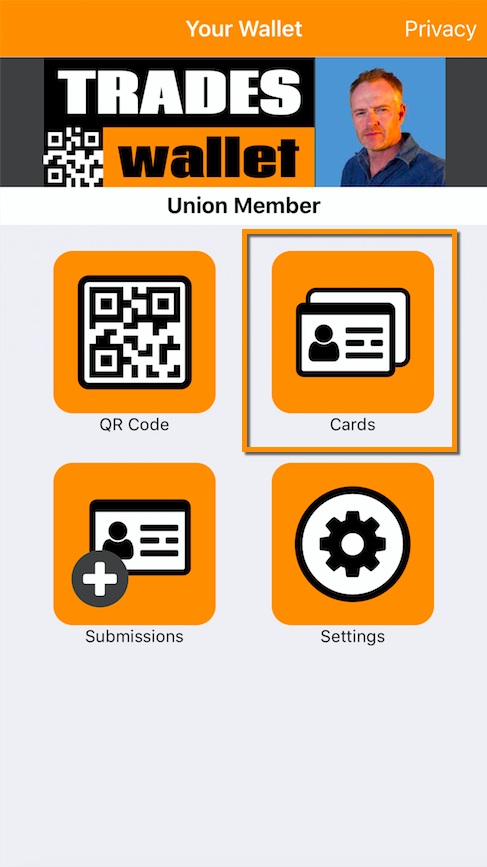
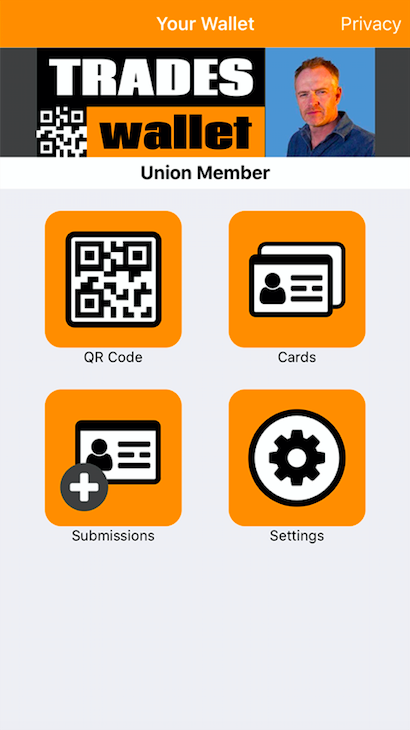
The Home Page of the TradesWallet Self Service app looks a little something like this (see example below).
In order to access your personal Wallet profile will require you to 'Log In'. TradesWallet provides you with (3) avenues with which to log in without the need for a username or password!

If you have downloaded the app to the same mobile device you use to access your Email client, you can simply select the orange 'Sign In' link from within the 'Welcome Email' you should have received when your TradesWallet was created.
This will result in you being automatically signed in to the app using your 'verified' credentials!
NOTE: If you cannot located this email, please contact your TradesWallet provider to request this be resent.
Alternatively, if you don't have your 'Welcome Email' you can simply request a new 'Login' link by sent via email, directly from the Home Page of the app.
Click the 'Request Login Email' button (bottom of page) and enter the email address that is associated to your Wallet profile. Then, check your email for Subject line: 'Automatic Sign In'.
Clicking the 'Sign In' link will result in you being automatically signed in to the app using your 'verified' credentials!
For more information, click HERE.
When presented with the "Camera View", simply scan your personalized 'QR Code' to access your Wallet profile.
Your personalized QR Code can be found within the 'Welcome Email' you received when your Wallet was set up and may have been issued to you on a physical TradesWallet card.
For more information about your 'QR Code', click here.
NOTE: Please contact your Union administrator should you need to have either your QR Code or your Welcome Email re-issued to you.
Upon signing in to the application for the FIRST time, you will be prompted to set up your personalized TradesWallet profile.
For details on how to 'Get Started!' with TradesWallet, click HERE.
The TradesWallet Self Service app is available FREE for iOS and Android devices.
For more information on how to 'Sign In' to the application, click HERE.
The 'Training Request' functionality within TradesWallet enables your employers to notify you of training and certification requirements directly via your TradesWallet profile. This can include anything from general orientations to role or site-specific safety certification requirements.
For more information about 'Requested Training', click here.
TradesWallet tracks each card entry within a Wallet by its 'Issued' and 'Expires' dates and will alert the Wallet holder 60-days in advance of a Card entry reaching the end of its validity term. This is true for both 'Public' and 'Private' card entries.
For more information about 'Card Notifications', click here.
Public Cards - When new cards or certifications are earned, photos of the physical cards or certification can be uploaded for inclusion within your TradesWallet profile.
For more information about Uploading a new certification to your TradesWallet, click here.
Private Cards - You may wish to keep the card or certification completely 'Private' - visible only to you. A card that is marked 'Private' within a Wallet is not shared with the TradesWallet Community unless expressly directed by you.
For more information about uploading 'Private' cards, click here.
If you have a Card or certification within your Wallet that is approaching the end of its validity term you can review any upcoming classes for a Course on offer, or recommended, by your organization that upon the successful completion would result in the recertification of your credential.
If your organization provides in-house training, or if they have recommended training providers linked through TradesWallet, you can view and even sign up for upcoming classes directly from your TradesWallet profile.
For more information about renewing your credentials via your Self Service profile, click HERE.
Having a 'Verified' Email address associated to your TradesWallet profile provides you with additional security when 'Signing In' to the Self Service application and unlocks additional functionality for managing cards within your Wallet.
With a 'Verified' Email Address established, you will be prompted to confirm your identity via Email during the 'Sign In' process. This verification will ensure that you, and only you, are able to view the contents of your TradesWallet from the Self Service app.
For more information on how to 'Sign In using your Verified Email', click here.
Having a 'Verified' Email Address will also enable you to have more control over the information you share with the TradesWallet Community:
Private Cards: You may wish to keep a card or certification completely 'Private' - visible only to you. A card that is marked 'Private' within a Wallet is not shared with the TradesWallet Community unless expressly directed by you.
For more information on uploading a 'Private' card to your TradesWallet, click here.
Mask a Photo: If you deem the information contained within a relevant entry sensitive, or private, you may choose to 'Mask' these details (i.e. the address listed on your Government Issued ID).
For more information on 'Masking' images within your TradesWallet, click here.
When setting up your TradesWallet Self Service app for the FIRST time, you will be prompted to add and/or verify your Email as part of the 'Get Started' process.
Upon submitting your 'Profile Picture' for review you will be presented with the following screen:
NOTE: For more information on how to 'Upload a Profile Picture to your Self Service App', click here.
If you already have an Email associated to your TradesWallet profile, it will be presented for you to review. You will need to complete the verification process via Email so ensue there are no errors.
If you would like to use the existing Email, simply select the (blue) 'Verify Email' button.
If you would like to update the existing Email, simply enter your NEW Email address into the field provided, then select the (blue) 'Verify Email' button.
NOTE: Should you want to 'Skip' this step, select the relevant link. You can add/update your 'Email' at any time via the 'Settings' menu within the Self Service app.
If you do not yet have an 'Email Address' associated to your TradesWallet Profile you will be presented with the following notification to your Home screen:
Until the 'Email Address' on file has been 'Verified', you will be presented with the following notification to your Home screen:
Select the 'Settings' option from the Home Page. You will be navigated to the 'Settings' page:
Select the 'Email Address' navigator. You will be navigated to the 'Email Address page'.
If you already have an Email associated to your TradesWallet profile, it will be presented for you to review. You will need to complete the verification process via Email so ensue there are no errors.
If you would like to use the existing Email, simply select the (blue) 'Verify Email' button.
If you would like to update the existing Email, simply enter your NEW Email address into the field provided, then select the (blue) 'Verify Email' button.
To complete the verification process, check the Email client associated with the Email Address you entered and locate an email from TradesWallet with the subject line: 'Email Address Verification'.
NOTE: Navigate to your Email Client using the same mobile device onto which you have downloaded the TradesWallet app.
Within the email you will find some instructional verbiage and an (orange) 'Verify Email Address' link.
Click this link to complete the verification process and be automatically logged into the application using your credentials.
NOTE: Once your Email has been 'Verified' it can no longer be changed by an administrator assigned by your Union or organization. Future updates can only be made via the Self Service app.
TradesWallet offers Trades people a FREE mobile app, available for download on both iOS and Android devices, to help you to manage your cards and tickets more efficiently online.
Using TradesWallet provides significant benefits to you!
For more information on the Self-Service Application, click HERE.
Yes! The security and privacy of your information is of the utmost importance to us. Your TradesWallet has been secured with industry best-practices for data encryption.
Having a 'Verified' Email address associated to your TradesWallet profile provides you with additional security when 'Signing In' to the Self Service application.
With a 'Verified' Email Address established, you will be prompted to confirm your identity via Email during the 'Sign In' process. This verification will ensure that you, and only you, are able to view the contents of your TradesWallet from the Self Service app.
To learn more about 'Verified Email Address', click here.
The TradesWallet Self Service app is available FREE for iOS and Android devices.
The FAQs in this section detail what TradesWallet is and how it works for both Basic and Enterprise accounts.
TradesWallet databases are protected with Transparent Data Encryption (TDE), which ensures data files and backups are all encrypted. To learn more about TDE, click here.
All communication between TradesWallet and its users is encrypted using secureweb connections. This prevents unauthorized access to your data while in transit.
Sensitive data within the TradesWallet database is encrypted on a per company basis. As stewards of your data, select individuals within the TradesWallet team have the ability to access the underlying data to perform maintenance and administrative tasks, however, the data itself is un-readable.
For this reason guarding access to your administrative logins is crucial; Losing all logins will result in losing the data stored within TradesWallet.
Finally, all data within TradesWallet is currently stored within secure data centers, physically located within Canada.
At TradesWallet we've gone to great lengths to ensure we are good stewards of your data and have been SOC 2 Certified since July of 2017.
SOC 2 attestation demonstrates to our customers, the maturity of our information security program via an independent third-party attestation. It also validates the measures we have take n to enable the security, confidentiality, and availability of our customer data.
To learn more about SOC 2, click here.
Having a 'Verified' Email address associated to a TradesWallet profile provides Wallet holders with additional security when 'Signing In' to the Self Service application.
With a 'Verified' Email Address established, users will be prompted to confirm their identity via Email during the 'Sign In' process. This verification will ensure that they, and only they, are able to view the contents of their TradesWallet from the Self Service app.
To learn more about 'Verified Email Address', click here.
If you are interested in seeing TradesWallet in action, contact [email protected] to request a demo.
TradesWallet was designed to be user friendly, with helpful tool tips available throughout the Web Admin Portal and both companion apps.
Admins can reference a full suite of tutorial videos, or read through the knowledge articles within our Help Center, for more detailed instructions about a piece of functionality or process within the system, all available through the 'Help' tab of the Web Admin Portal.
TradesWallet tutorial videos are short, visually informative ways to learn about a piece of functionality TradesWallet offers. Our videos cover functionality for admins, as well as learning videos for Wallet holders utilizing the mobile Self Service app.
To access our tutorial videos, navigate to the 'Help' tab of your Web Admin Portal:
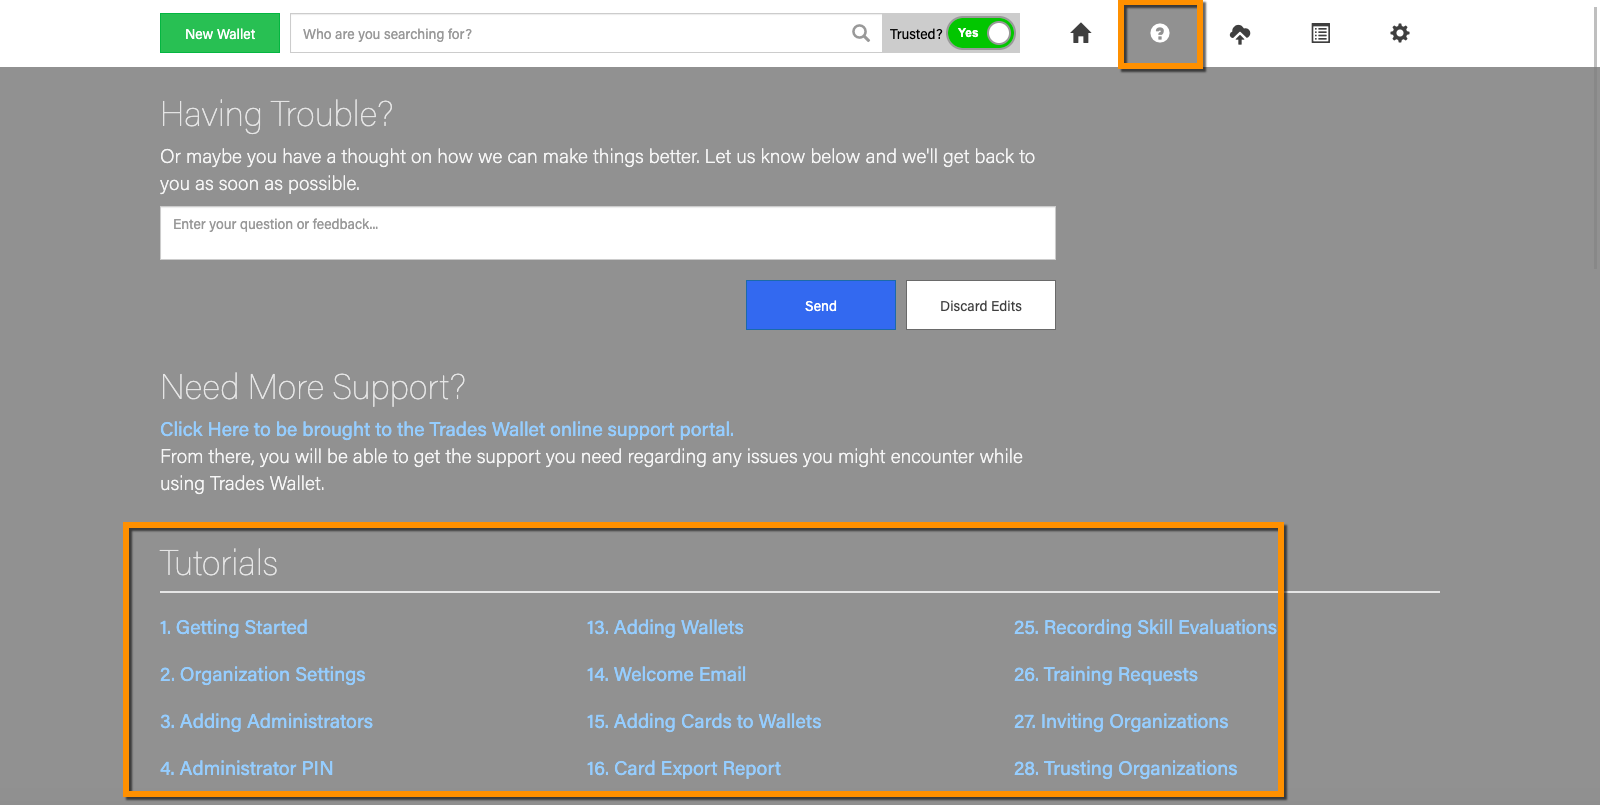
Available within our 'Help Center', our full suite of knowledge articles is not only a great resource for admins getting to know their way around the system, but the step by step instructions can also be used as a training aid for Wallet holders coming on board with TradesWallet.
To access our 'Help Center' from the Web Admin Portal, navigate to the 'Help' tab:
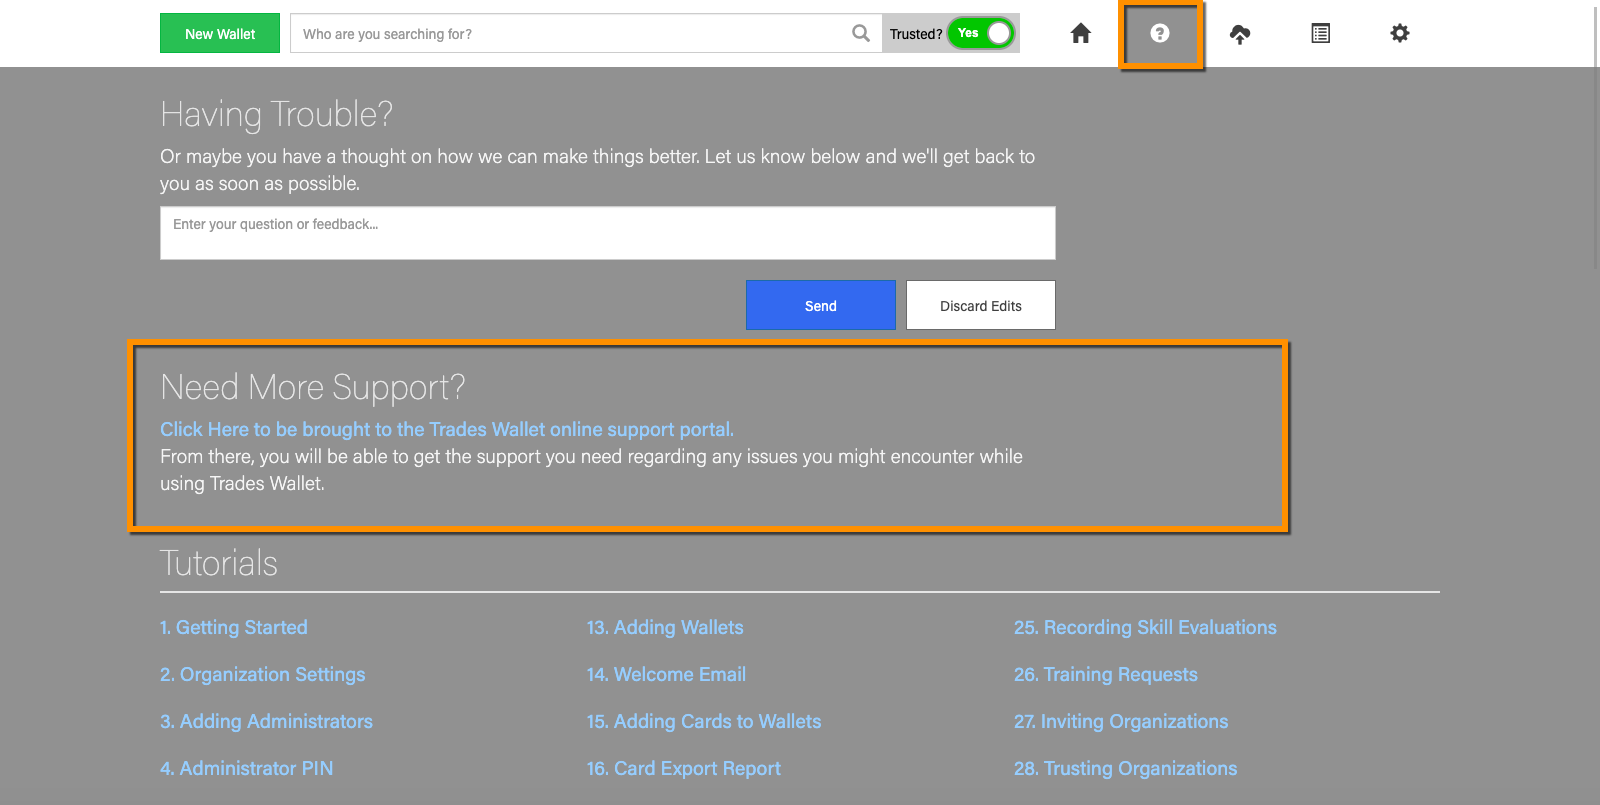
Alternatively, click HERE.
If your Union or organization would like additional assistance getting started with TradesWallet, our dedicated Customer Service team is more than happy to facilitate an on-boarding plan that will not only meet, but exceed your expectations.
Whether you simply want help with data transfer OR you could benefit from personalized training sessions for your admins and Wallet holders, we've got you covered.
Contact [email protected] for more information.
One of our goals at TradesWallet is to provide a global platform where data can be shared between you and your trusted connections. With a simple, intuitive interface, it's easy to manage your workforce's data - all inside the cloud - accessible from anywhere at any time.
When your Union or organization registers with TradesWallet, however, your information is not shared blindly within the community. Only those organizations that you engage with, and have explicitly granted 'Trust' to, will have access to view the contents of Wallets you own or manage.
For more information about 'Trusted Relationships' within TradesWallet, click HERE.
Not only can you decide which organizations within the community have access to your data, but our rich permission structure enables you to decide how your administrators will engage with TradesWallet with respect to what information they can view and action, and from where.
For more information about 'Administrative Roles and Privileges', click HERE.
When your organization registers with TradesWallet you will note a 'Support Account' is automatically created within your accounts 'Admins' tab.
While you do have the option to remove this account, we don't recommend it. This account enables our customer service team to access your account in a support capacity when needed. Your account will never be accessed without your expressed permission.
A benefit of TradesWallet is that all your data is stored in the Cloud - accessible from anywhere at any time, on a multitude of screens.
While TradesWallet will accommodate all browsers, we do recommend using Google Chrome to provide you with the best overall TradesWallet experience.
Our companion apps are FREE to download and are available on both Android and iOS devices.
NOTE: Wallet holders attempting to connect to the TradesWallet Self Service application via a Huawei P10 mobile device may experience issues accessing the camera feed when using the recommended Chromebrowser. As such, we suggest using 'Microsoft Edge', in lieu of Google Chrome, as a means of accessing the Self Service Application from your mobile phone.
For more information about how to download the mobile apps, click HERE.
The contents of a TradesWallet are 'authenticated' by an administrator, assigned by the organization who owns and/or manages a TradesWallet, in the following ways:
A 'Profile Picture' is one of the most important means of authentication within TradesWallet, used to confirm that the TradesWallet being presented belongs to the Wallet holder in question.
A Wallet holder can create a profile picture directly from within the 'Self Service' app, as described below, OR by visiting their TradesWallet provider in person.
When accessing the 'Self Service' app for the first time, a Wallet holder will first be required to create a 'Profile Picture' for their Wallet.
This i**nitial profile submission will also require the Wallet holder to submit a picture of a valid piece of photo ID. This ID will be used by an administrator, assigned by the organization who owns the Wallet, to compare against the profile picture submitted in order to validate the Wallet profile.
NOTE: The type of ID required is at the discretion of the Union or organization who owns the TradesWallet. Once confirmed, the ID is purged from the TradesWallet system.
For more information about 'Profile Pictures' and how they are validated by an administrator, click HERE.
When a Wallet holder earns a new 'Card' or certification, photos of the physical credential earned can be uploaded via the 'Self Service' app for inclusion within a TradesWallet profile.
Prior to a 'Public Card' being made available within a relevant Wallet, an administrator, assigned by the Union or organization that owns the TradesWallet, must first review the image(s) and approve their origin and authenticity. Until approved, the card(s) will not be available within the Wallet.
Wallet holders can review the status of their Card submissions via the 'Submissions' tab of their Self Service app.
For more information about authenticating credentials within a Wallet, click HERE.
Once a 'Public Card' or certification has been approved within a Wallet, the entry will be automatically be associated with an 'Acceptance' record attributed to the owning organization.
Each time the 'Card' or certification is viewed by an organization within the TradesWallet Community, an 'Acceptance' entry will be automatically associated, indicating that the organization has reviewed the credential and accepted it as 'valid'.
Short for 'Quick Response Code', a QR Code is a two-dimensional barcode that can be read by an imaging device such as a Smartphone camera.
In an era where almost everyone has access to a mobile device, the use of 'QR Codes' eliminates the need for Wallet holders to remember yet another 'Username/Password'.
Instead, a quick scan of a 'QR Code' will enable a Wallet holder to access their personal TradesWallet profile via the mobile 'Self Service' app.
Wallet holders will scan their personalized 'QR Code' to 'Sign In' to the mobile 'Self Service' application in order to manage the contents of their TradesWallet.
For more information on the Self Service app, click HERE.
'QR Code(s)' are assigned to each Wallet created, but also to each administrator account. A Worksite administrator can use their own 'QR Code', in lieu of their username and password, in order to 'Sign In' to the mobile 'Field Scanner' app.
To learn more about how TradesWallet can integrate with your existing processes and systems, contact us.
Think of TradesWallet as a secure online repository filled with an organizations membership information. Within this repository, the credentials for an entire workforce is catalogued into individual 'Wallets', unique to each member or employee.
Each 'virtual Wallet' contains the cards and certifications a member or employee has earned and would be required to present to potential employers.
TradesWallet is comprised of a robust Web Admin Portal, used by office admins to manage the day-to-day operations within TradesWallet.
TradesWallet also includes two companion mobile apps - one designed with the Wallet holder in mind, the other intended as a means of viewing the credentials within a TradesWallet while out in the field.
Unions and organizations can utilize the functionality of the TradesWallet Web Admin Portal to ensure their workforce is trained and qualified for the jobs their employees are being dispatched to.
The portal (www.tradeswallet.com) is designated for use by office administrators, responsible for managing the day to day operations of TradesWallet for their organization. Within the Web Admin Portal, an admin can:
For more information on the TradesWallet Web Application and its functionality, click HERE.
Your Wallet holders can utilize the mobile 'Self Service' application to ensure their credentials are current and complete. The 'Self Service' app is FREE to download to and works on both iOS and Android devices.
Using the app, directly from their Smartphone, a member/employee can:
For more information on the Self-Service Application, click HERE.
The best way to review a Wallet holders various safety credentials and certifications from within a TradesWallet, while out in the field, is with the TradesWallet 'Field Scanner' app.
Also FREE to download, this app has been designed specifically to provide admins a means with which to view the contents of a relevant TradesWallet while out in the field.
Once signed in to the 'Field Scanner' app, admins will be able to complete the following actions:
For more information on the Field Scanner Application, click HERE.
TradesWallet is a secure, online certification management solution designed to ensure worksite compliance and increase productivity.
Our solution manages the various credentials an organization needs to verify their workforce is trained, qualified and certified to operate safely on your worksites.
From safety cards to trades certificates, the credentials for an entire workforce can be securely submitted, stored, managed and shared with key stakeholders from anywhere at anytime.
TradesWallet, as the name suggests, is a major player in the Trades industry across Canada. Our clients range from small business within the transport, rail and heavy equipment realms to the largest Operating Engineers Union in Canada.
For more information about how TradesWallet works, click HERE.
Here you will find documents relating to your 'Account Billing'.
Your Account Plan type can be modified at any time by the 'Billing Contact' assigned to your Account. If you don't see the relevant permissions, contact your Primary TradesWallet administrator.
From the Home Page, select the 'Settings' option (Gear Icon)
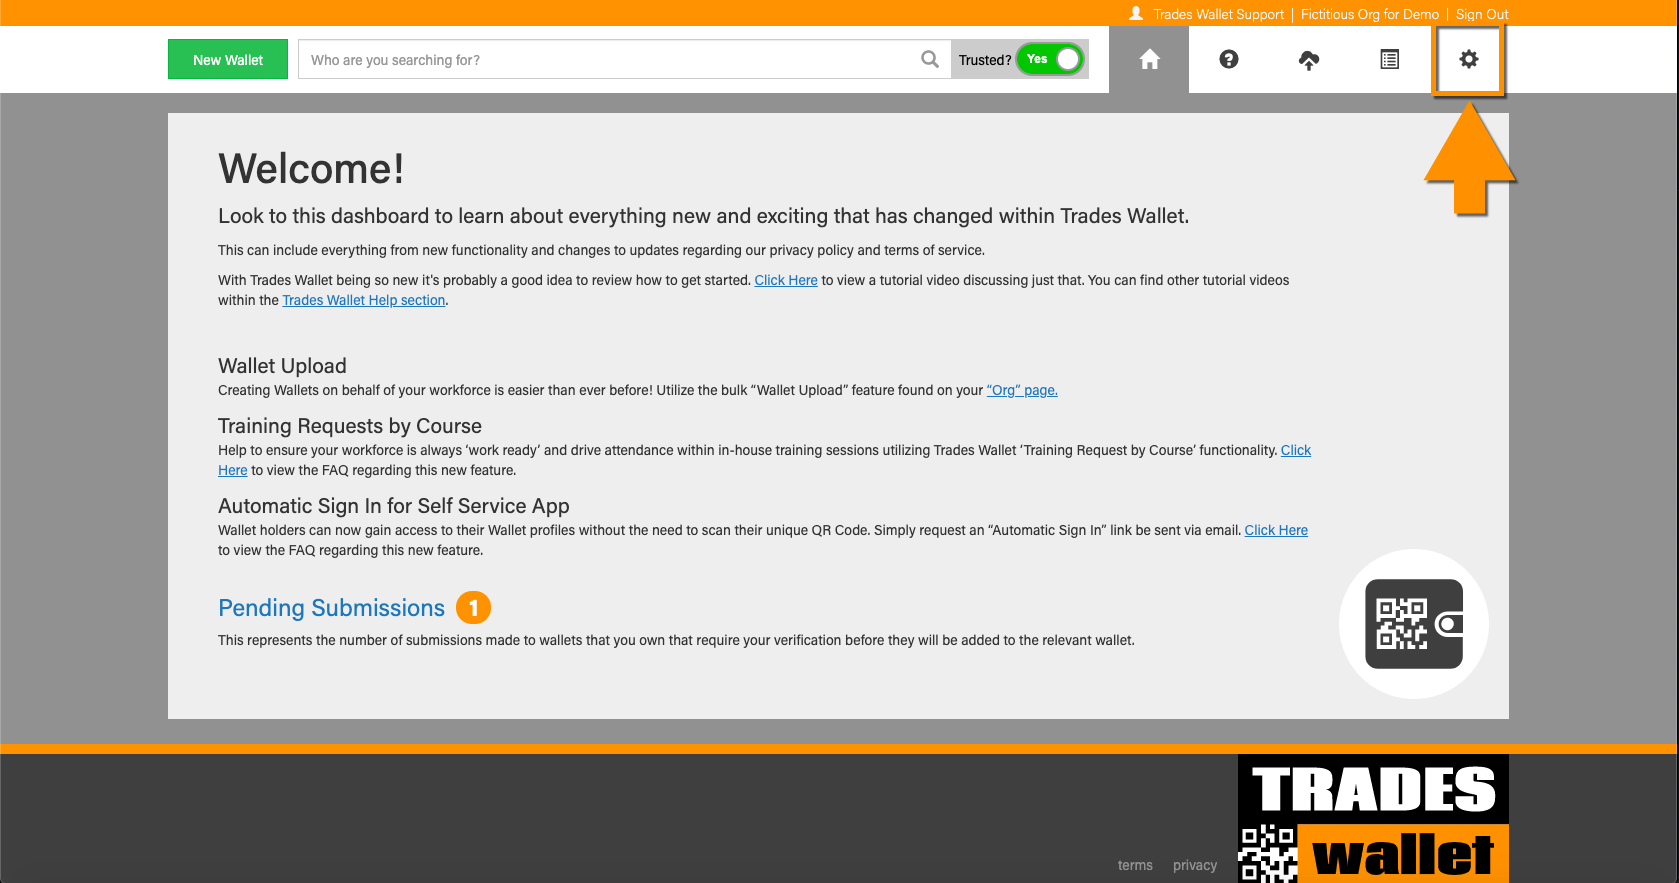
Select the 'ORG Tab'
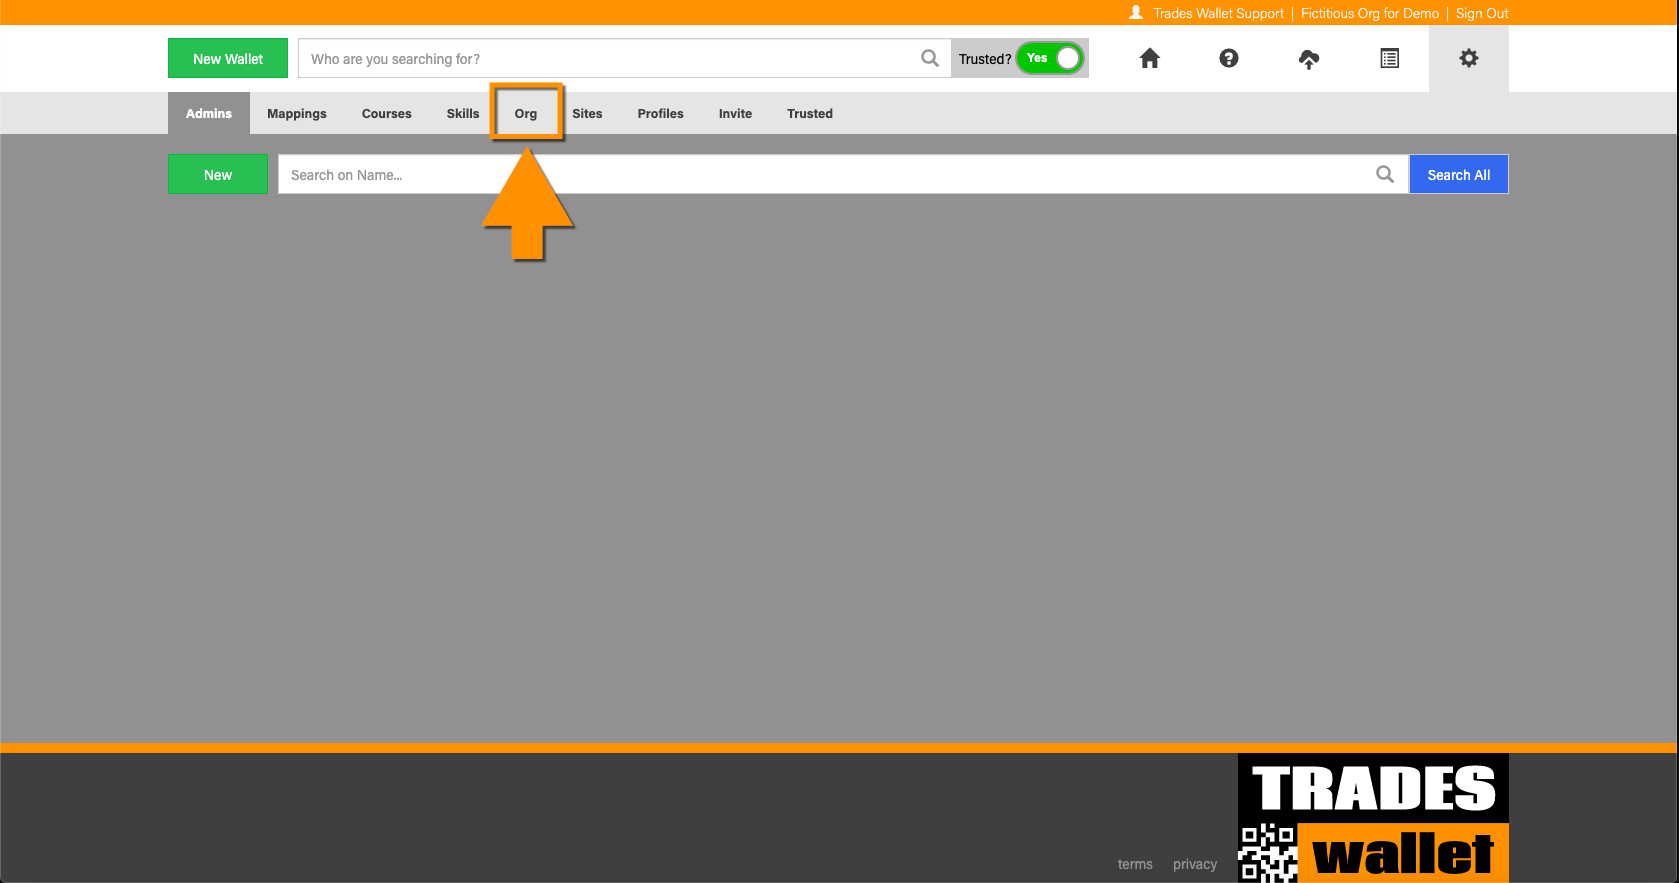
Scroll down the ORG Details page until you reach the 'Plan & Pricing' section. Here you will be presented with your CURRENT Plan option and terms
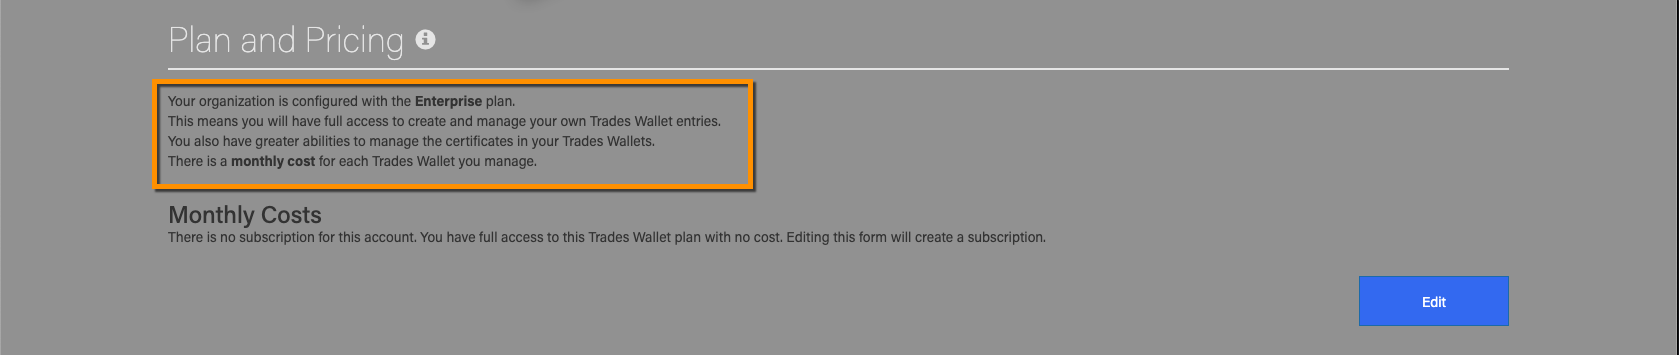
To modify your Plan type, select the 'Edit' button
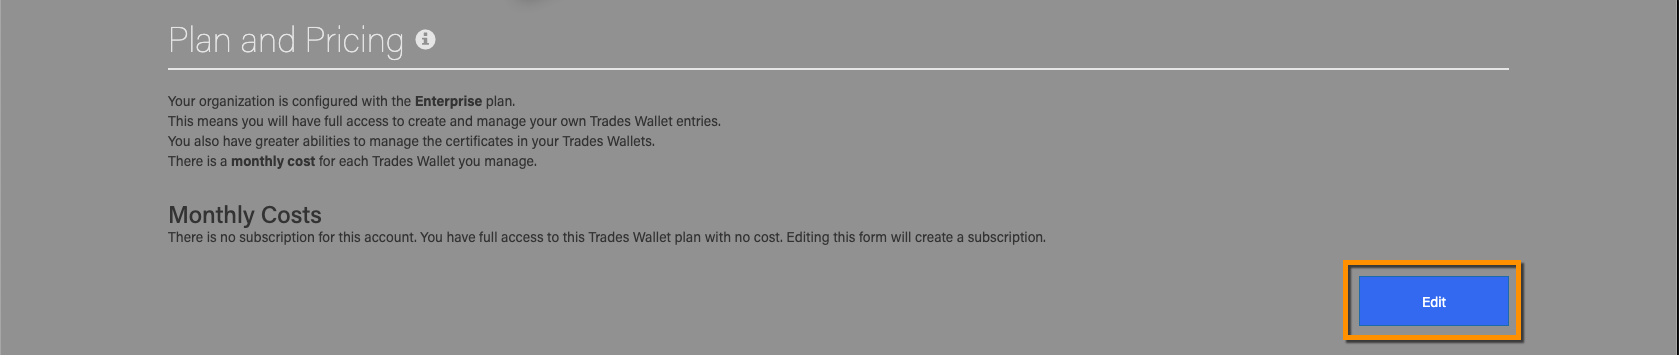
You will be presented with all Plan & Pricing options.
Select the Plan Type you wish to change to. You will be presented with the changes that will take place to your account as a result of the change in plan type.
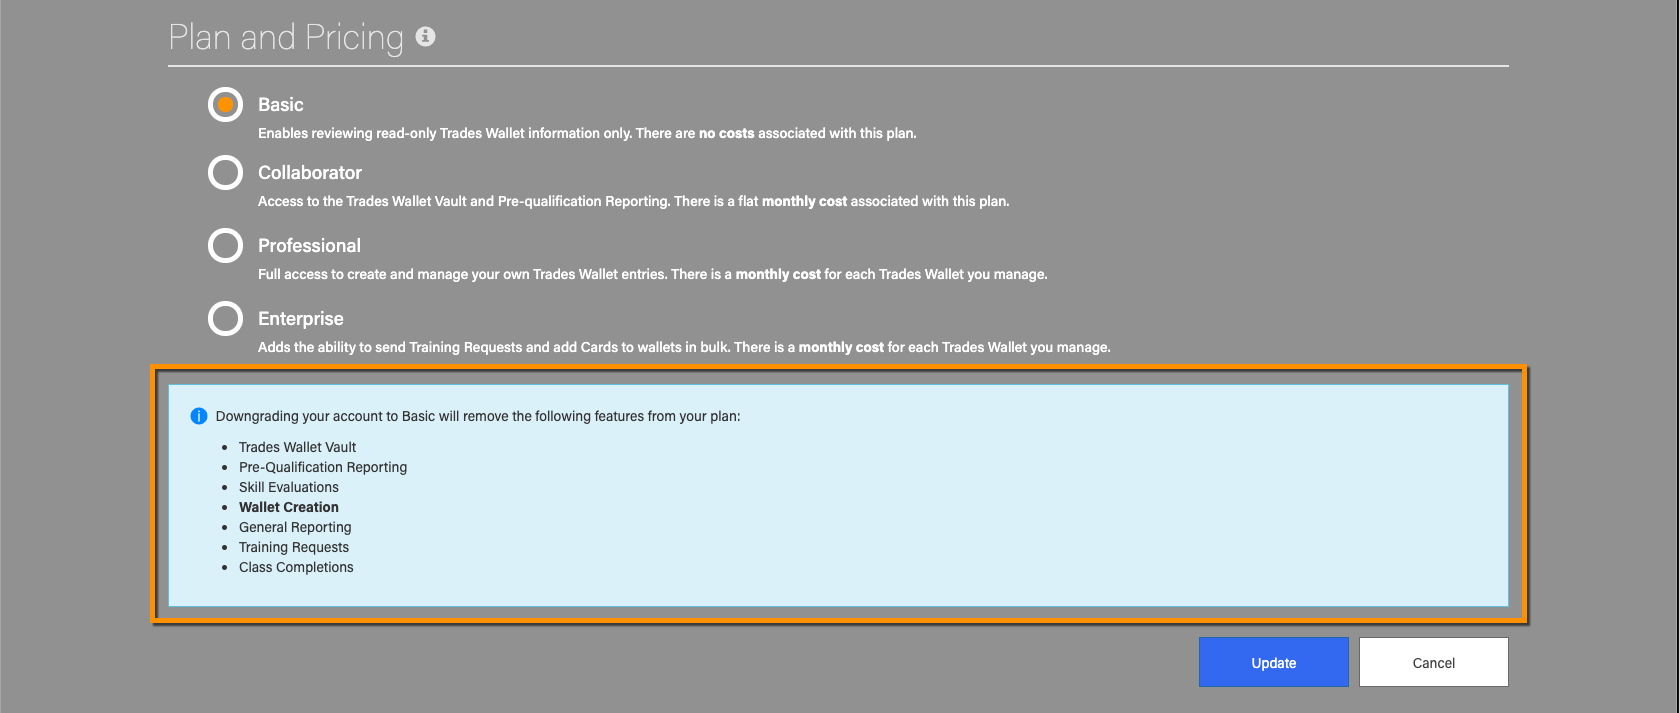
Select the 'Update' button to apply the change. You will be notified when your Plan Type has been successfully modified

Get the power, control and customization your organization needs to manage the credentials for your workforce. Our online solution is flexible enough to meet your company's specific needs.
For more information about the various plans TradesWallet provides, click HERE.
If you wish to REMOVE your TradesWallet account such that all account information is permanently deleted from the TradesWallet databases, please contact your Customer Care representative
When your organization joins the TradesWallet community, by default, the person who completed the registration will automatically be defined as the 'Primary Administrator' for your org.
This contact should be updated to the administrator or generic email address associated with any enquiries directed to your organization from other organizations within the TradesWallet community.
NOTE: While this is the contact that others within the community may use to reach out to your organization, no general communications from TradesWallet will be sent to this address.
For more information on updating your Organizations general contact details, click HERE.
If your organization is registered as an 'Enterprise' plan member, you will also need to provide TradesWallet with a specific 'Billing' contact.
While this *may* be the same contact entered above, this email address should be directed to the relevant person within your organization that TradesWallet would contact specifically regarding your billing details.
NOTE: This contact information will not be shared with the TradesWallet community as a whole and no general communication from TradesWallet will be sent out.
For more information on updating your Organizations specific Billing contact, click HERE.
Because there are costs associated with our 'Enterprise' plan, TradesWallet will ask you to identify how you would like to be billed. These details can be modified by a Primary Admin assigned to your account at any time via the ORG Tab of your account.
If your organization requires invoices to be issued by TradesWallet, we can certainly accommodate. Our invoice terms are standard NET30.
If you have any questions regarding our invoicing, please contact us.
Alternatively, you can opt to have TradesWallet charge a credit card of your choosing. Simply select the 'Automatic Payments' upon registration OR, have a Primary Admin update the details directly from the ORG Tab of your account.
For more information on updating your payment details, click HERE.
TradesWallet currently offers the following payment options:
For more information about one of the payment methods identified above, contact [email protected].
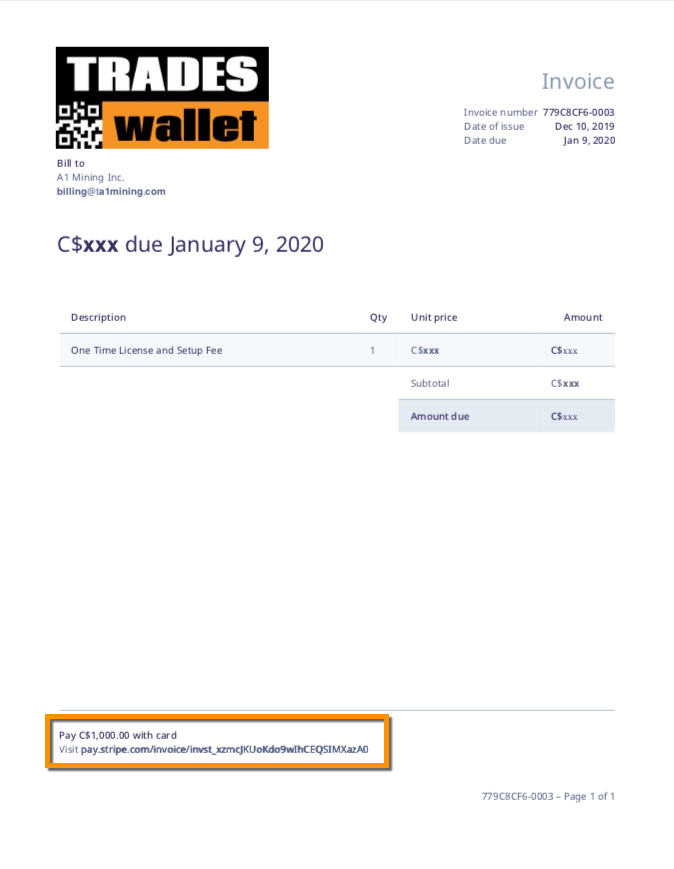
A Primary Admin can review your billing history at any time directly from the ORG Tab of your account.
For more information about reviewing your invoice history, click HERE.
Should you have any questions regarding your current or previous billing, please contact us.
Should your organization need to update or modify the credit card on file with TradesWallet, this can be accomplished directly from the ORG Tab of your account.
NOTE: Only a 'Primary Admin' assigned to your account has the authority to amend these details.
Select the 'gear' icon to access your 'Settings' menu options

Select the 'ORG Tab'
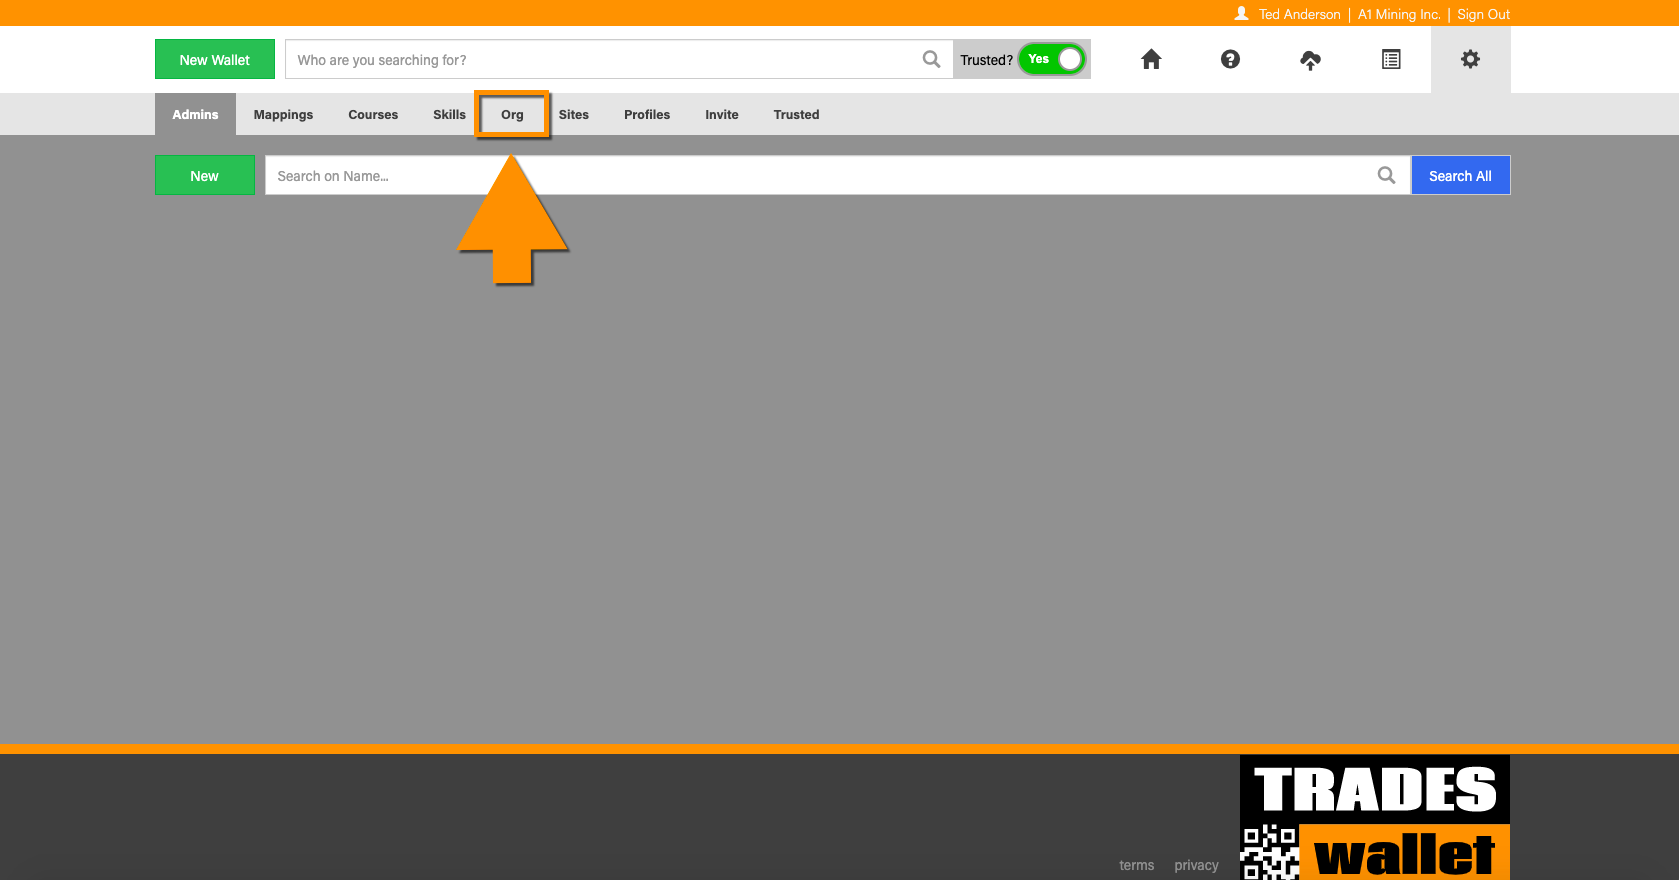
Scroll down the details page until you reach the 'Payment Method' section.
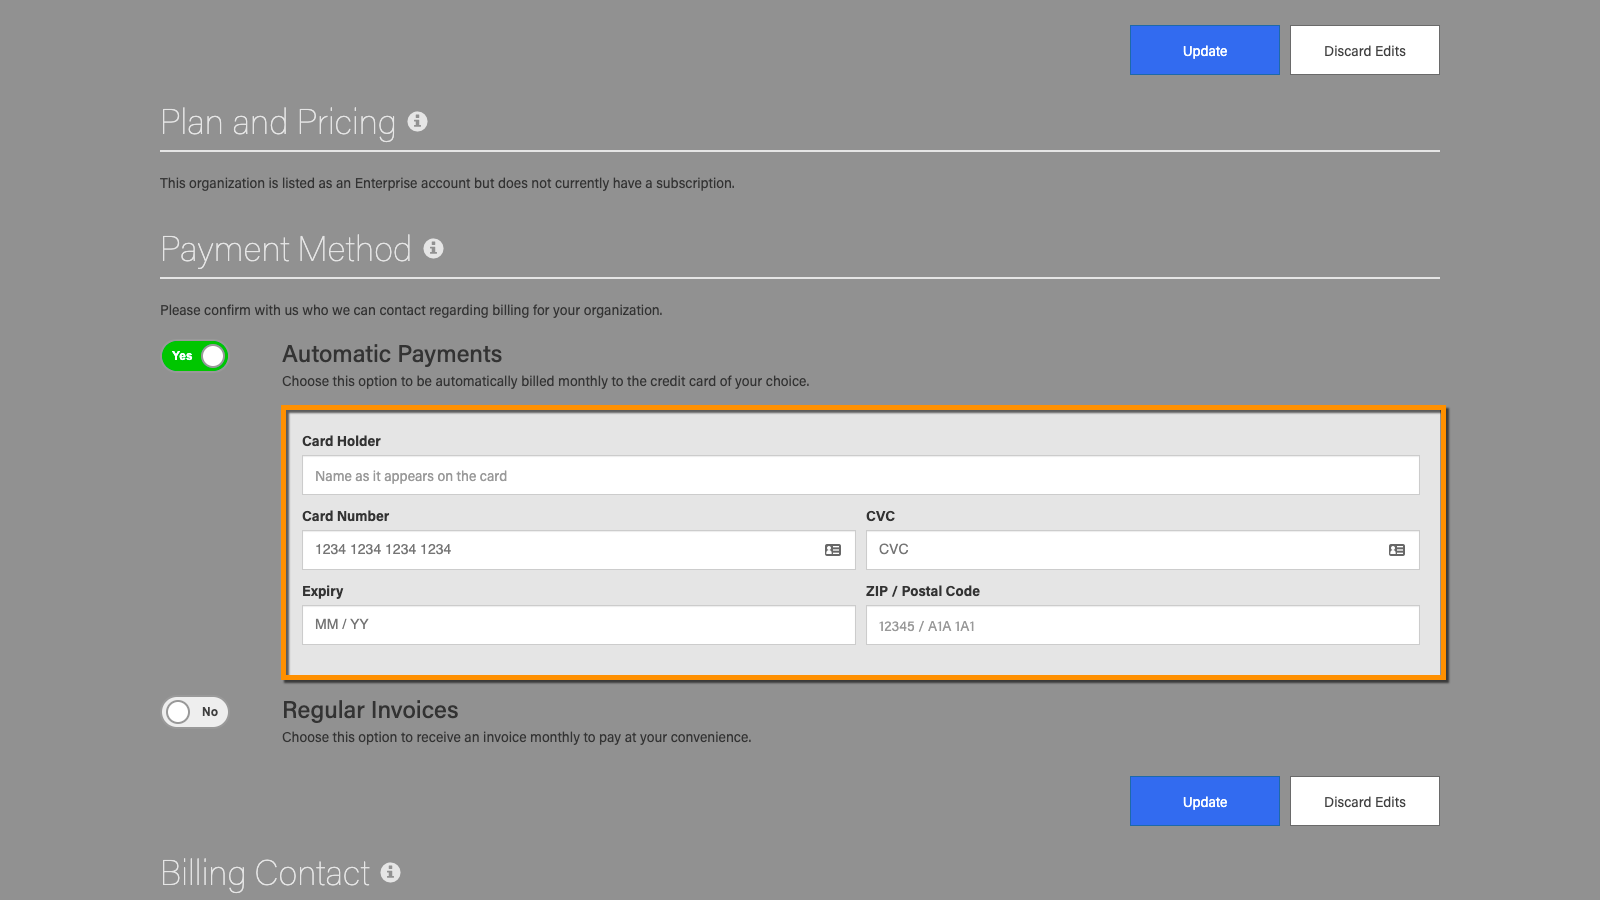
Update the relevant fields, then select the blue 'Update' button.
Now that you've registered with TradesWallet and are a part of the community, there's a few things we suggest you do, regardless of the membership plan selected:
One of the ways that TradesWallet builds and maintains a community of trustworthy organizations is by offering new memberships by invitation only. In this way, our community builds itself from the inside out.
If you have received an invitation from a member of our TradesWallet community, you can simply follow the instructions within the email to complete your registration.
If you have not yet been invited to TradesWallet but are interested in learning more about the benefits TradesWallet can provide to your organization, simply contact us and a member of our team will be in touch.
If you have been invited to join the TradesWallet Community, you will have received an invitation from TradesWallet via email with the subject line: 'you're invited'.
This email will detail the name of the organization and administrator who issued the invitation from TradesWallet and will include an introductory video and a link to begin registration.
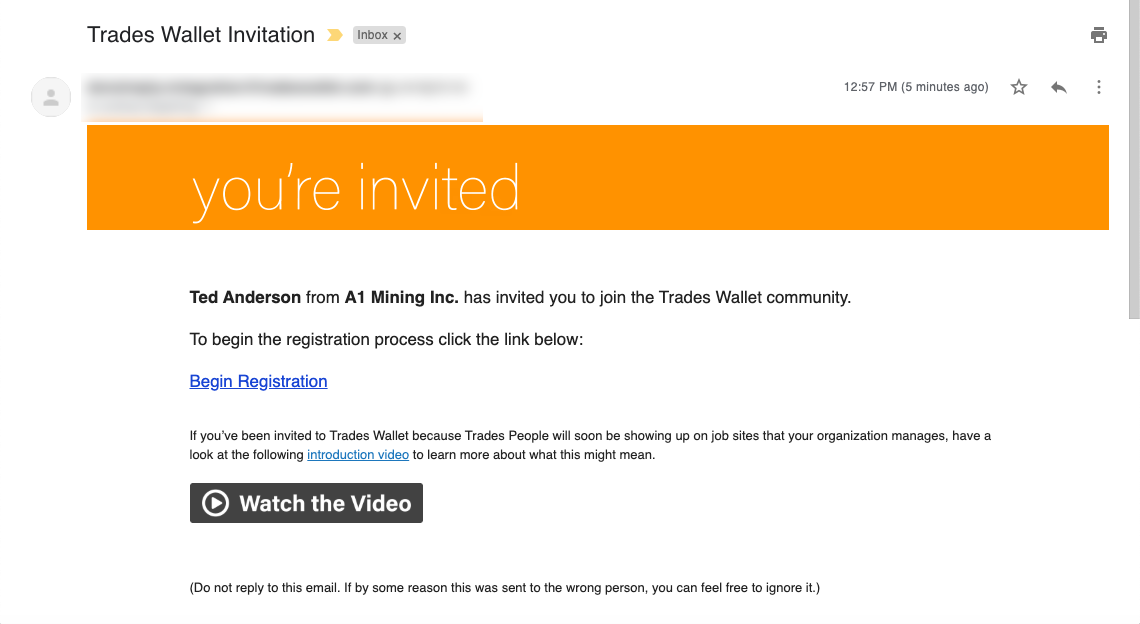
NOTE: Please ensure that the person completing the registration has the authority within your organization to do so. This person will be expected to set up TradesWallet on behalf of your organization, and act as the 'Primary Administrator', at least initially.
NOTE: Organizational details can be modified by a Primary Admin at any time via the ORG Tab of your Account profile.
The first step of the registration process is for you to tell us about your organization and to set yourself up as the 'Primary Admin'.
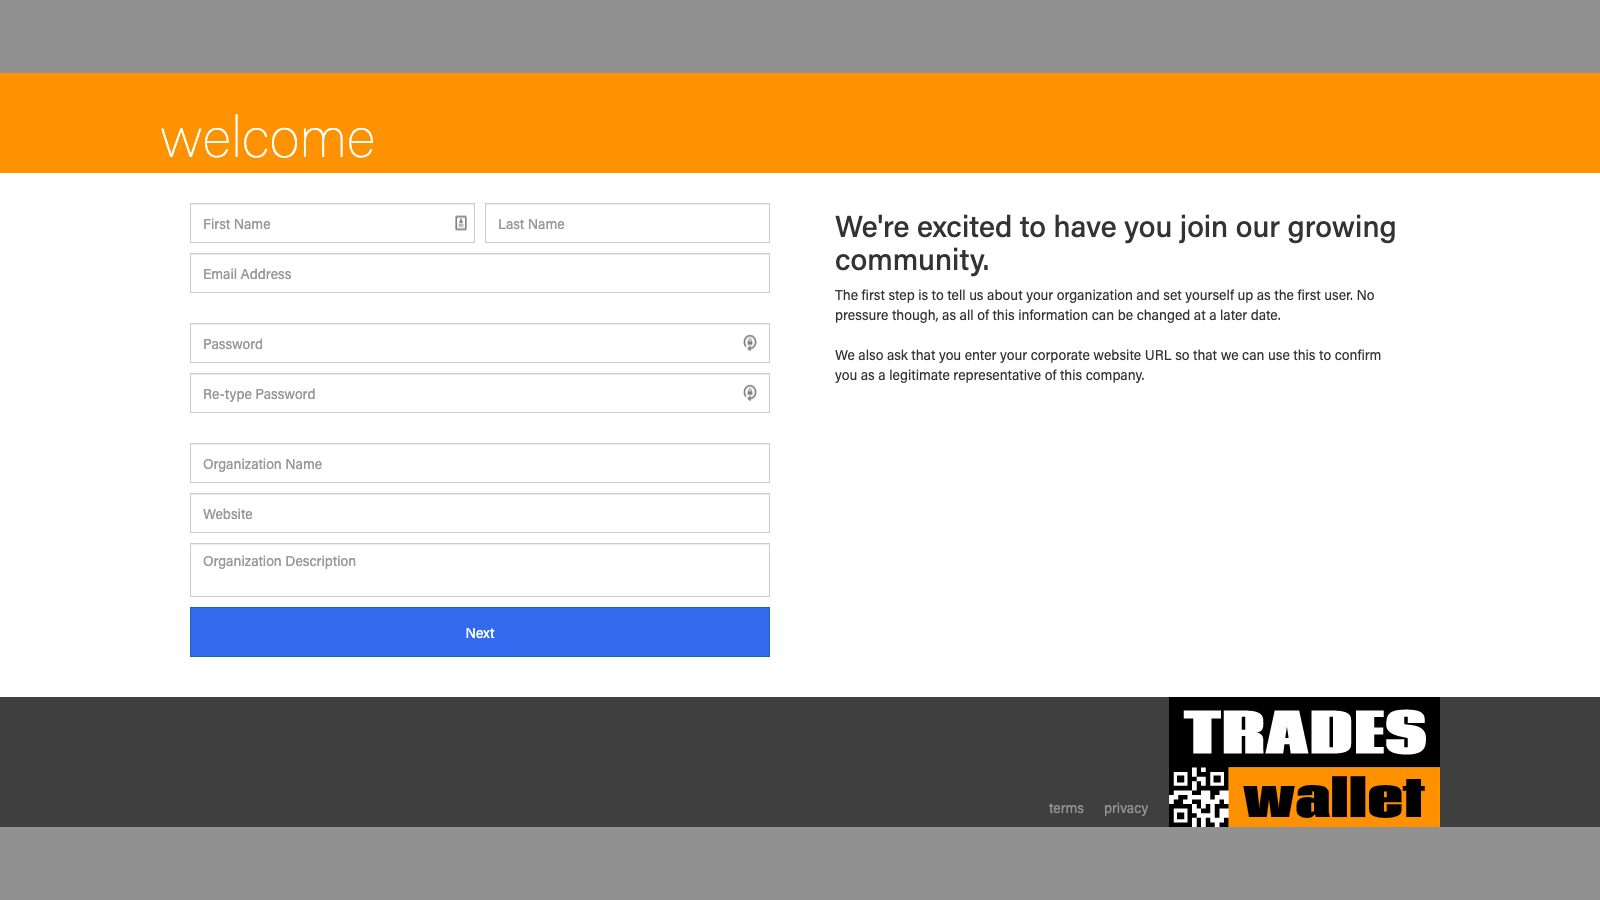
Next, select the TradesWallet Membership Plan that is right for your org! For more information about TradesWallet membership options, click HERE.
If selecting our 'Basic' plan, you can simply click the 'Complete Registration' button to be automatically logged into your account.

If selecting our 'Enterprise' plan option, we'll need you to complete a couple of more details. Select the 'Next' button.
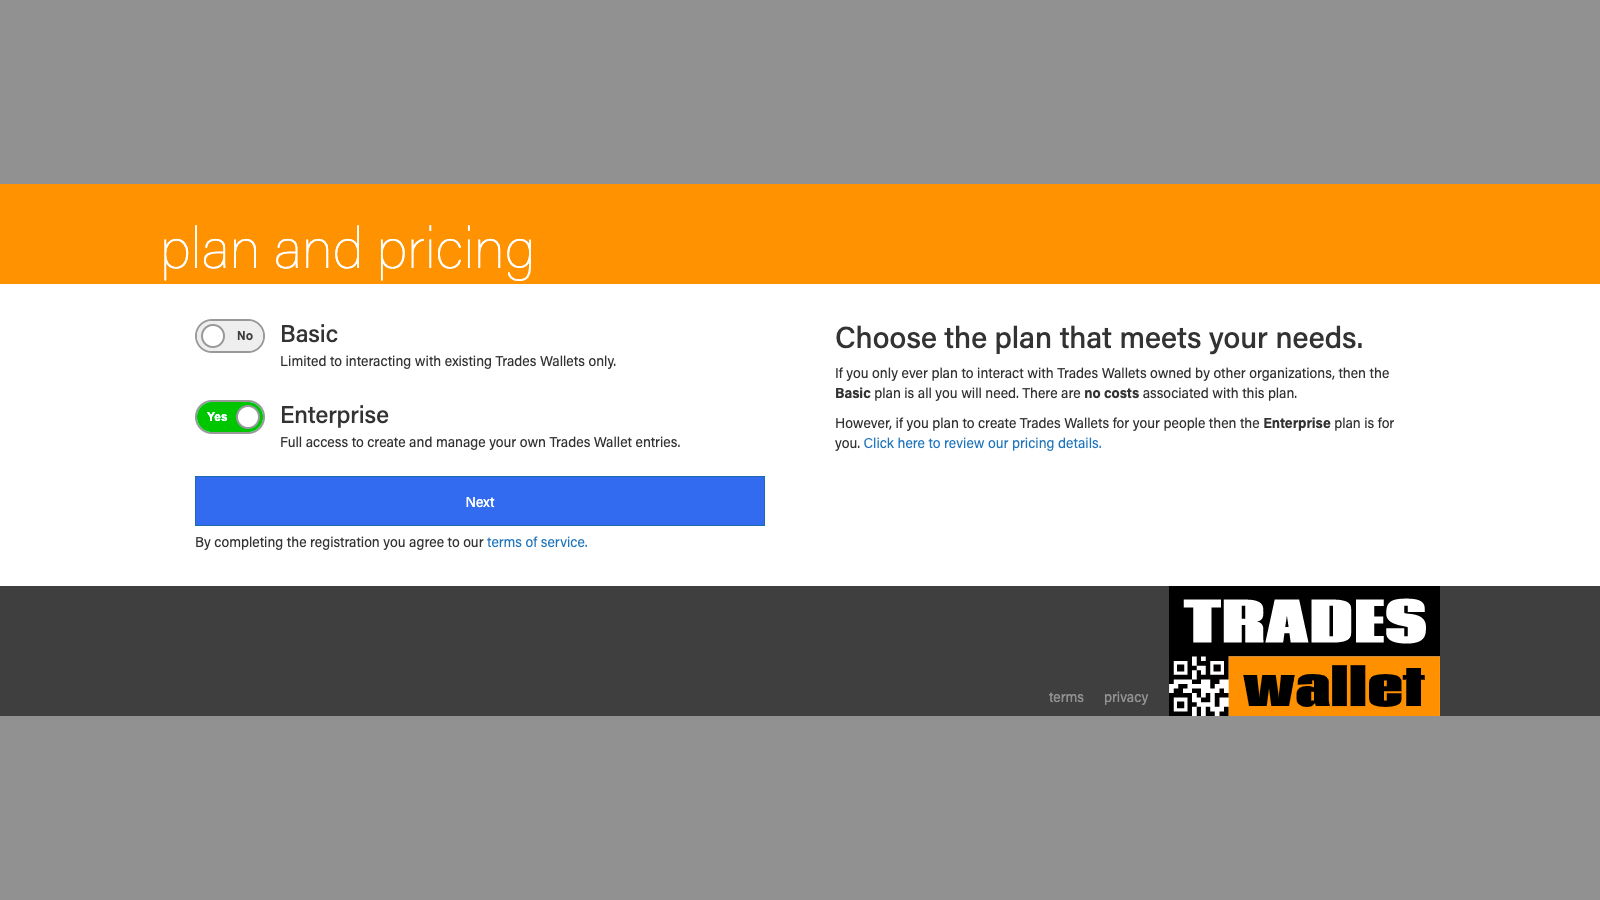
Because there are costs associated with our 'Enterprise' plan, TradesWallet will ask you to identify how you would like to be billed going forward.
NOTE: All new 'Enterprise' clients will receive a 30 day trial, during which time your account will NOT be billed. You can track the days remaining in your trial directly from the ORG Tab of your Account.
Here you have the option to have monthly invoices sent to your organizations specified billing contact:
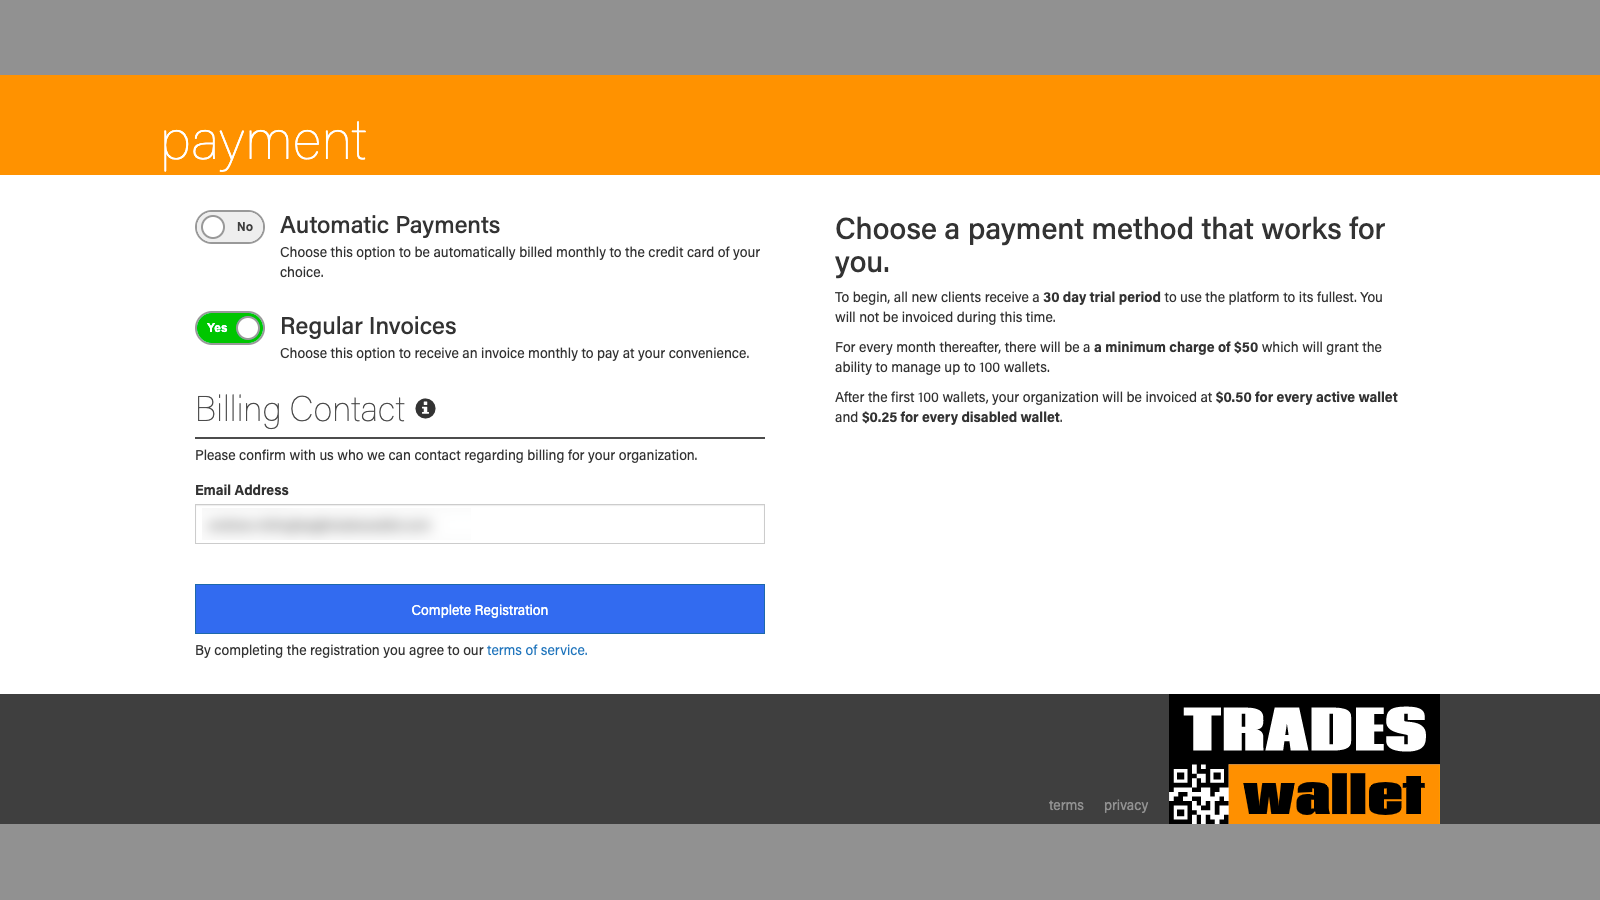
Alternatively, you can instead opt to have TradesWallet automatically bill a credit card of your choosing.
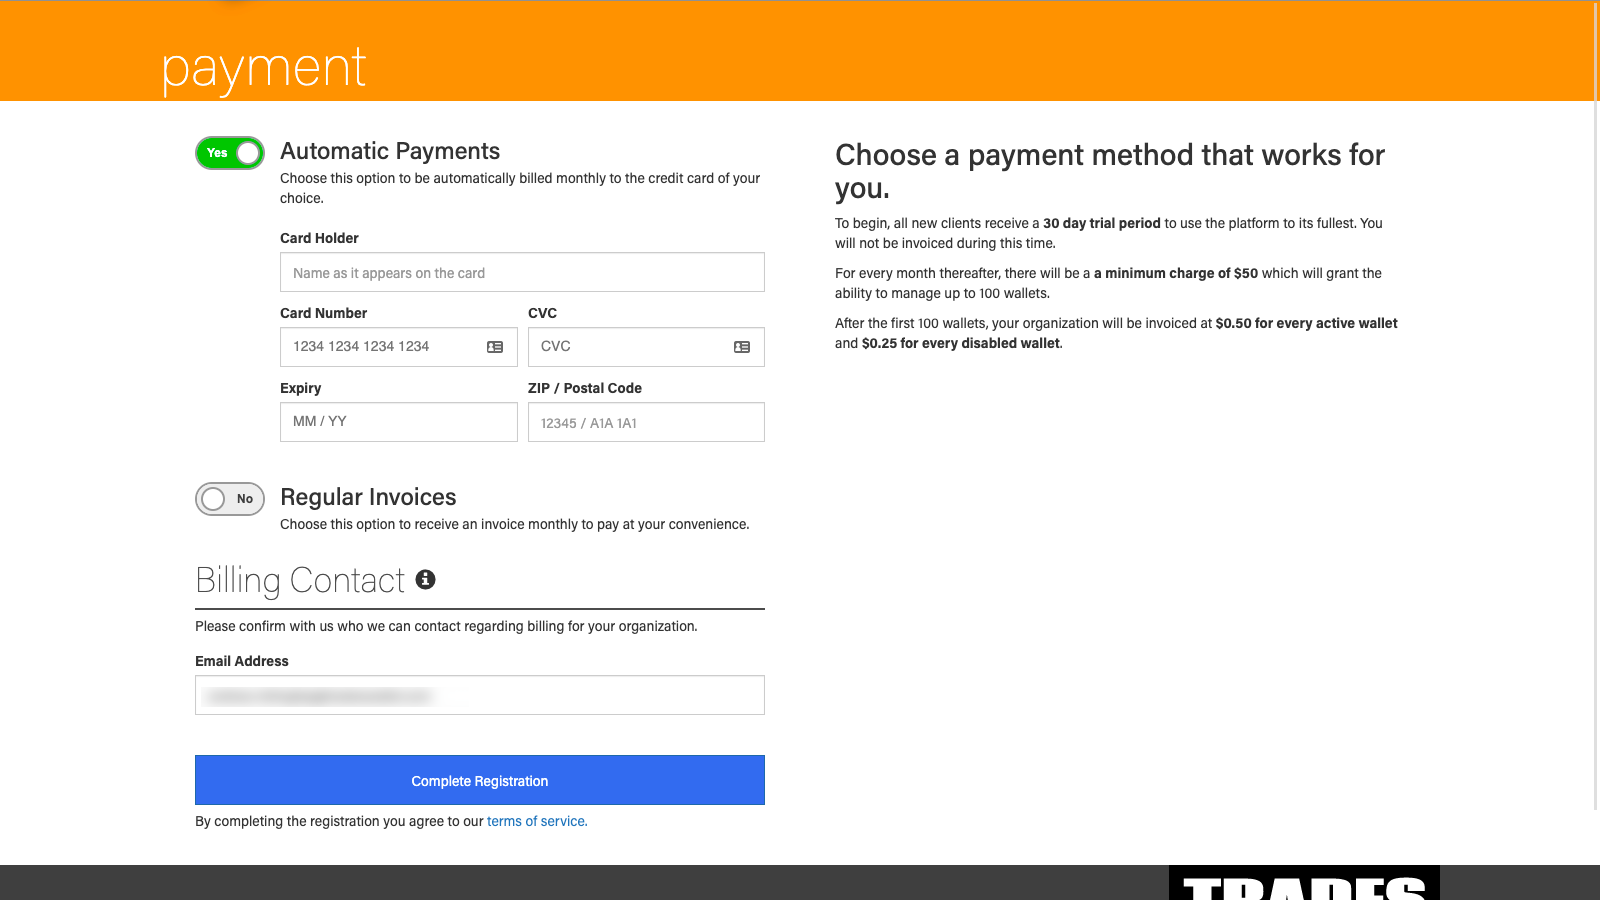
NOTE: The details entered on this screen can be updated at any time by a Primary Admin assigned to your account. For more information, click HERE.
Upon completing your registration you will be automatically logged into the Web Admin Portal.
Once you've completed your registration with TradesWallet, we encourage you to visit your 'ORG page' to add additional details, such as your logo for example, that others within the community may find helpful when searching for your organization using the Web Admin Portal.
The Org details page is also where a Primary Admin assigned to your account, can make changes to your specific account profile – including modifying account type, or updating any relevant billing details that may have been added during the registration process.
For more information about updating your ORG Details, click HERE.
Here you will find articles explaining the differences between our TradesWallet membership plans.
Our ENTERPRISE plan is tailored to organizations who, in addition to needing a solution to manage safety and training certifications online, require additional functionality to facilitate in-house training for their members or employees.
Our advanced Enterprise features enable you to integrate TradesWallet directly with in-house or preferred LMS systems, issue requests for training via email or push notification and even populate successful certificates directly within a Wallet using customizable templates.
When you register for our ENTERPRISE Plan, we'll ask you some information about those organizations you are interested in sharing information with (i.e. organization(s) who source employees from you).
While it is not required that these organizations sign up for our FREE BASIC Plan option, it is recommended in order to experience the most TradesWallet has to offer.
In order for an organization to have visibility into your Wallet details will first require your organization to establish "Trust" - think of this step as 'granting a follow request'. Once Trust has been granted, any system administrators assigned to their account will have online access to search and view Wallet details online, 24/7.
For more information about 'Trusted' relationships, click HERE.
Alternatively, your trusted partners can use our mobile TradesWallet Field Scanner application to view limited information relevant to your Wallet holders, directly from their mobile device! Click HERE for more information.
Our ENTERPRISE plan option has a base cost of $450.00 per month and enables your organization to create and manage up to 500 Wallets.
If your organization needs to manage significantly more than 2500 Wallets, get in touch with us to see what options are available!
If your organization wishes to grant another organization within the TradesWallet community 'Full Trust', thereby authorizing them to create and manage Wallets on your behalf, there may be an incremental monthly charge in accordance with the volume of active Wallets that are being created by your 'Trusted' partner.
For more information on 'Trust' relationships within TradesWallet, click HERE.
Take advantage of all the value TradesWallet has to offer! Sign up for TradesWallet and receive a 30-day FREE trial to access and experience the features, flexibility and freedom our system has to offer.
TradesWallet offers a full suite of tutorial videos and knowledge articles to help you get started, but if you need a more hands-on approach, our Customer Care team is here to help.
If you're interested in any our Enterprise Plan option and would like to learn more about how TradesWallet can help your organization create efficiencies within existing processes or procedures and increase productivity for your staff, employees and customers, please reach out to us any time.
We'd be happy to provide a no-obligation demo, tailored to address your specific needs and challenges.
Our BASIC Plan option is best suited for organizations who rely on resources from organizations who are using TradesWallet to manage the credentials for their workforce online.
This FREE plan provides 'read-only' access to view employee credentials and competencies online; to pre-qualify them in advance of their arrival on your job sites and even export a pdf copy of their valid certs for your files.
BASIC plan members will have access to both the 'Web Admin Portal', as well as the mobile 'Field Scanner' app as a means of reviewing the contents of Wallets owned and managed by 'Trusted' members within the Community.
When you register for our BASIC Plan, we'll ask you some information whose Wallet information you are interested in having access to (i.e. those Union(s) or organization(s) you resource employees from).
These organizations will first need to establish "Trust" with your TradesWallet account - think of this step as 'accepting your follow request'.
Once Trust has been granted, any system administrators assigned to your account will have online access to search and view Wallet details online, 24/7.
NOTE: This information is read-only and will only display the cards and certifications that are actively managed within the Wallet profile - expired or archived cards are not available.
If you're interested in maintaining your own copies of the cards that are actively managed within a Wallet at any given time, we suggest our COLLABORATOR Plan.
For more information about 'Trusted' relationships, click HERE.
There is NO cost associated with our BASIC plan option - we're happy to have you here as part of the TradesWallet community.
If you're interested in any our BASIC Plan option and would like to learn more about how TradesWallet can help your organization create efficiencies within existing processes or procedures and increase productivity for your staff, employees and customers, please reach out to us any time.
We'd be happy to provide a no-obligation demo, tailored to address your specific needs and challenges.
Our COLLABORATOR plan option is suited to those organizations who rely on resources from organizations using TradesWallet to manage the credentials for their workforce online, but who want more control over the way they engage with the data available for their employees.
In addition to our Basic features, this plan provides you with access to the Vault, a personalized repository where you can save a 'point in time' snapshot of your employees' credentials, as well as the ability to query the system based on active or non-compliant pre-qualification assignments.
When you register for our COLLABORATOR Plan, we'll ask you some information whose Wallet information you are interested in having access to (i.e. those Union(s) or organization(s) you resource employees from).
These organizations will first need to establish "Trust" with your TradesWallet account - think of this step as 'accepting your follow request'.
Once Trust has been granted, any system administrators assigned to your account will have online access to search and view Wallet details online, 24/7.
For more information about 'Trusted' relationships, click HERE.
A monthly flat fee of $100.00 will be charged to your Account.
If you're interested in any our COLLABORATOR Plan option and would like to learn more about how TradesWallet can help your organization create efficiencies within existing processes or procedures and increase productivity for your staff, employees and customers, please reach out to us any time.
We'd be happy to provide a no-obligation demo, tailored to address your specific needs and challenges.
Our PROFESSIONAL plan option is best suited for organizations looking for a comprehensive yet easy to use solution for managing safety and training certifications for their workforce online.
From safety cards to trade certifications and competencies, the credentials for your workforce can be submitted, stored and shared with key stakeholders more easily than ever before. Designed to facilitate compliance with internal and OH&S guidelines, TradesWallet helps to promote accountability with required regulations by ensuring the information you need is always at your fingertips.
When you register for our PROFESSIONAL Plan, we'll ask you some information about those organizations you are interested in sharing information with (i.e. organization(s) who source employees from you).
While it is not required that these organizations sign up for our FREE BASIC Plan option, it is recommended in order to experience the most TradesWallet has to offer.
In order for an organization to have visibility into your Wallet details will first require your organization to establish "Trust" - think of this step as 'granting a follow request'. Once Trust has been granted, any system administrators assigned to their account will have online access to search and view Wallet details online, 24/7.
For more information about 'Trusted' relationships, click HERE.
Alternatively, your trusted partners can use our mobile TradesWallet Field Scanner application to view limited information relevant to your Wallet holders, directly from their mobile device! Click HERE for more information.
Our PROFESSIONAL plan option has a base cost of $250.00 per month and enables your organization to create and manage up to 250 Wallets.
If your organization needs to manage significantly more than 250 Wallets, then our ENTERPRISE plan option may be better suited. For more information on our ENTERPRISE plan option, click HERE.
If your organization wishes to grant another organization within the TradesWallet community 'Full Trust', thereby authorizing them to create and manage Wallets on your behalf, there may be an incremental monthly charge in accordance with the volume of active Wallets that are being created by your 'Trusted' partner.
For more information on 'Trust' relationships within TradesWallet, click HERE.
Take advantage of all the value TradesWallet has to offer! Sign up for TradesWallet and receive a 30-day FREE trial to access and experience the features, flexibility and freedom our system has to offer.
TradesWallet offers a full suite of tutorial videos and knowledge articles to help you get started, but if you need a more hands-on approach, our Customer Care team is here to help.
If you're interested in any our PROFESSIONAL Plan option and would like to learn more about how TradesWallet can help your organization create efficiencies within existing processes or procedures and increase productivity for your staff, employees and customers, please reach out to us any time.
We'd be happy to provide a no-obligation demo, tailored to address your specific needs and challenges.
Get the power, control and customization your organization needs to manage the credentials for your workforce. Our online solution is flexible enough to meet your company's specific needs.
Our BASIC Plan option is best suited for organizations who rely on resources from organizations who are using TradesWallet to manage the credentials for their workforce online.
This FREE plan provides 'read-only' access to view employee credentials and competencies online; to pre-qualify them in advance of their arrival on your job sites and even export a pdf copy of their valid certs for your files.
For more information about our BASIC Plan option, click HERE or REQUEST A DEMO to speak to our Customer Care team abut how TradesWallet BASIC could benefit your organization.
Our COLLABORATOR plan option is suited to those organizations who rely on resources from organizations using TradesWallet to manage the credentials for their workforce online, but who want more control over the way they engage with the data available for their employees.
In addition to our Basic features, this plan provides you with access to the Vault, a personalized repository where you can save a 'point in time' snapshot of your employees' credentials, as well as the ability to query the system based on active or non-compliant pre-qualification assignments.
For more information about our COLLABORATOR Plan option, click HERE or REQUEST A DEMO to speak to our Customer Care team abut how TradesWallet COLLABORATOR could benefit your organization.
Our PROFESSIONAL plan option is best suited for organizations looking for a comprehensive yet easy to use solution for managing safety and training certifications for their workforce online.
From safety cards to trade certifications and competencies, the credentials for your workforce can be submitted, stored and shared with key stakeholders more easily than ever before. Designed to facilitate compliance with internal and OH&S guidelines, TradesWallet helps to promote accountability with required regulations by ensuring the information you need is always at your fingertips.
For more information about our PROFESSIONAL Plan option, click HERE or REQUEST A DEMO to speak to our Customer Care team abut how TradesWallet COLLABORATOR could benefit your organization.
Our ENTERPRISE plan is tailored to organizations who, in addition to needing a solution to manage safety and training certifications online, require additional functionality to facilitate in-house training for their members or employees.
Our advanced Enterprise features enable you to integrate TradesWallet directly with in-house or preferred LMS systems, issue requests for training via email or push notification and even populate successful certificates directly within a Wallet using customizable templates.
For more information about our ENTERPRISE Plan option, click HERE or REQUEST A DEMO to speak to our Customer Care team abut how TradesWallet ENTERPRISE could benefit your organization.
Take advantage of all the value TradesWallet has to offer, risk free! Sign up for TradesWallet and receive a 30-day FREE trial to access and experience the features, flexibility and freedom our system has to offer.
TradesWallet offers a full suite of tutorial videos and knowledge articles to help you get started, but if you need a more hands-on approach, our Customer Care team is here to help.
Click HERE to sign up for one of our Plan option OR contact our Customer Care team for more information on which Plan option would best fit your unique needs and challenges.
You can change your Plan Type at any time, hassle free, directly from the ORG Tab of your Account. Fore more information about changing your 'Membership Plan', click HERE.